

Amazon SageMaker gives a complete hub that integrates knowledge, analytics, and AI capabilities, offering a unified expertise for customers to entry and work with their knowledge. By Amazon SageMaker Unified Studio, a single and unified atmosphere, you should use a variety of instruments and options to help your knowledge and AI improvement wants, together with knowledge processing, SQL analytics, mannequin improvement, coaching, inference, and generative AI improvement. This providing is additional enhanced by the mixing of Amazon Q and Amazon SageMaker Catalog, which offer an embedded generative AI and governance expertise, serving to customers work effectively and successfully throughout your entire knowledge and AI lifecycle, from knowledge preparation to mannequin deployment and monitoring.
With the SageMaker Catalog knowledge lineage function, you may visually monitor and perceive the move of your knowledge throughout completely different methods and groups, gaining an entire image of your knowledge property and the way they’re related. As an OpenLineage-compatible function, it helps you hint knowledge origins, monitor transformations, and think about cross-organizational knowledge consumption, providing you with insights into cataloged property, subscribers, and exterior actions. By capturing lineage occasions from OpenLineage-enabled methods or via APIs, you may achieve a deeper understanding of your knowledge’s journey, together with actions inside SageMaker Catalog and past, in the end driving higher knowledge governance, high quality, and collaboration throughout your group.
Moreover, the SageMaker Catalog knowledge lineage function variations every occasion, so you may monitor adjustments, visualize historic lineage, and examine transformations over time. This gives precious insights into knowledge evolution, facilitating troubleshooting, auditing, and knowledge integrity by exhibiting precisely how knowledge property have developed, and generates belief in knowledge.
On this submit, we focus on the visualization of knowledge lineage in SageMaker Catalog and the way seize lineage from completely different AWS analytics providers corresponding to AWS Glue, Amazon Redshift, and Amazon EMR Serverless robotically, and visualize it with SageMaker Unified Studio.
Answer overview
The era of knowledge lineage in SageMaker Catalog operates via an automatic system that captures metadata and relationships between completely different knowledge artifacts for AWS Glue, Amazon EMR, and Amazon Redshift. When knowledge strikes via numerous AWS providers, SageMaker robotically tracks these actions, transformations, and dependencies, creating an in depth map of the info’s journey. This monitoring consists of details about knowledge sources, transformations, processing steps, and ultimate outputs, offering an entire audit path of knowledge motion and transformation.
The implementation of knowledge lineage in SageMaker Catalog gives a number of key advantages:
- Compliance and audit help – Organizations can exhibit compliance with regulatory necessities by exhibiting full knowledge provenance and transformation historical past
- Impression evaluation – Groups can assess the potential affect of adjustments to knowledge sources or transformations by understanding dependencies and relationships within the knowledge pipeline
- Troubleshooting and debugging – When points come up, the lineage system helps determine the basis trigger by exhibiting the whole path of knowledge transformation and processing
- Knowledge high quality administration – By monitoring transformations and dependencies, organizations can higher keep knowledge high quality and perceive how knowledge high quality points would possibly propagate via their methods
Lineage seize is automated utilizing a number of instruments in SageMaker Unified Studio. To be taught extra, seek advice from Knowledge lineage help matrix.
Within the following sections, we present you the right way to configure your assets and implement the answer. For this submit, we create the answer assets within the us-west-2 AWS Area utilizing an AWS CloudFormation template.
Stipulations
Earlier than getting began, be sure to have the next:
Configure SageMaker Unified Studio with AWS CloudFormation
The vpc-analytics-lineage-sus.yaml stack creates a VPC, subnet, safety group, IAM roles, NAT gateway, web gateway, Amazon Elastic Compute Cloud (Amazon EC2) consumer, S3 buckets, SageMaker Unified Studio area, and SageMaker Unified Studio undertaking. To create the answer assets, full the next steps:
- Launch the stack
vpc-analytics-lineage-susutilizing the CloudFormation template:
- Present the parameter values as listed within the following desk.
Parameters Pattern worth DatazoneS3Bucket s3://datazone-{account_id}/ DomainName dz-studio EnvironmentName sm-unifiedstudio PrivateSubnet1CIDR 10.192.20.0/24 PrivateSubnet2CIDR 10.192.21.0/24 PrivateSubnet3CIDR 10.192.22.0/24 ProjectName sidproject PublicSubnet1CIDR 10.192.10.0/24 PublicSubnet2CIDR 10.192.11.0/24 PublicSubnet3CIDR 10.192.12.0/24 UsersList analyst VpcCIDR 10.192.0.0/16
The stack creation course of can take roughly 20 minutes to finish. You may examine the Outputs tab for the stack after the stack is created.
Subsequent, we put together supply knowledge, setup the AWS Glue ETL Job, Amazon EMR Serverless Spark Job and Amazon Redshift Job to generate the lineage and seize lineage from Amazon SageMaker Unified Studio
Put together knowledge
The next is instance knowledge from our CSV information:
attendance.csv
staff.csv
Add the pattern knowledge from attendance.csv and staff.csv to the S3 bucket specified within the earlier CloudFormation stack (s3://datazone-{account_id}/csv/).
Ingest worker knowledge in Amazon Relational Database Dervice (Amazon RDS) for MySQL desk
On the CloudFormation console, open the stack vpc-analytics-lineage-sus and accumulate the Amazon RDS for MySQL database endpoint to make use of within the following instructions to create a default employeedb database.
- Connect with Amazon EC2 occasion with mysql bundle set up
- Run the next command to connect with the database
- Run the next command to create an worker desk
- Working the next command to insert rows.
Seize lineage from AWS Glue ETL job and pocket book
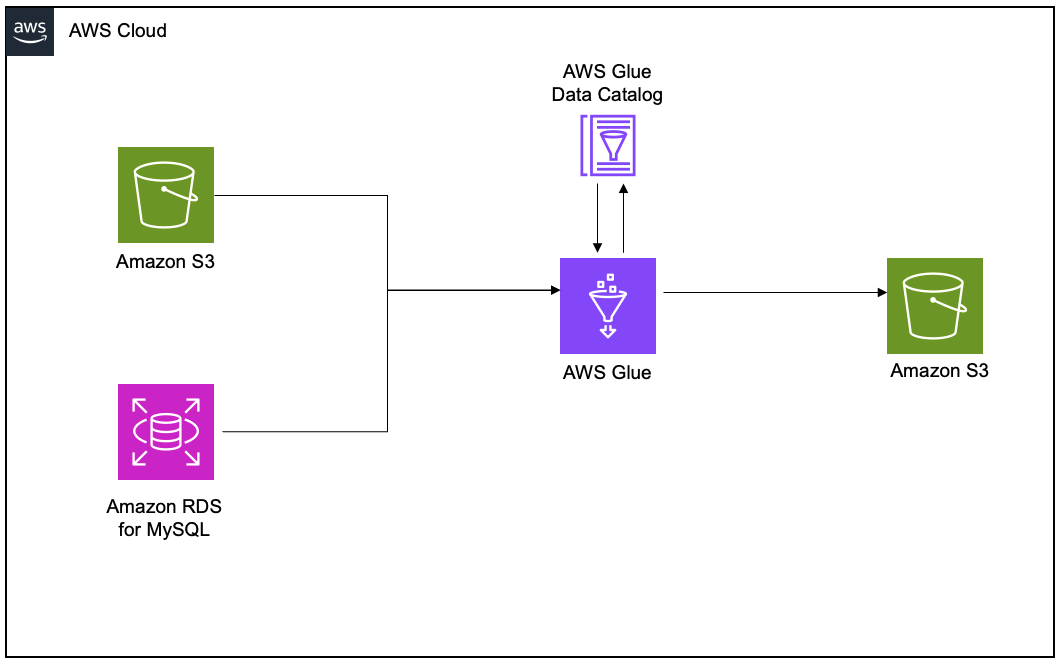
To exhibit the lineage, we arrange an AWS Glue extract, rework, and cargo (ETL) job to learn the worker knowledge from an Amazon RDS for MySQL desk and the worker attendance knowledge from Amazon S3, and be a part of each datasets. Lastly, we write the info to Amazon S3 and create the attendance_with_emp1 desk within the AWS Glue Knowledge Catalog.
Create and configure AWS Glue job for lineage era
Full the next steps to create your AWS Glue ETL job:
- On the AWS Glue console, create a brand new ETL job with AWS Glue model 5.0.
- Allow Generate lineage occasions and supply the area ID (retrieve from the CloudFormation template output for
DataZoneDomainid; it’s going to have the formatdzd_xxxxxxxx)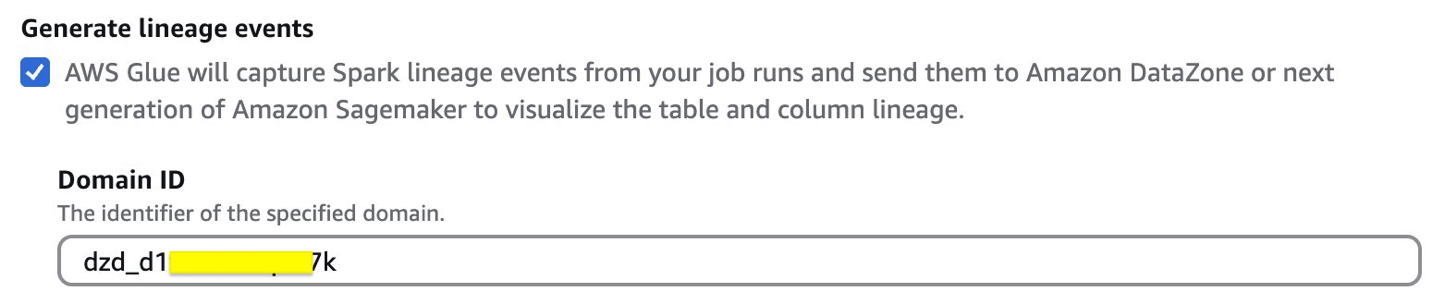
- Use the next code snippet within the AWS Glue ETL job script. Present the S3 bucket (
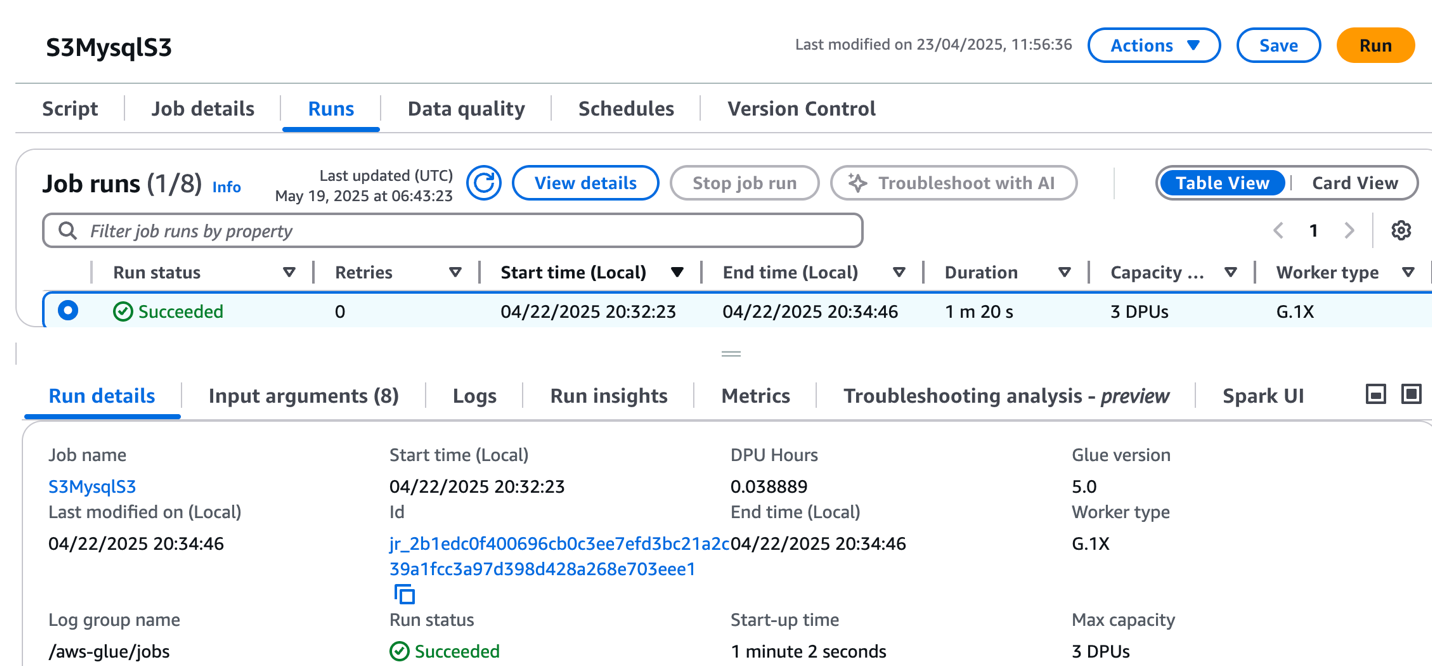
bucketname-{account_id}) used within the previous CloudFormation stack. - Select Run to start out the job.
- On the Runs tab, affirm the job ran with out failure.
- After the job has executed efficiently, navigate to the SageMaker Unified Studio area.
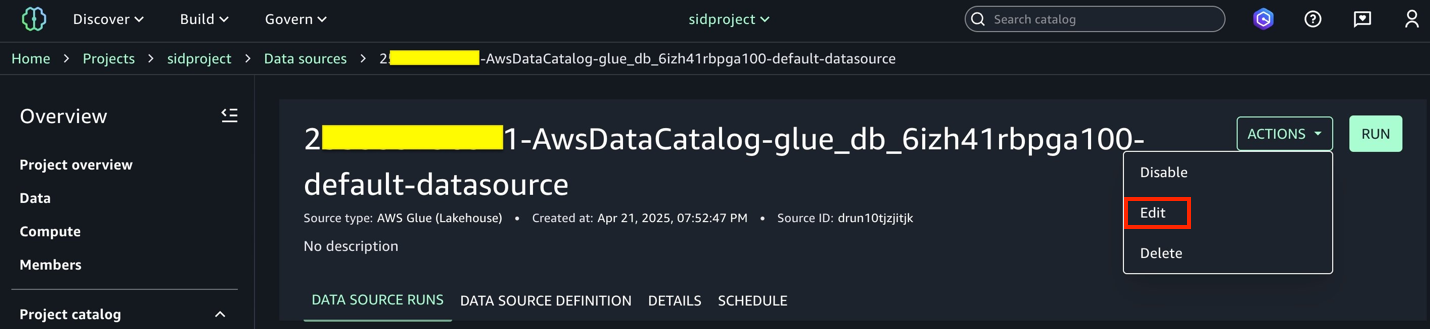
- Select Mission and underneath Overview, select Knowledge Sources.
- Choose the Knowledge Catalog supply (
accountid-AwsDataCatalog-glue_db_suffix-default-datasource). - On the Actions dropdown menu, select Edit.
- Below Connection, allow Import knowledge lineage.
- Within the Knowledge Choice part, underneath Desk Choice Standards, present a desk title or use
*to generate lineage. - Replace the info supply and select Run to create an asset referred to as
attendance_with_emp1in SageMaker Catalog. - Navigate to Property, select the
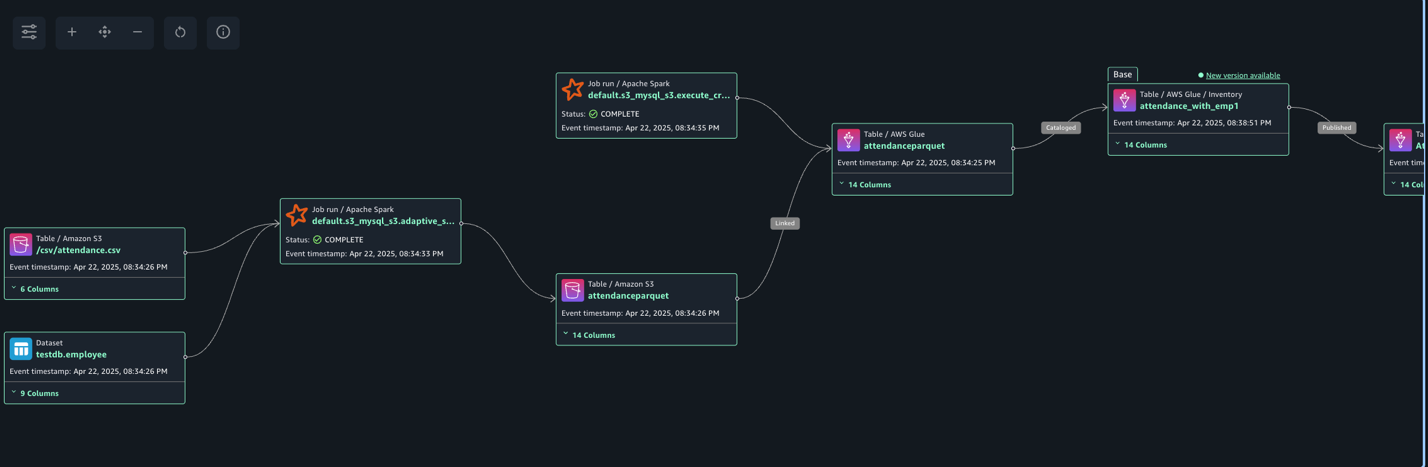
attendance_with_emp1asset, and navigate to the LINEAGE part.
The next lineage diagram exhibits an AWS Glue job that integrates knowledge from two sources: worker data saved in Amazon RDS for MySQL and worker absence information saved in Amazon S3. The AWS Glue job combines these datasets via a be a part of operation, then creates a desk within the Knowledge Catalog and registers it as an asset in SageMaker Catalog, making the unified knowledge out there for additional evaluation or machine studying functions.
Create and configure AWS Glue pocket book for lineage era
Full the next steps to create the AWS Glue pocket book:
- On the AWS Glue console, select Creator utilizing an interactive code pocket book.
- Below Choices, select Begin contemporary and select Create pocket book.
- Within the pocket book, use the next code to generate lineage.
Within the following code, we add the required Spark configuration to generate lineage after which learn CSV knowledge from Amazon S3 and write in Parquet format to the Knowledge Catalog desk. The Spark configuration consists of the next parameters:
- spark.extraListeners=io.openlineage.spark.agent.OpenLineageSparkListener – Registers the OpenLineage listener to seize Spark job execution occasions and metadata for lineage monitoring
- spark.openlineage.transport.sort=amazon_datazone_api – Specifies Amazon DataZone because the vacation spot service the place the lineage knowledge shall be despatched and saved
- spark.openlineage.transport.domainId=dzd_xxxxxxx – Defines the distinctive identifier of your Amazon DataZone area the place the lineage knowledge shall be related
- spark.glue.accountId={account_id} – Specifies the AWS account ID the place the AWS Glue job is working for correct useful resource identification and entry
- spark.openlineage.sides.custom_environment_variables – Lists the particular atmosphere variables to seize within the lineage knowledge for context in regards to the AWS and AWS Glue atmosphere
- spark.glue.JOB_NAME=lineagenotebook – Units a novel identifier title for the AWS Glue job that may seem in lineage monitoring and logs
See the next code:
- After the pocket book has executed efficiently, navigate to the SageMaker Unified Studio area.
- Select Mission and underneath Overview, select Knowledge Sources.
- Select the Knowledge Catalog supply (
{account_id}-AwsDataCatalog-glue_db_suffix-default-datasource). - Select Run to create the asset
attendance_with_empnotein SageMaker Catalog. - Navigate to Property, select the
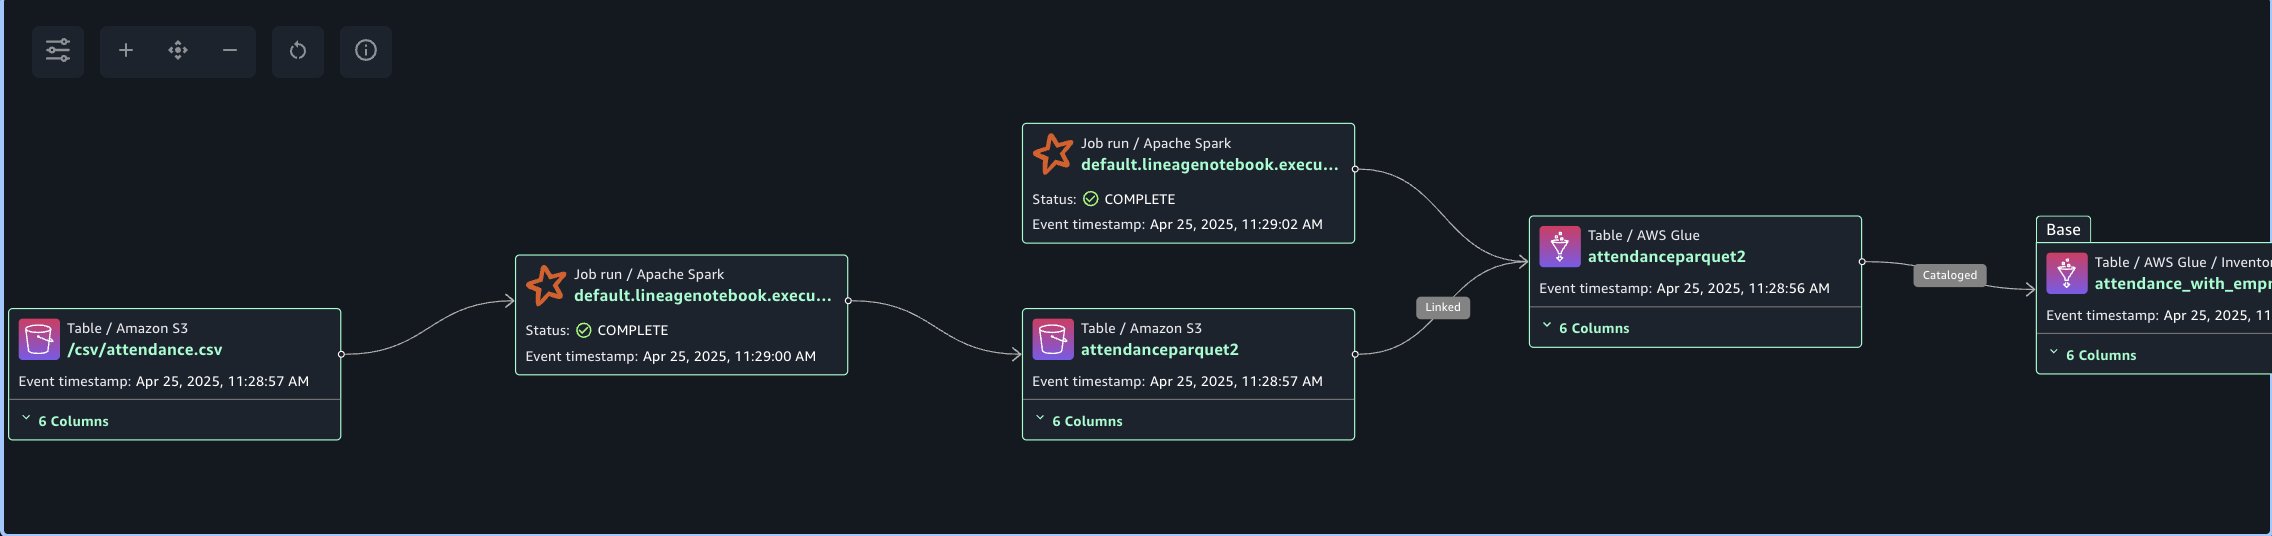
attendance_with_empnoteasset, and navigate to the LINEAGE part.
The next lineage diagram exhibits an AWS Glue job that reads knowledge from the worker absence information saved in Amazon S3. The AWS Glue job rework CSV knowledge into Parquet format, then creates a desk within the Knowledge Catalog and registers it as an asset in SageMaker Catalog.
Seize lineage from Amazon Redshift
To exhibit the lineage, we’re creating an worker desk and an attendance desk and be a part of each datasets. Lastly, we create a brand new desk referred to as employeewithabsent in Amazon Redshift. Full the next steps to create and configure lineage for Amazon Redshift tables:
- In SageMaker Unified Studio, open your area.
- Below Compute, select Knowledge warehouse.
- Open
undertaking.redshiftand replica the endpoint title (redshift-serverless-workgroup-xxxxxxx).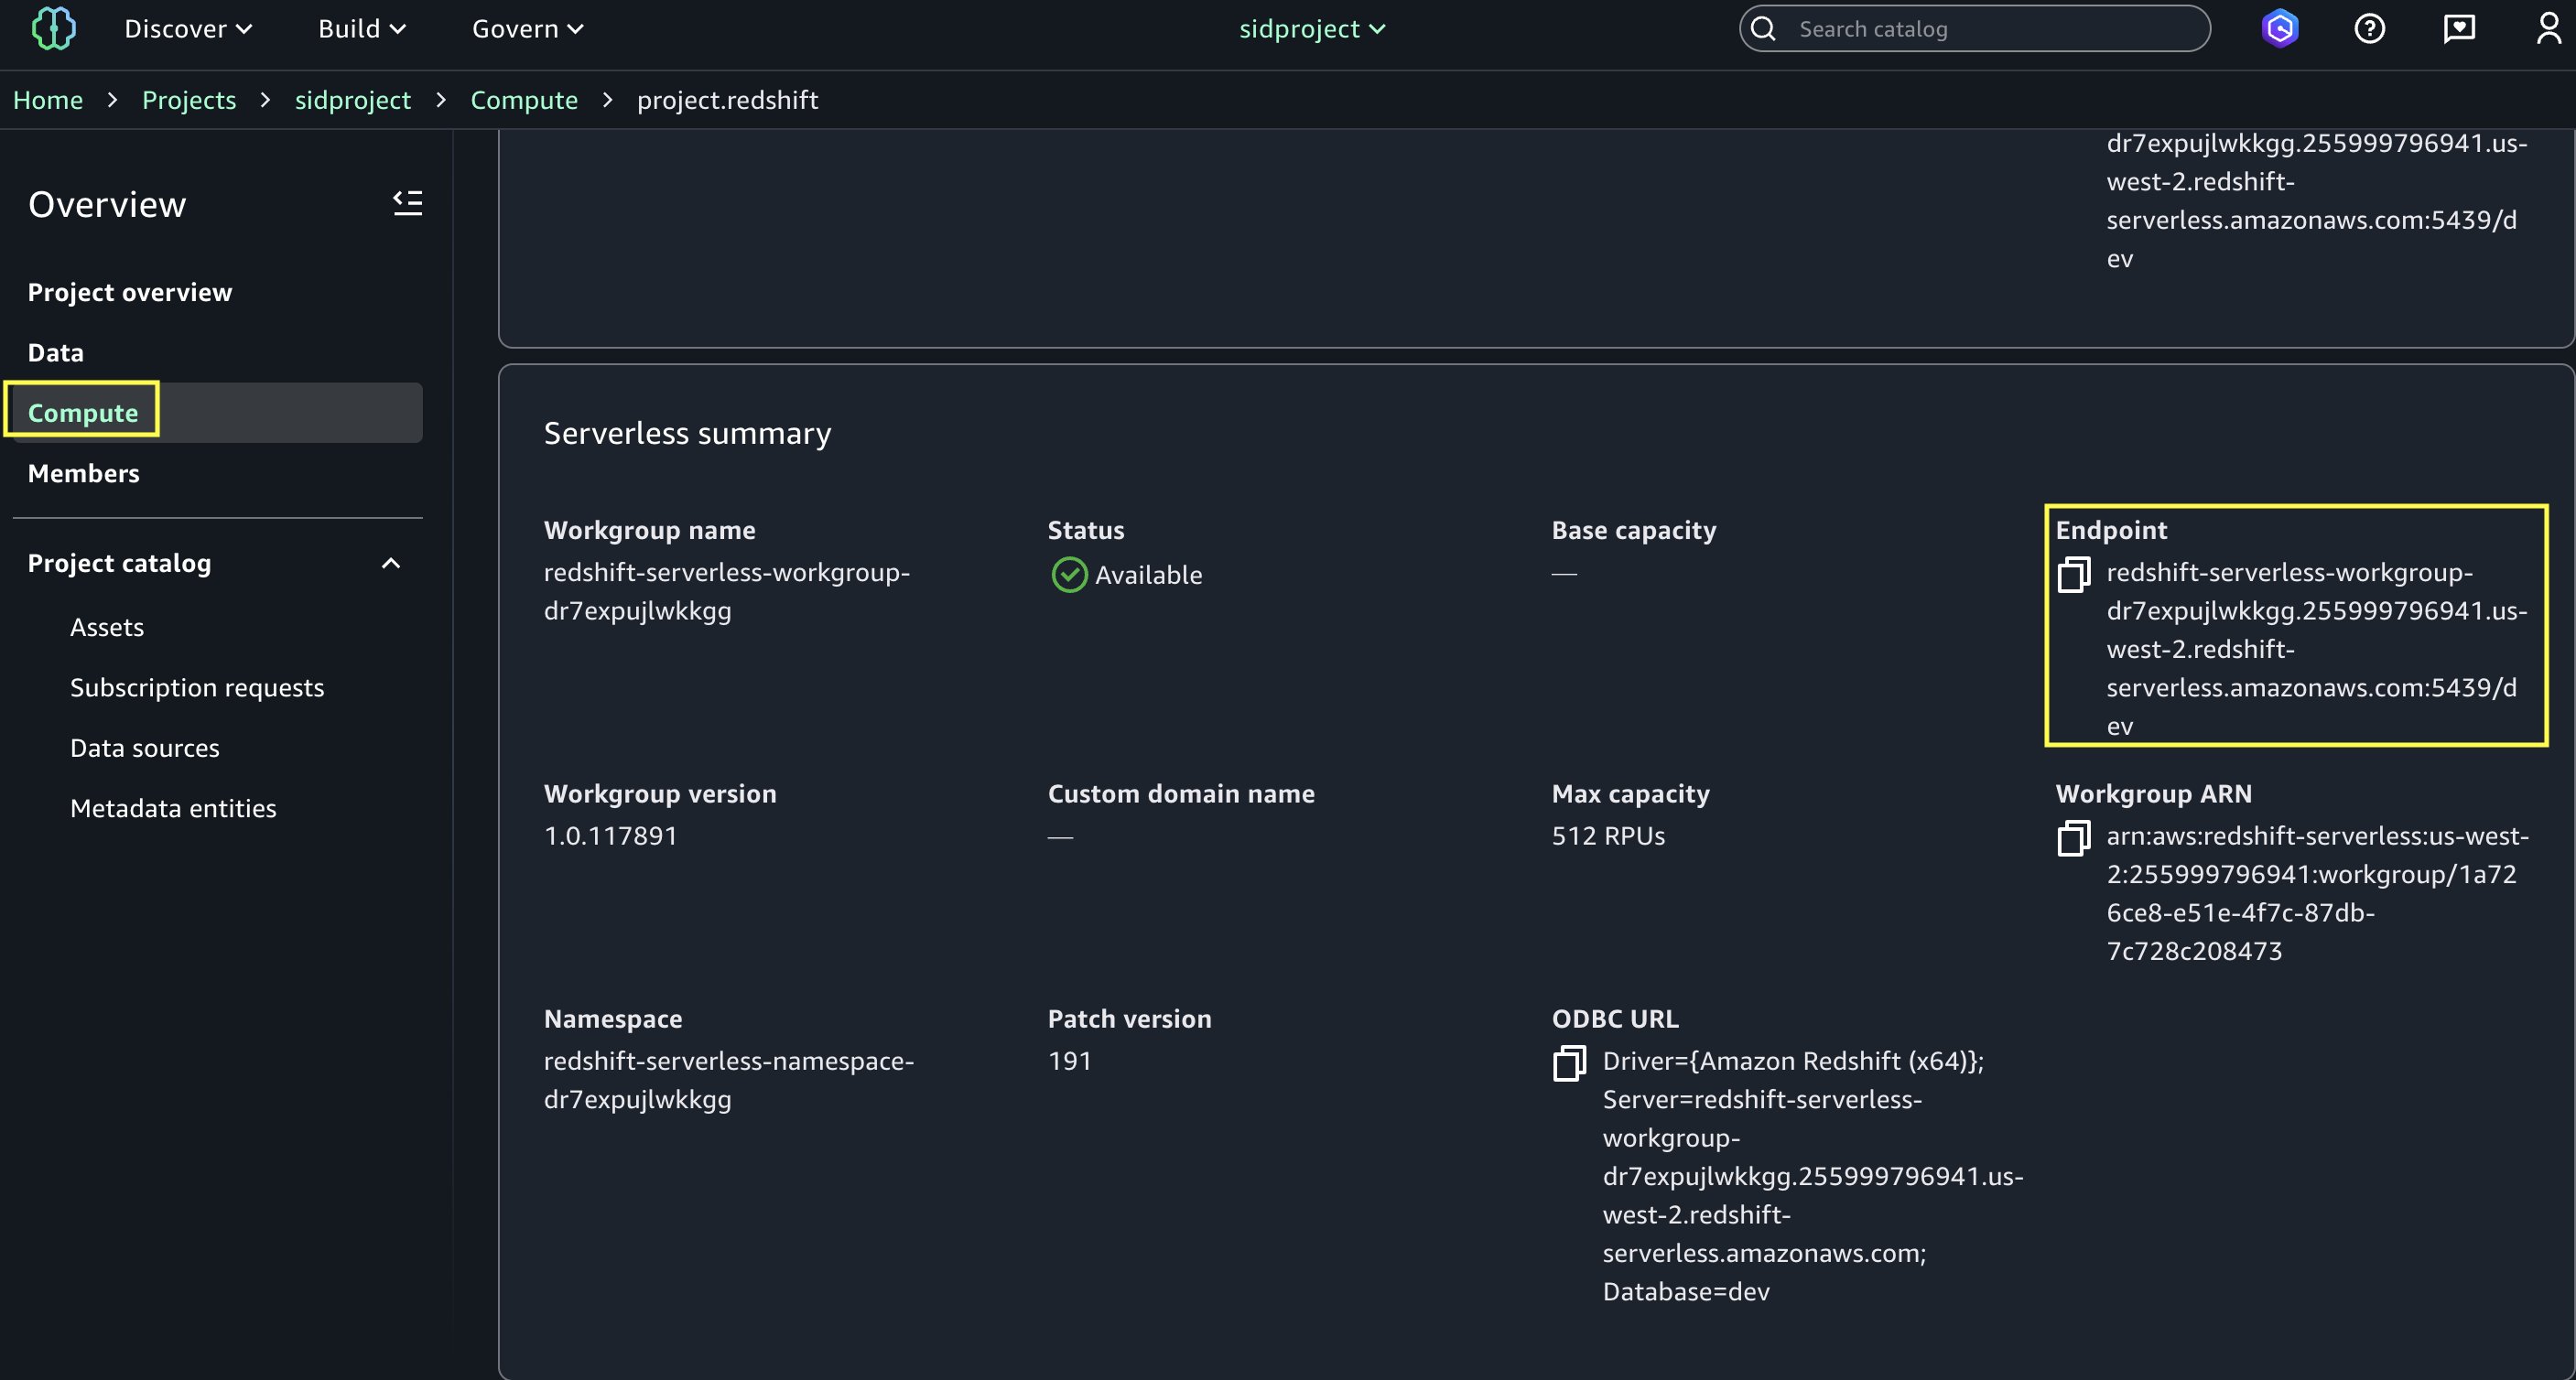
- On the Amazon Redshift console, open the Question Editor v2, and connect with the Redshift Serverless workgroup with a secret. Use the AWS Secrets and techniques Supervisor possibility and select the key
redshift-serverless-namespace-xxxxxxxx.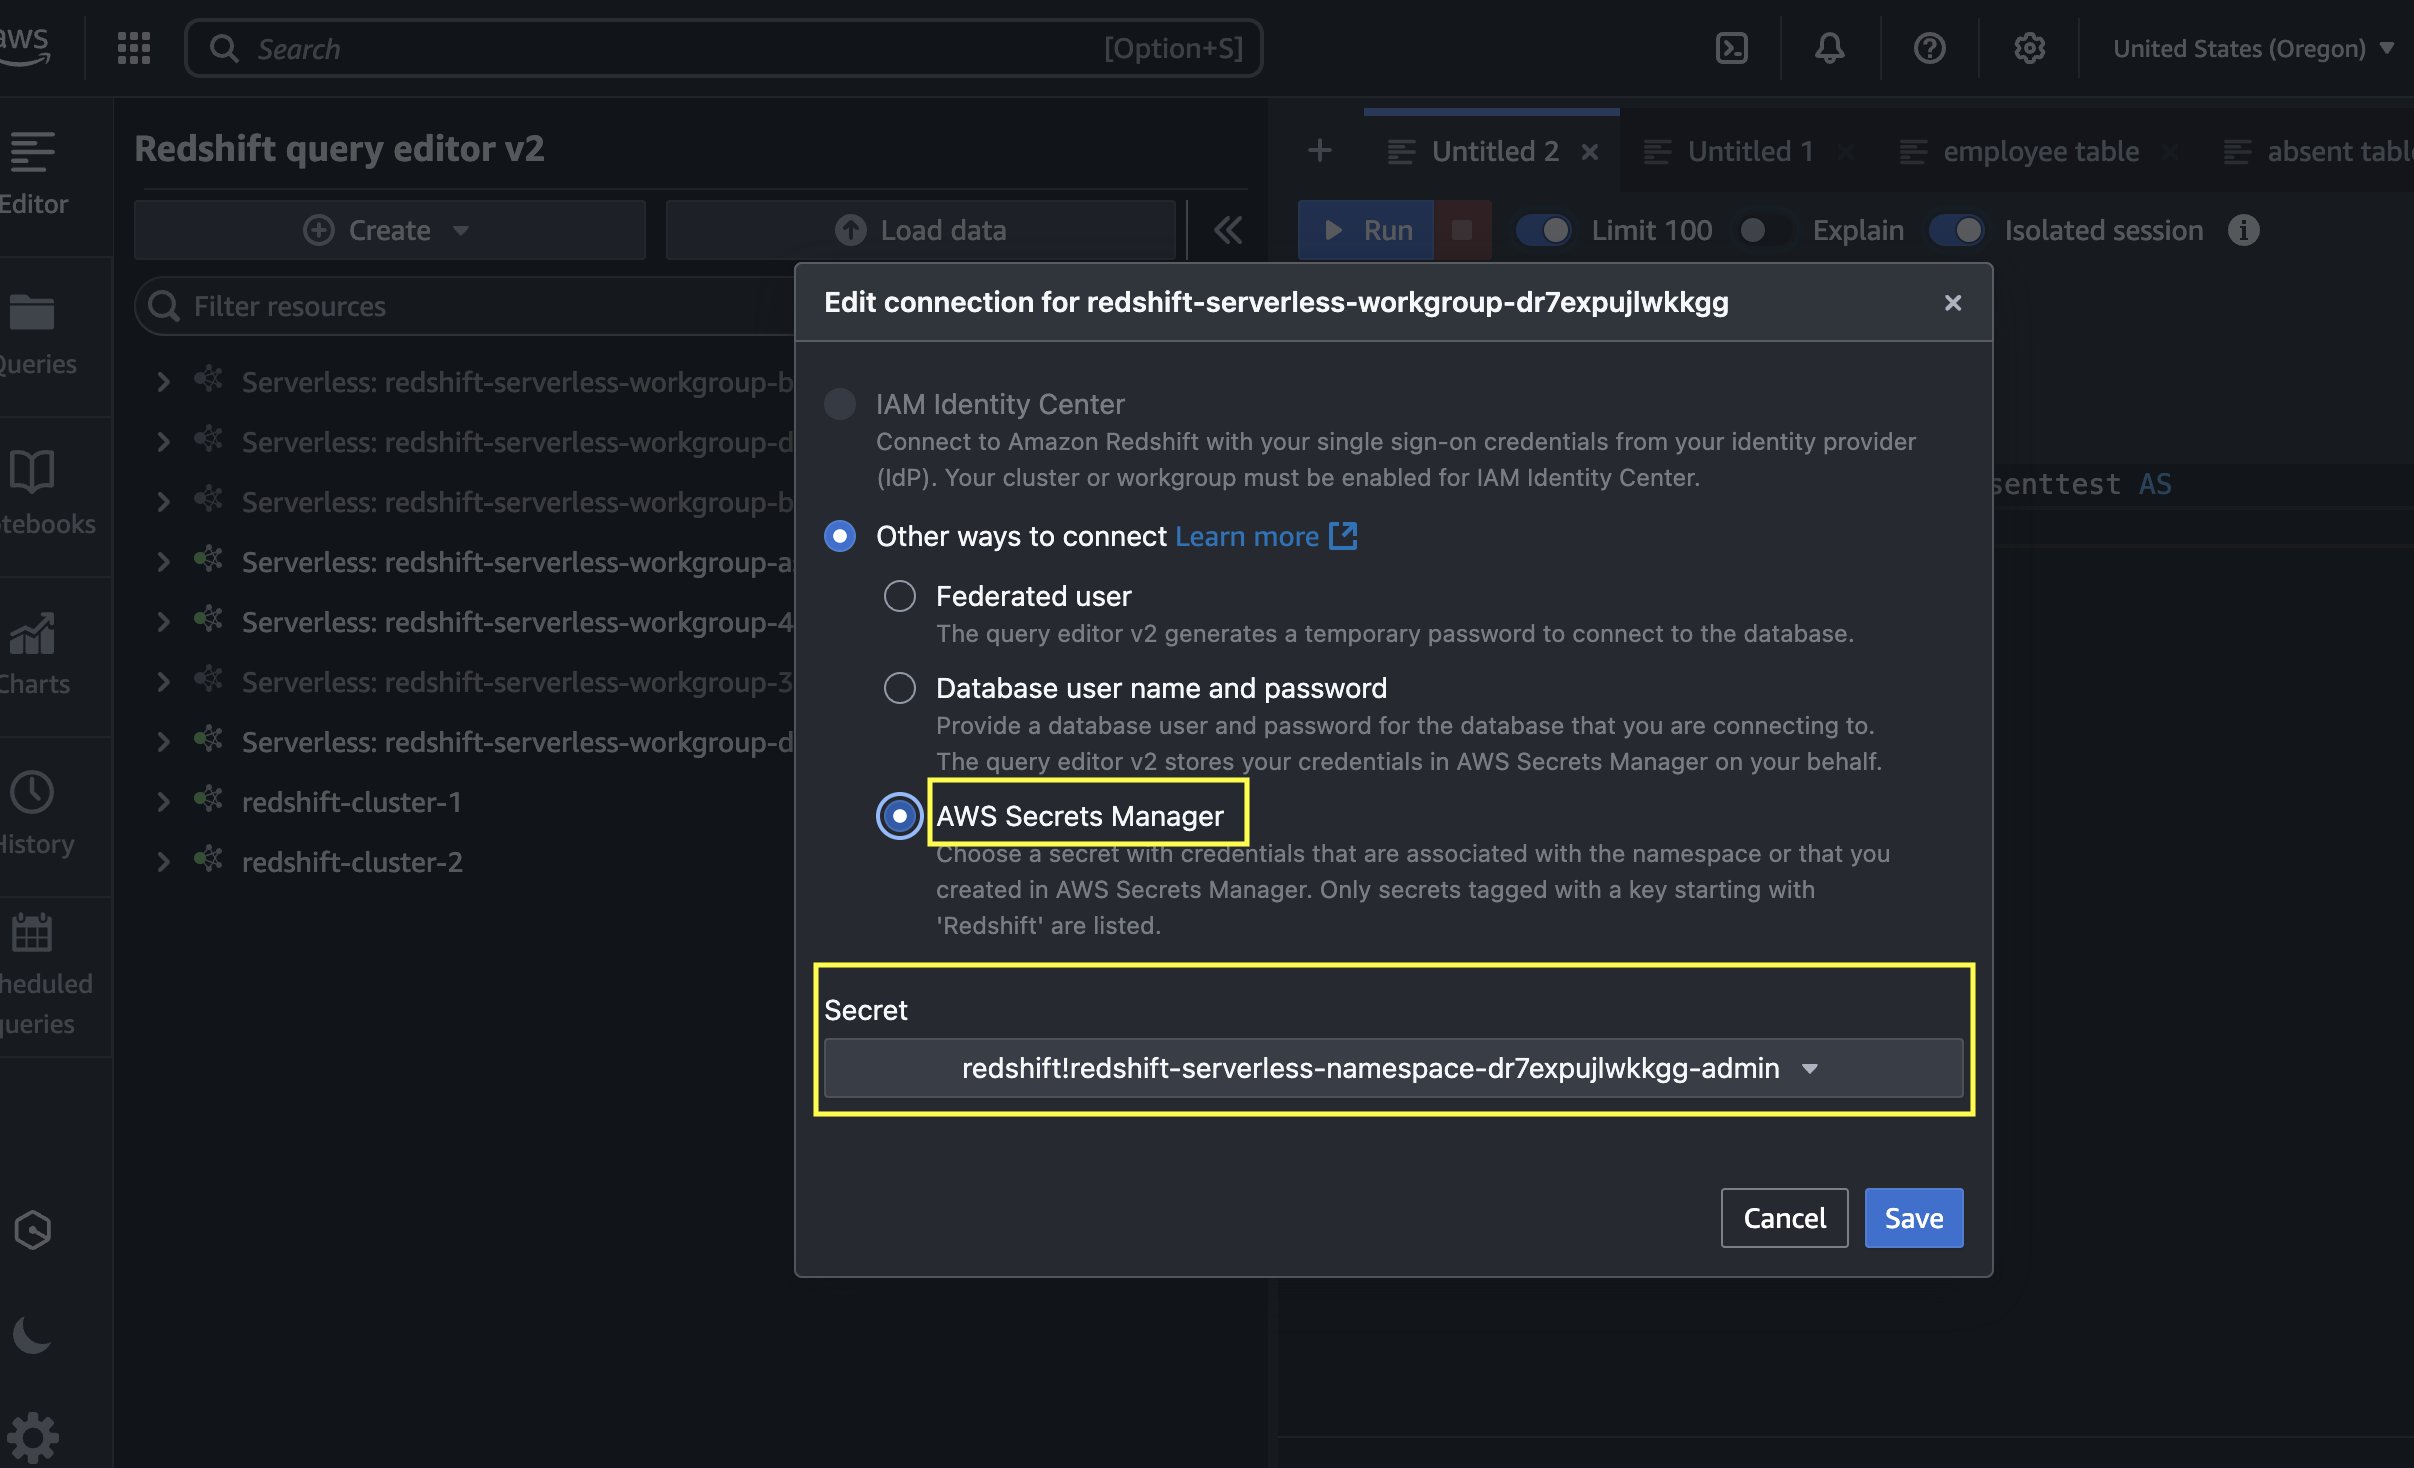
- Use the next code to create tables in Amazon Redshift and cargo knowledge from Amazon S3 utilizing the COPY command. Make certain the IAM function has
GetObjectpermission on the S3 informationattendance.csvandstaff.csv.Create Redshift desk absent
Load knowledge into absent desk.
Create Redshift desk worker
Load knowledge into worker desk.
- After the tables are created and the info is loaded, carry out the be a part of between the tables and create a brand new desk with a CTAS question:
- Navigate to the SageMaker Unified Studio area.
- Select Mission and underneath Overview, select Knowledge Sources.
- Choose the Amazon Redshift supply (
RedshiftServerless-default-redshift-datasource). - On the Actions dropdown menu, select Edit.
- Below Connection, Allow Import knowledge lineage.
- Within the Knowledge Choice part, underneath Desk Choice Standards, present a desk title or use
*to generate lineage. - Replace the info supply and select Run to create an asset referred to as
employeewithabsentin SageMaker Catalog. - Navigate to Property, select the
employeewithabsentasset, and navigate to the LINEAGE part.
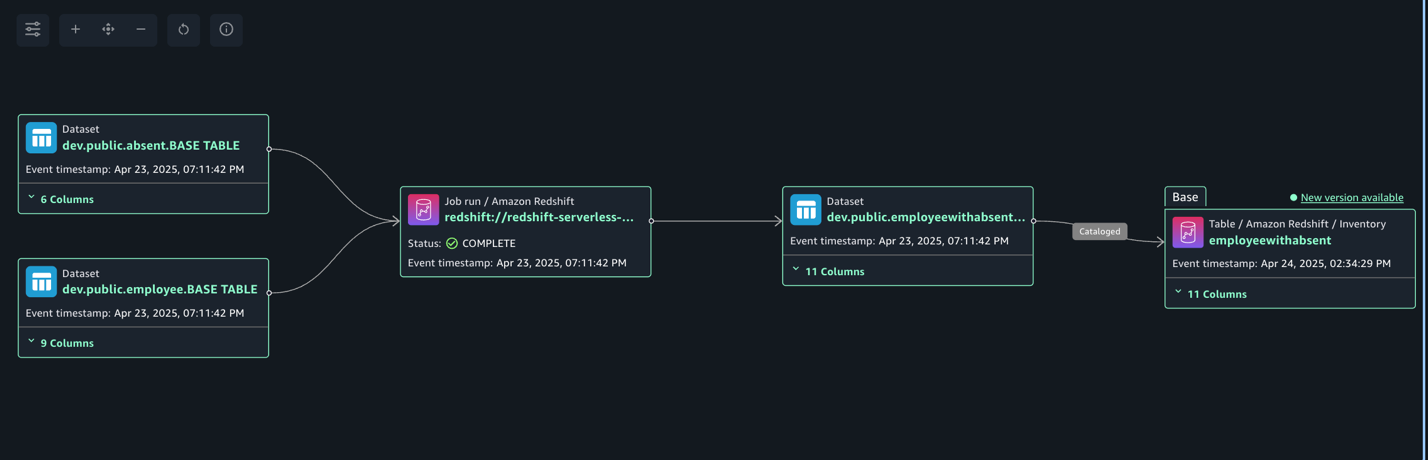
The next lineage diagram exhibits becoming a member of two redshift tables and creating a brand new redshift desk and registers it as an asset in SageMaker Catalog.
Seize lineage from EMR Serverless job
To exhibit the lineage, we learn worker knowledge from an RDS for MySQL desk and an attendance dataset from Amazon Redshift, and be a part of each datasets. Lastly, we write the info to Amazon S3 and create the attendance_with_employee desk within the Knowledge Catalog. Full the next steps:
- On the Amazon EMR console, select EMR Serverless within the navigation pane.
- To create or handle EMR Serverless functions, you want the EMR Studio UI.
- If you have already got an EMR Studio within the Area the place you need to create an software, select Handle functions to navigate to your EMR Studio, or choose the EMR Studio that you simply need to use.
- In case you don’t have an EMR Studio within the Area the place you need to create an software, select Get began after which select Create and launch Studio. EMR Serverless creates an EMR Studio for you so you may create and handle functions.
- Within the Create studio UI that opens in a brand new tab, enter the title, sort, and launch model on your software.
- Select Create software.
- Create an EMR Spark serverless software with the next configuration:
- For Sort, select Spark.
- For Launch model, select emr-7.8.0.
- For Structure, select x86_64.
- For Software setup choices, choose Use customized settings.
- For Interactive endpoint, allow the endpoint for EMR Studio.
- For Software configuration, use the next configuration:
- Select Create and Begin software.
- After software has began, submit the Spark software to generate lineage occasions. Copy the next script and add it to the S3 bucket (
s3://datazone-{account_id}/script/). Add the MySQL-connector-java JAR file to the S3 bucket (s3://datazone-{account_id}/jars/) to learn the info from MySQL. - After you add the script, use the next command to submit the Spark software. Change the next parameters in response to your atmosphere particulars:
application-id: Present the Spark software ID you generated.execution-role-arn: Present the EMR execution function.entryPoint: Present the Spark script S3 path.domainID: Present the area ID (from the CloudFormation template output forDataZoneDomainid:dzd_xxxxxxxx).accountID: Present your AWS account ID.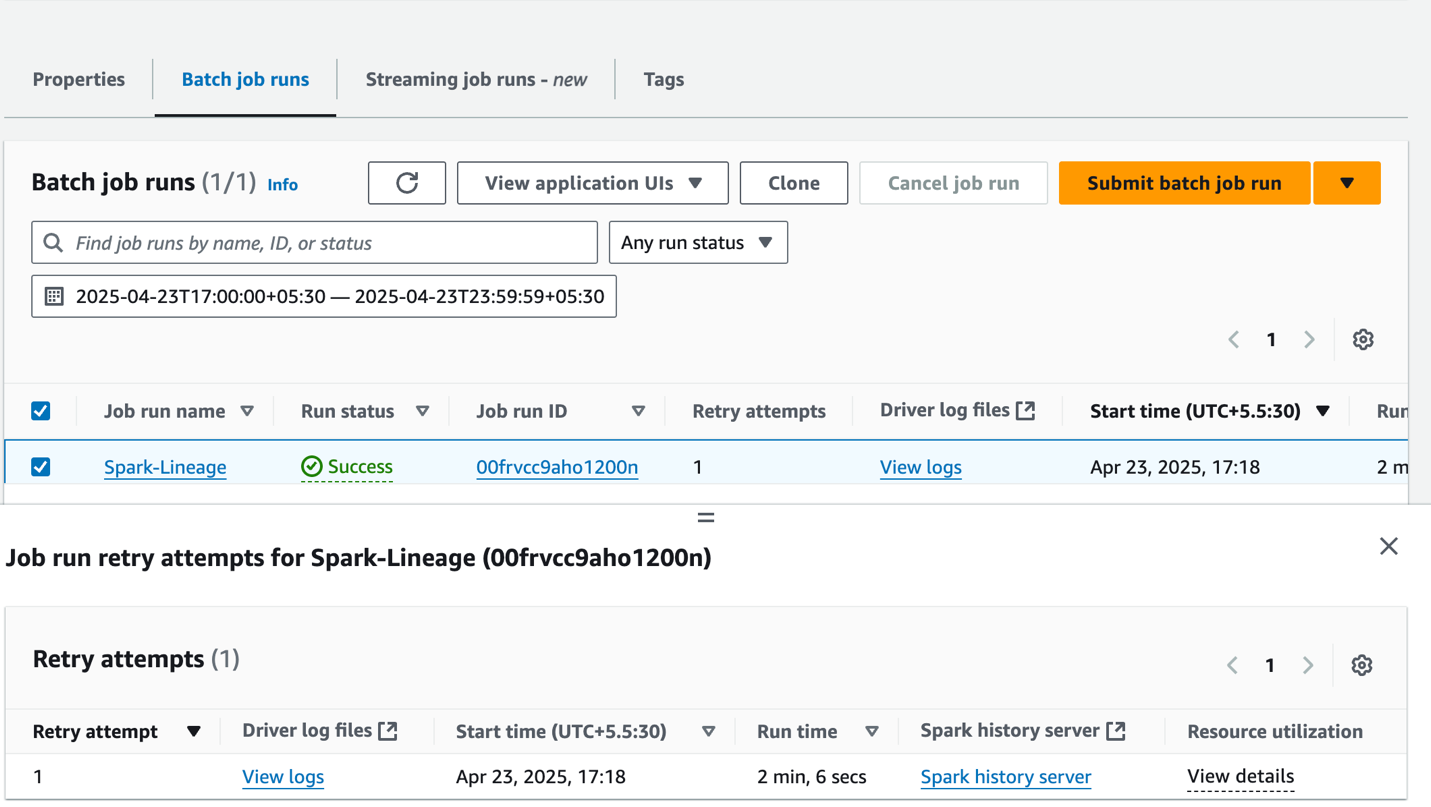
- After the job has executed efficiently, navigate to the SageMaker Unified Studio area.
- Select Mission and underneath Overview, select Knowledge Sources.
- Choose the Knowledge Catalog supply (
{account_id}-AwsDataCatalog-glue_db_xxxxxxxxxx-default-datasource). - On the Actions dropdown menu, select Edit.
- Below Connection, allow Import knowledge lineage.
- Within the Knowledge Choice part, underneath Desk Choice Standards, present a desk title or use
*to generate lineage. - Replace the info supply and select Run to create an asset referred to as
attendancewithempnewin SageMaker Catalog. - Navigate to Property, select the
attendancewithempnewasset, and navigate to the LINEAGE part.
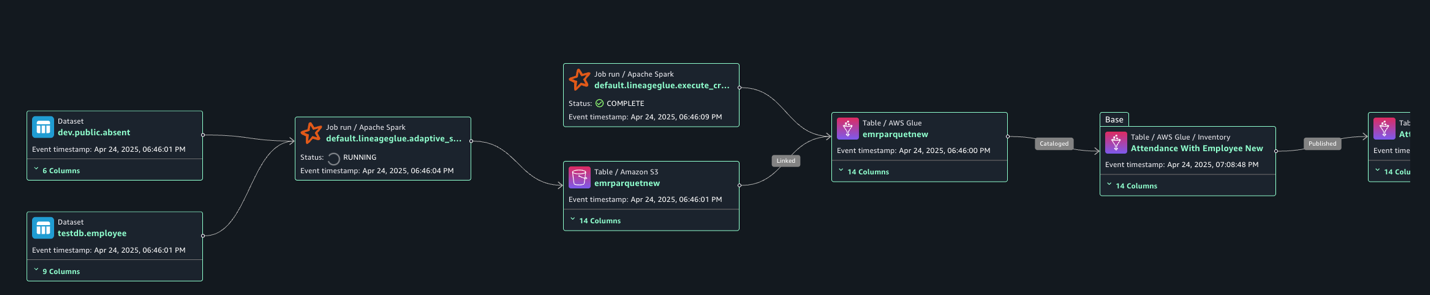
The next lineage diagram exhibits an AWS Glue job that integrates worker data saved in Amazon RDS for MySQL and worker absence information saved in Amazon Redshift. The AWS Glue job combines these datasets via a be a part of operation, then creates a desk within the Knowledge Catalog and registers it as an asset in SageMaker Catalog.
Clear up
To scrub up your assets, full the next steps:
- On the AWS Glue console, delete the AWS Glue job.
- On the Amazon EMR console, delete the EMR Serverless Spark software and EMR Studio.
- On the AWS CloudFormation console, delete the CloudFormation stack
vpc-analytics-lineage-sus.
Conclusion
On this submit, we confirmed how knowledge lineage in SageMaker Catalog helps you monitor and perceive the whole lifecycle of your knowledge throughout numerous AWS analytics providers. This complete monitoring system gives visibility into how knowledge flows via completely different processing levels, transformations, and analytical workflows, making it a vital device for knowledge governance, compliance, and operational effectivity.
Check out these lineage visualization strategies on your personal use circumstances, and share your questions and suggestions within the feedback part.
In regards to the Authors