North Korea-linked threat actor Kimsuky has been tied to leveraging a newly developed, malicious Google Chrome extension aimed at siphoning sensitive information in the context of its ongoing intelligence gathering endeavors.
In early March 2024, Zscaler’s ThreatLabz exercise, codenamed TRANSLATEXT, revealed an extension capable of gathering sensitive information, including email addresses, usernames, passwords, cookies, and browser screenshots.
A targeted marketing initiative was allegedly designed to counteract the academic community in South Korea, with a specific focus on research and studies related to North Korean politics.
KimSuKy is a notorious group originating from North Korea, first identified in 2012, which has been actively engaged in conducting cyber-attacks, primarily targeting South Korean organizations for financial gain and espionage purposes.
The sibling grouping of the Lazarus Cluster and member of the Reconnaissance Common Bureau (RGB), known by aliases including APT43, Archipelago, Black Banshee, Emerald Sleet, Springtail, and Velvet Chollima.
Recently, a cybersecurity threat group was discovered exploiting a previously identified vulnerability in Microsoft Workplace (CVE-2017-11882), dubbed “CVE-2017-11882”, to distribute a keylogger, which has been used in attacks targeting the aerospace and defense sectors with the intention of deploying an espionage tool featuring information gathering and secondary payload execution capabilities.
A previously unknown vulnerability in the backdoor allows attackers to conduct initial reconnaissance, deploy additional malware payloads, and potentially compromise or remotely control the affected system, according to CyberArmor. The marketing campaign, titled ‘Niki’, has been designed to effectively promote the new product line.
While the exact mechanism by which this newly discovered exercise facilitates the activation of an infection chain remains unclear, it is hypothesized that the group may exploit this phenomenon to initiate the process.
The starting point of the assault is a suspicious ZIP file posing as a repository of Korean military history, containing two files: a Hangul Phrase Processor document and an executable.
Upon launching the executable, a PowerShell script is obtained from a malicious server, subsequently transmitting sensitive information about the compromised victim to a publicly accessible GitHub repository, before downloading additional PowerShell code through a Windows shortcut file (LNK).
Zscaler reported discovering a malicious extension, “Google Translate.crx,” created on February 13, 2024, which temporarily hosted the TRANSLATEXT extension, with its distribution method currently unknown.
These records data were stored in the repository from March 7, 2024, only to be deleted the following day, suggesting that Kimsuky aimed to minimize exposure and utilize the malware for a limited period to target specific individuals, according to security researcher Seongsu Park.
A malicious software, TRANSLATEXT, disguises itself as Google Translate to evade security protocols employed by prominent tech firms such as Google, Kakao, and Naver. It employs JavaScript code to circumvent these safeguards, pilfering email addresses, login credentials, and cookies while simultaneously capturing browser screenshots. This nefarious entity then clandestinely transmits the illicitly obtained data.
This advanced tool is designed to fetch instructions from Blogger Blogspot URLs, allowing it to execute tasks such as taking screenshots of newly opened tabs, deleting all cookies from the browser, and more.
“The primary objective of the Kimsuky group is to gather crucial intelligence by conducting surveillance on tutorial and authority figures, according to Park.”
Discovered this text attention-grabbing? Join us on social media platforms and stay updated on our latest unique content offerings.
Offering a comprehensive, petabyte-scale data warehousing solution, fully managed and cloud-based. Starting with mere hundreds of gigabytes, you can scale up to a petabyte or even beyond. By leveraging your data, you can gain valuable insights that drive business growth and enhance client experiences.
The primary objective of a catastrophe recovery plan is to minimize downtime and expedite system restoration in the event of a disaster, thereby reducing the overall impact of system failure. By developing catastrophe restoration plans, companies can ensure they comply with regulatory requirements, providing a clear and actionable framework for recovery efforts.
To minimize the risks associated with unexpected disruptions, take these proactive measures to ensure your team is better equipped to respond and quickly recover from a disaster, should one occur while working on an Amazon Redshift project. With features similar to automated snapshots and cross-area replication, Amazon Redshift enables you to significantly enhance your catastrophe resilience.
Catastrophe restoration planning
Catastrophe restoration planning hinges on two fundamental components:
RPO (Recovery Point Objective) defines the maximum acceptable timeframe to restore data to a certain point, ensuring the highest possible recovery level. What criteria are considered acceptable in terms of information gaps between the target restoration level and service disruption?
RTO denotes the maximum tolerable duration between service disruption and recovery, ensuring seamless continuity. What criteria are considered to define a suitable time frame for calculating latency when system downtime occurs?
To develop a comprehensive catastrophe restoration plan, complete the following tasks:
In the event of a catastrophic failure, our primary goal is to minimize both downtime and information loss while ensuring seamless data recovery. To achieve this, we have established the following restoration targets:
RTO: 2 hours or less RPO: 15 minutes or less
For metadata, we aim to restore critical information within an RPO of 5 minutes or less, guaranteeing minimal disruption to our operations.
Please note that these targets are subject to change based on future assessments and recommendations. Ensure that all relevant enterprise stakeholders are actively involved in determining and agreeing upon key performance objectives.
Establish effective restoration strategies that align with predefined restoration objectives.
In the event that our innovative new manufacturing process does not yield the desired results, we will implement a fallback plan to restore operations to their previous configuration.
This contingency plan will involve reversing the changes made to the production line and reinstating the original equipment and procedures used in the traditional manufacturing setup.
Verify and validate the catastrophe restoration plan by simulating a failover scenario in a non-production environment.
Stakeholder Communication Plan for Downtime Notification
To ensure timely and effective communication, we will establish clear protocols for informing stakeholders of planned or unplanned downtime.
**Purpose:** To maintain transparency and minimize disruption by keeping stakeholders informed of any downtime affecting our operations.
**Scope:** This plan applies to all employees, customers, partners, and suppliers who rely on our systems or services.
**Key Messages:**
1. Notification of planned or unplanned downtime 2. Estimated duration of the outage 3. Alternative arrangements for affected processes or services
**Communication Channels:**
1. Internal notification: Company intranet, email, or SMS to employees 2. External notification: Customer service portal, social media, and/or email to customers and partners 3. Public notification: Website, news releases (if necessary)
**Timeline:**
1. Planned downtime: Notification at least 24 hours in advance 2. Unplanned downtime: Immediate notification with updates every 30 minutes
**Key Performance Indicators (KPIs):**
1. Response time to stakeholder inquiries 2. Satisfaction ratings from stakeholders regarding communication effectiveness
**Training and Testing:**
1. Designate a central point of contact for all downtime notifications 2. Conduct regular training sessions for communication team members 3. Test the communication plan annually or as needed
The project team will maintain transparent communication with stakeholders regarding progress updates, restoration efforts, and service availability through the following channels:
Regularly scheduled progress reports will be sent to key decision-makers and project sponsors, detailing milestones achieved, challenges faced, and corrective actions taken.
A dedicated webpage or portal will be created for easy access to project information, including status updates, timelines, and contact details for team members and stakeholders.
The project manager will conduct bi-weekly conference calls with the core team to discuss ongoing tasks, obstacles, and proposed solutions. These calls will also serve as an opportunity to address questions and concerns from team members.
In addition to scheduled reports, immediate notification will be provided in cases of significant delays, changes in scope, or major milestones achieved.
Stakeholders will receive timely updates on restoration progress, including estimated timelines for service availability. Ongoing monitoring and reporting will ensure that users are informed of any disruptions or outages.
The project manager will maintain an up-to-date dashboard displaying key performance indicators (KPIs) such as task completion rates, timeline adherence, and issue resolution times. This information will be shared with stakeholders to track progress and identify areas for improvement.
Develop a comprehensive catastrophe restoration training program that empowers professionals with the skills to effectively respond to and mitigate the devastating effects of disasters on communities worldwide.
Catastrophe restoration methods
Amazon Redshift is a cloud-based data warehousing solution that enables organizations to leverage historical insights, accelerate business decisions, and minimize the impact of unforeseen outages by quickly recovering from disruptions.
Amazon Redshift RA3 instance types and Redshift serverless store their data in Redshift Managed Storage (RMS), which leverages Amazon S3 as its underlying storage, offering high availability and durability as a default configuration.
We explore diverse failure scenarios, coupled with corresponding recovery strategies.
Utilizing backups
Effective data management requires reliable backup procedures to ensure the integrity and availability of critical information. Regular backups provide a safeguard against human error, hardware failure, virus attacks, power outages, and natural disasters.
Amazon Redshift enables users to create two types of snapshots – automated and guided – allowing for more effective data retrieval. Snapshots are instantaneous point-in-time backups of a Redshift data warehouse, capturing its exact state at a specific moment in time. Amazon Redshift securely stores these snapshots internally using an encrypted Secure Sockets Layer (SSL) connection via its Relational Management System (RMS).
Redshift’s provisioned clusters offer automated snapshotting, with default retention set at one day, although this period can be extended up to 35 days. Snapshots are captured every 5 gigabytes of information updated on a node, as well as every 8 hours, with no less than a quarter-hour interval between consecutive snapshots. The information gleaned from this clustering process should far surpass the overall data absorbed by the entire network (a 5GB increase in node diversity). You can also set a customized snapshot schedule with frequencies ranging from 1 to 24 hours. To manage the retention period for automated backups, utilize the API’s `RetentionPeriod` parameter and configure it according to your needs. To completely opt out of automated backups, you’ll have the flexibility to set a retention interval of zero days. Check the details for additional information.
Mechanically generates restoration factors approximately every 30 minutes. Unless otherwise specified, these restoration factors are retained by default for 24 hours before being automatically purged from the system. You have the option to convert a restoration level into a snapshot if you want to preserve it for more than 24 hours.
Amazon Redshift provides both provisioned and serverless cluster options, which offer the ability to take on-demand snapshots that can be retained indefinitely. Guided snapshots enable you to retain your snapshots for a longer period than automated snapshots, thereby catering to your specific compliance requirements. Guidelines emphasize the importance of promptly deleting guide snapshots to avoid incurring unnecessary storage fees, highlighting the need for timely deletion once their purpose is no longer required. Please clarify.
Amazon Redshift seamlessly integrates with various tools to enable centralized and automated information security across all AWS services, both in the cloud and on-premises. With AWS Backup for Amazon Redshift, you’ll have the ability to define data protection policies and track activity for multiple Redshift provisioned clusters from a centralized location. You can create and retailor guide snapshots for Redshift provisioned clusters? This enables automation and consolidation of backup tasks that were previously done manually without standardized procedures. To learn more about setting up AWS Backup for Amazon Redshift, consult the documentation. As of this writing, AWS Backup does not currently support backups for Redshift Serverless.
Node failure
A Redshift is a group of computing sources known as. Amazon Redshift automatically detects and replaces a failed node within your data warehousing cluster. Amazon Redshift ensures that your standby node is readily available immediately, prioritizing the retrieval of frequently accessed data from Amazon S3 to enable seamless querying upon failover.
Although a single-node cluster might be feasible, it would essentially imply that there’s only one instance of the data stored within the cluster, rendering it less than ideal for manufacturing settings where buyers require more robust solutions. AWS aims to restore a cluster from the most recent Amazon S3-stored snapshot when a failure occurs, effectively determining your Recovery Point Objective (RPO).
We recommend adopting a minimum of two nodes to ensure seamless manufacturing operations.
Cluster failure
Each cluster features a lead node, serving as its central hub, and multiple compute nodes that work in tandem with it. Upon occurrence of a cluster failure, it is essential that you Snapshots provide instant restore points for a cluster by capturing its state at a specific moment in time. A snapshot represents a comprehensive collection of data from all operational databases within your cluster. This section also includes information about your cluster, including the number of nodes, node type, and administrator user name. When restoring a cluster from a snapshot, Amazon Redshift utilizes the existing cluster information to create a fresh, identical instance. The system then proceeds to restore all databases from the stored snapshot data. With the brand-new cluster now available, you can begin querying it sooner than expected, with access possible mere minutes after launch. The cluster is restored in the original AWS region, as well as a randomly selected Availability Zone; however, you can specify an additional Availability Zone in your request for more flexibility.
Availability Zone failure
The region is a physical location on Earth where data centers are situated. An Availability Zone is a self-contained region within an Area that comprises multiple data centers, each equipped with redundant power, networking, and connectivity infrastructure to ensure high availability and reliability of cloud-based resources. Availability Zones enable businesses to operate manufacturing facilities and databases that are highly available, fault-tolerant, and scalable, far exceeding what is possible with a single data center. All Availability Zones within an Area are connected through a robust, high-bandwidth network infrastructure featuring fully redundant and dedicated metro fiber, providing fast, efficient communication between these zones with no single point of failure.
To mitigate the impact of Availability Zone failures, consider implementing one of these strategies:
When deploying a single-AZ Amazon Redshift information warehouse, if the underlying Availability Zone becomes unavailable, Redshift automatically transfers the cluster to a new Availability Zone without data loss or service disruptions. To utilize this feature, ensure that the necessary configuration settings are allowed within your provisioned cluster, a process that is seamlessly enabled for Redshift Serverless instances. Cluster relocation is now decoupled from pricing considerations, but this best-effort strategy is subject to available resources within the targeted Availability Zone, which may impact Recovery Time Objective (RTO) due to factors related to bootstrapping a new cluster? Restoration periods typically last between 10 and 60 minutes. To gain a deeper understanding of configuring Amazon Redshift’s data relocation capabilities, consult their documentation.
A Multi-AZ deployment enables running your data warehousing solution across multiple Availability Zones simultaneously, allowing continuous operation even in the event of an unforeseen failure scenario. With a Multi-AZ deployment, no utility modifications are necessary to ensure business continuity, as this configuration treats the multiple Availability Zones as a single logical data repository with a unified access point. Multi-AZ deployments significantly reduce restoration times by ensuring automatic failover capabilities, designed specifically for customers with mission-critical analytics requirements that necessitate the highest levels of availability and resiliency against Availability Zone outages. This enhancement enables you to deploy a solution that is even more in line with the recommendations of the Reliability Pillar within the AWS Well-Architected Framework. Based on our thorough pre-launch evaluations, we found that the Recovery Time Objective (RTO) for Amazon Redshift Multi-AZ deployments typically falls under 60 seconds, and in the extremely improbable event of an Availability Zone failure, this time is significantly reduced to near-instant recovery. To gain further insights on configuring Multi-AZ, consult the AWS documentation. As of writing, Redshift Serverless currently does not support Multi-AZ deployment.
Area failure
Amazon Redshift currently supports single-AZ deployments for clusters. Despite this, you’ve obtained a variety of options to aid in disaster recovery or accessing data across multiple area scenarios.
Use a cross-Area snapshot
Amazon Redshift allows you to configure data repetition through its query settings. To successfully configure cross-Area snapshot copying, it is crucial to enable this feature for both serverless and provisioned data warehouses, while specifying the location to store repeated snapshots and the retention period for automated or manual snapshots in the target Area. When cross-area copying is enabled for a knowledge warehouse, newly created guides and automatic snapshots are replicated in the specified area. In the event of an AWS Region failure, you can recover your Amazon Redshift data warehouse by restoring it in a new Region using the latest cross-Region snapshot.
The diagram that follows will visually illustrate this very same structure. To discover more about enabling cross-area snapshots, consult:
Use a customized area identify
Creating a custom area identifier simplifies recall and usage compared to the standard Amazon Redshift endpoint URL. By utilizing CNAME, you’ll efficiently redirect website traffic to a newly established cluster or workgroup derived from a snapshot in a failover configuration. In the event of a catastrophic failure, a robust network architecture can seamlessly redirect traffic to a central hub, ensuring minimal service disruptions for customers, without requiring them to modify their configurations.
To ensure high availability of prime data, it is crucial to maintain a redundant cluster or workgroup that can seamlessly receive and process restored information from the primary cluster in real-time. This information warehouse may reside in an additional Availability Zone or a distinct geographic region. If an entire region experiences a catastrophic failure, you can reroute users to the secondary Redshift cluster within a short timeframe.
We discuss learning how to utilize a customized area identifier to handle area failures within Amazon Redshift. The following requirements must be fulfilled:
What specific geographic area would you like to identify? To register a website, you typically require using a domain name registrar, either a primary or a third-party service provider.
Will you need to access a Redshift cluster or workgroup?
in your Redshift cluster. Can you use the AWS CLI command `aws redshift create-cluster-subnet-group –cluster-identifier my_cluster –subnet-group-name my_subnet_group –availability-zone us-west-2a` to relocate your Redshift provisioned cluster? Redshift Serverless is automatically enabled, offering seamless scalability and cost-effectiveness. For extra info, see .
Ensure you are mindful of your Redshift endpoint configuration. To locate the endpoint for your Redshift cluster, simply navigate to your workgroup or provisioned cluster and access the Amazon Redshift console.
Customize a designated space on Amazon Redshift to optimize query performance and storage capacity.
In the hosted zone created by Route 53 upon registering the domain, configure routing settings to direct website traffic to your Redshift endpoint by completing the following steps:
Select a hosted zone from the navigation pane on the AWS Route 53 console.
Select your hosted zone.
Click on the tab to proceed.
What is your preferred subdomain name?
For , select .
What is your Redshift cluster identifier? Ensure the value of your system by removing the colon, port, and database. For instance, redshift-provisioned.eabc123.us-east-2.redshift.amazonaws.com.
Select .
Create a tailored region in Amazon Redshift utilizing the CNAME document identifier. For directions, see .
Now you can connect to your cluster using the customised area identifier. The JDBC URL should be precisely jdbc:redshift://prefix.rootdomain.com:5439/dev?sslmode=verify-fullThe designated custom space prefix.rootdomain.com serves as a personalized zone identifier, while ‘dev’ represents the default database instance. Connect to the specified URL using my editor’s credentials.
As the crisis unfolds, immediately notify the central operations team and relevant stakeholders.
In the event of an unlikely regional failure, the following steps should be taken immediately:
Take a comprehensive cross-area snapshot in your secondary area.
Within the secondary area of your Redshift cluster. You can use the AWS CLI command aws redshift create-credentials-task –cluster-identifier –new-credentials-username –new-credentials-password to activate relocation for a Redshift provisioned cluster.
Create a customised area within your Redshift cluster or workgroup using the CNAME record identified in your Route 53 hosted zone setup, thereby streamlining data processing and analytics workflows.
Are you alerted to newly created Redshift clusters or workgroups via the Redshift endpoint?
To ensure uninterrupted communication, it is crucial to update the Redshift endpoint in Route 53.
In the Route 53 console, navigate to the and select it from the navigation pane.
Select your hosted zone.
On the tab, select the CNAME record you created earlier.
Below , select .
Configure the application to utilize the new Redshift endpoint’s value. Ensure the value is delivered by removing the colon, port, and database. For instance, redshift-provisioned.eabc567.us-west-2.redshift.amazonaws.com.
Select .
Once connected to your customised area using the same JDBC URL as your application, you should be connected to your new cluster in your secondary region.
Use active-active configuration
To ensure uninterrupted operations for mission-critical initiatives, a fault-tolerant setup at the area level can be configured in an active-active arrangement. To ensure writes are replicated across all clusters, one effective approach involves maintaining data consistency through concurrent ingestion into both primary and secondary clusters. By leveraging union semantics, you can effectively synchronize information between two clusters. For extra particulars, see .
Further concerns
When discussing your disaster recovery protocol, what additional considerations arise?
Amazon Redshift Spectrum
Amazon Redshift is characterized by the ability to run SQL queries on exabytes of data stored in Amazon S3. With Redshift Spectrum, you’re no longer required to load or extract data from Amazon S3 into Amazon Redshift before querying.
To avoid disruptions when using external tables with Redshift Spectrum, make sure the configuration is set up and readily available on your secondary failover cluster for seamless failovers.
What’s the original text you’d like me to improve?
.
Catalog replication of information objects between primary and secondary areas.
Arrange identity-based IAM insurance policies to grant secure access to the S3 bucket located in the secondary region.
Cross-Area information sharing
Amazon Redshift enables secure information sharing by providing seamless access to live data across clusters, workgroups, AWS accounts, and regions without manual data transfer or copying.
When leveraging cross-Area data sharing, it is crucial to develop a robust business continuity plan to ensure seamless failover of producer and consumer clusters in the event of an Area outage, minimizing service disruptions.
When an outage affects the area where a producer cluster is deployed, you can establish a new producer cluster in another region by leveraging a cross-area snapshot and reconfiguring data sharing, thereby ensuring business continuity.
A new Redshift cluster is provisioned using the cross-Area snapshot feature, allowing for seamless migration of data between different Availability Zones and regions, thereby ensuring business continuity and scalability while minimizing downtime. Are you certain that your node kind, dependencies, and safety settings are correctly configured?
Retrieve the previously configured Redshift information shares specific to the particular producer cluster.
Information sharing has been successfully migrated to the newly established producer cluster within the designated goal area.
Reconfigure the shopper configurations within the existing shopper cluster to align with the newly established producer cluster settings.
Confirmation is ensured of the requisite authorizations and access restrictions being implemented for data sharing within the customer aggregation group.
The brand-new producer cluster is now fully operational, and the patron cluster is prepared to access the shared data.
In the event of an outage affecting the area where your customer cluster is hosted, it is essential to provision a new cluster in a different region to ensure business continuity and minimize downtime. All processes related to the patron cluster function as intended, with accurate initialization.
The process of completing this task involves the following procedures:
Identify a backup location that remains operational despite the current disruption.
Establish a completely novel customer cluster within a distinct geographic region.
Define key components for successful knowledge dissemination platforms?
Configure the appliances in sync with the newly established shopper cluster.
Validating whether each purpose is adequately aligned with the newly acquired customer segment and operating as intended?
For further details on configuring information sharing, consult with.
Federated queries
In Amazon Redshift, you’ll have the ability to query and analyze data across operational databases, data warehouses, and data lakes. When relying on federated queries, it is crucial to configure federated queries within a failover cluster effectively to prevent any service disruptions.
Abstract
We discussed various scenarios where Amazon Redshift may encounter failures and outlined strategies for recovering from these incidents. Catastrophic event restoration options ensure seamless recovery of your data and workloads, allowing you to quickly return to enterprise operations following a devastating incident, thereby minimizing downtime and maximizing business continuity.
As an administrator, define a reliable Amazon Redshift disaster recovery strategy to minimize business interruptions. Developing a comprehensive strategy that encompasses all aspects of your project or endeavour is crucial for achieving success.
Identifying Key Sources of Information and Insights at Redshift.
Establishing backup and restoration procedures
Defining failover and failback processes
Implementing information integrity and consistency
The organization must prioritize implementing comprehensive catastrophe restoration testing and drills to ensure seamless recovery from disruptions. By simulating worst-case scenarios, we can identify vulnerabilities and develop effective mitigation strategies to minimize downtime and preserve critical operations.
Please clarify what you mean by “methods” and “go away”, as the text is unclear. Additionally, provide more context or specify which parts of the text you would like me to revise.
In regards to the authors
As a seasoned options architect and senior analytics specialist at Amazon Web Services (AWS), primarily located in New York. With more than two decades of experience in designing data storage solutions, she specializes in crafting Amazon Redshift options that meet the unique needs of her clients. She focuses intensely on delivering bespoke solutions to clients by designing and building large-scale, thoroughly planned analytics and decision-making platforms that meet their unique needs.
Serves as a Senior Analytics Options Architect at Amazon Web Services (AWS). She is fervently dedicated to delivering tailored cloud-based analytics solutions that empower clients to uncover the root causes of their business challenges. Outside of work, she enjoys traveling and spending quality time with her loved ones.
Serves as an Analytics Specialist and Options Architect at Amazon Web Services (AWS). With expertise in Amazon Redshift, he assists clients in building scalable analytical solutions. With over 16 years of experience in various database and information warehousing technologies. He has an unwavering dedication to streamlining and resolving customer concerns regarding cloud-based products.
Serving as a seasoned Senior Redshift Specialist and Options Architect at AWS, this expert leverages extensive information warehousing experience to navigate and optimize vast datasets, effortlessly managing petabytes of information. Prior to joining AWS, he developed data warehousing solutions at Amazon.com and Amazon Services. With a specialty in Amazon Redshift, he assists clients in developing scalable analytics solutions.
works as an AWS Options Architect based in Boston. As a trusted partner, Agasthi collaborates closely with leading enterprises to guide them through transformative cloud migrations, empowering them to reimagine their business models and operations with flexibility, scalability, and enhanced efficiency. Prior to joining AWS, he worked with major IT consulting firms on client projects encompassing cloud architecture, enterprise architecture, IT strategy, and transformation initiatives. With an unwavering passion for harnessing cloud-based innovations, he is dedicated to tackling complex real-world business challenges head-on.
Microsoft’s Azure Container Networking team is pleased to introduce its latest offering: Enhanced Container Networking Services. This portfolio of solutions is built atop existing networking capabilities for Azure Kubernetes Service (AKS), enabling organizations to effectively address complex issues related to observability, security, and regulatory compliance.
Building on the success of Microsoft’s Azure Container Networking, we are pleased to introduce Superior Container Networking Services, a new offering that takes container networking to the next level. A suite of companies built upon existing networking capabilities for Azure Kubernetes Services (AKS), designed to tackle sophisticated issues surrounding observability, security, and compliance. The primary feature of this suite is now available in public preview.
What’s Superior Container Networking Providers?
Supreme container networking providers constitute a collective of organizations designed to significantly enhance the operational efficacy of your Azure Kubernetes Service (AKS) clusters, thereby optimizing their overall performance and reliability. The suite is comprehensive and specifically engineered to accommodate the diverse and intricate demands of modern containerized operations. Enabling clients to effectively navigate container networking through tailored capabilities specifically designed for observability, safety, and compliance, unlocking a fresh approach to management.
Container networking providers excel in delivering integrated expertise, empowering you to maintain robust security postures, ensure comprehensive compliance, and gain profound insights into network traffic and application performance. By leveraging containerization, you can guarantee not only the security and compliance of your functions, but also their efficiency and reliability, allowing you to confidently scale and manage your infrastructure as needed.
What’s Superior Community Observability?
What if a comprehensive observability solution for your Linux-based network infrastructure? Unlocks Hubble’s comprehensive metrics, as well as its command-line interface (CLI) and user interface (UI), allowing for deep insights into containerized workloads within AKS clusters. Superior Community Observability enables customers to precisely identify and troubleshoot community-related issues within a Kubernetes cluster with ease.
This feature provides real-time community circulation information at a granular level, aggregating data in real-time through Linux kernel expertise utilizing eBPF capabilities. With the integration of community visitor flows, volumetric data on knowledge and packet drops, we can now deliver comprehensive DNS metrics and network traffic information, providing in-depth insights into requests and responses.
powered by a combination of Cilium and Retina-based observability.
expertise.
To pinpoint specific areas for improvement and optimize processes using Hubble’s advanced analytics and visualization capabilities?
Throughout your cluster, gain insights into and debug complex network behaviors with the on-demand Hubble CLI, empowering community-driven flow analysis.
Intercompany collaborations are facilitated by leveraging an unmanaged Hubble UI, ultimately ensuring optimal configurations and heightened efficiency.
To ensure compliance with regulatory requirements and enhance overall safety standards.
What’s the relationship between Hubble and Cilium/Retina? Are you mapping their interactions or describing a workflow? To clarify, here’s a rephrased version:
Containerized applications thrive in a cloud-native ecosystem where CNI (Container Network Interface) is the unsung hero.
Superior community observability enables the Hubble management plane to transcend beyond Cilium’s boundaries, fostering enhanced visibility and monitoring capabilities. In Cilium-based mostly clusters, Cilium provides eBPF opportunities to Hubble. In non-Cilium-based mostly clusters, Microsoft Rethink serves as the dataplane surface layer, providing deep insights to Hubble, thereby offering a seamless and interactive experience for customers.
Visualizing Hubble metrics with Grafana
Superior Community Observability seamlessly enables two integration modes for visualization, empowering users to create a tailored observability experience.
Azure Managed Prometheus and Grafana.
Empower discerning clients with seamless, end-to-end monitoring by integrating BYO Prometheus and Grafana for streamlined management of complex systems.
Azure provides out-of-the-box solutions for streamlined setup and management of monitoring and visualization through its managed Prometheus and Grafana offerings. Azure Monitor provides a managed instance of Prometheus, collecting and storing metrics from various sources alongside Hubble.
Can’t you just query a community’s flow using Hubble’s command-line interface? Simply navigate to the desired community and run `hubble communities query –flow` to get the desired information.
With Superior Community Observability, clients can leverage the Hubble CLI to query community flows across all nodes, either globally or with filtered results.
With our platform, clients can gain real-time visibility into dropped or forwarded network flows across all nodes from a unified dashboard.
The service dependency graph provides a visual representation of how your services interact with each other, enabling you to identify and troubleshoot complex relationships between your systems. With the Hubble UI, you can easily create a comprehensive graph of your services, including their dependencies, interactions, and performance metrics. This allows you to gain insights into system behavior and optimize your architecture for better reliability and scalability.
Clients can deploy Hubble UI onto clusters with Superior Community Observability enabled, thereby enabling the visualization of service dependencies. Hubble UI provides an on-demand, comprehensive view of flows across the entire cluster, allowing customers to select a specific namespace and visualize network flows between various pods within the cluster, offering detailed insights into each flow.
Advantages
Superior community visibility
Through Superior Community Observability, communities gain unprecedented transparency into visitor behavior at the pod level, delivering highly detailed insights that foster meaningful connections and informed decision-making. This granular visibility enables directors to scrutinize visitor flows, identify irregularities, and gain a comprehensive comprehension of community patterns within their Azure Kubernetes Service (AKS) deployments. Through harnessing the power of eBPF-based data aggregation from the Linux kernel, Superior Community Observability provides real-time insights into visitor traffic, packet loss, and DNS performance metrics. Enhanced visibility enables community directors to rapidly identify and address potential issues, thereby maintaining optimal community efficiency and ensuring safety.
Cross node community circulation monitoring
With superior community observability, clients gain visibility into community flows across multiple nodes within their Kubernetes clusters. This feature enables precise tracking of packet flows, allowing for a deep understanding of sophisticated network behaviors and interactions among various nodes. The Hubble CLI empowers users to query community flows, allowing them to sift through and scrutinize specific visitor patterns with ease. This cross-node monitoring capability proves indispensable for troubleshooting community points, as it provides a comprehensive view of community flow within a unified dashboard, thereby facilitating the identification of dropped and forwarded packets across all nodes.
Actual-time efficiency monitoring
With Superior Community Observability, clients can tap into real-time insights for enhanced efficiency tracking. By leveraging Hubble metrics empowered by either Cilium or Retina, customers can track community visitors in real-time, identifying bottlenecks and optimization opportunities as they occur. This iterative feedback loop is crucial for maintaining peak performance, ensuring that any dip in community effectiveness is swiftly identified and resolved. The Hubble metrics and circulation logs offer comprehensive, granular insights into community operations, enabling proactive management and swift issue resolution through real-time monitoring and data-driven decision-making.
Multi-Cluster historic evaluation
Enhanced community observability is achieved by integrating Azure Managed Prometheus and Grafana, allowing for seamless monitoring across multiple clusters and providing valuable insights for strategic long-term planning and optimization of community management. By leveraging the power of stored and analyzed historical data across multiple clusters, directors can identify trends, patterns, and key milestones that will have a profound impact on community effectiveness and dependability moving forward. This historical perspective is crucial for informing capability planning, optimizing efficiency through effective benchmarking, and ensuring compliance with regulatory requirements in reporting. The ability to assess and analyse prior community knowledge enables a profound comprehension of how community efficiency has evolved over time, thereby providing valuable insights that inform strategic decisions regarding future community design and configuration options.
What’s driving your interest in superior container networking providers in Azure? Whether you’re seeking to enhance the connectivity and management of containers or leveraging the benefits of a cloud-native network architecture, understanding the capabilities of top-tier container networking solutions is crucial.
Azure offers a robust set of features and services designed to optimize the performance and scalability of containerized workloads. With features like Azure Container Networking (ACN), you can simplify the deployment and management of containers at scale, while enjoying seamless integration with other Azure services.
Moreover, by leveraging innovative technologies like Service Mesh and Ingress Controllers, you can streamline communication between microservices, ensure high availability and reliability, and secure your applications from unauthorized access.
To get started, let’s explore some key considerations when selecting a superior container networking provider in Azure:
What are the most critical requirements for your containerized application?
Explore the comprehensive documentation and examine its contents within your current clusters immediately.
Azure Kubernetes Service (AKS)
Automate container deployment and scaling on a managed Kubernetes platform with ease.
CSS is about styling containers. The internet’s very foundation lies in the intricate web of containers, stretching from the browser’s viewport to the individual components on a webpage, seamlessly interlocking and rendering the digital landscape we navigate daily. Occasionally, a novel feature emerges, compelling us to reexamine and refine our design approach.
Imagine having fun playing with rounded clip zones. Supply challenges to refine arrangements that avoid miscontent. Let’s reinvigorate our approach to harnessing the full potential of this space by exploring multiple innovative and unorthodox ways to utilize it.
The recent advancements in the net platform have significantly increased the challenges and demands on designing products. These innovative alternatives provide a welcome escape from the confines of our standard rectangles.
Let’s implement a window controls overlay for progressive web apps.
Are dissolving the boundaries between applications and websites. Bringing together the most exceptional elements from diverse realms. While they offer a steady, linkable, searchable, and responsive online presence similar to websites. With their ability to provide additional powerful features, operate independently of the internet, and seamlessly access information akin to native applications.
On design floors, Progressive Web Apps (PWAs) spark curiosity by posing the question: What if we merged the internet and native device interfaces? On desktop units, our minds are conditioned by a mental framework, which can be overwhelming when attempting to break free from its constraints. Greater than, specifically, is now informing us about the expected functionalities, making it arduous to deviate from this predetermined pattern?
At the end of the day, however, Progressive Web Apps (PWAs) on desktop are limited to the window in which they appear: a rectangular frame with a title bar at the top.
A typical desktop PWA app resembles.
While creating a Progressive Web App (PWA), as its creator, you have control over the title bar’s color through the Net Utility Manifest property, but this is largely limited to that single aspect.
What if we were to reimagine the concept of an outdoor space, redefining the notion of a field that truly reflects the app’s comprehensive scope? By doing so, we’ll gain a chance to elevate our apps’ visual appeal and create a seamless user experience that truly integrates with the operating system.
This provides exactly that. This Progressive Web App’s performance enables it to fully utilize the entire screen real estate, including the area typically occupied by the title bar.
The user interface design for the title bar and window controls requires careful consideration to ensure that they are intuitive, aesthetically pleasing, and functional.
The importance of understanding the title bar and window controls in computing lies in their ability to facilitate navigation and interaction with various applications. A typical title bar contains the application’s name, whereas the window controls typically comprise a combination lock, minimize, restore, and close icons. These controls enable users to manage open windows efficiently.
The title bar is the region displayed at the top of an app window, typically comprising the app’s title. Are the affordances, namely the buttons, that enable users to reduce, maximize, or close the app’s window, prominently displayed at the top?
Windows Controls Overlay eliminates the physical restriction imposed by title bars and window control regions. The feature allows for a seamless user experience by fully utilizing the top portion of the app’s window, thereby providing an overlay for the title bar and window management controls that seamlessly integrates with the application’s actual content.
If you’re studying this text on a desktop laptop, take a quick glance at the various applications installed. The likelihood is that they’re already doing something similar to this. The modern web browser you’re using to read this information likely consumes a considerable amount of screen real estate due to its tab-based interface.
Spotify displays album artwork across the entire width of the application window, leaving no empty space at its edges.
Microsoft Phrase leverages the available title bar space to showcase auto-save and search features, among others.
This characteristic’s primary objective is to enable users to effectively utilize the space with their personalized content, while also providing a means to accommodate window management buttons. The feature allows for seamless deployment of your expertise across various platforms, without compromising performance on browsers or devices that do not support Window Controls Overlay. Despite the challenges, Progressive Web Apps (PWAs) capitalise on offline support, allowing you to strengthen your app by leveraging this additional feature when available.
Let’s use the characteristic
Throughout the remainder of this exercise, we will delve into a demo application to explore the functionality in greater depth.
The demonstration application is simply referred to as ‘Dot’. This is an intuitive CSS playground where customers can craft designs using CSS and a solitary HTML component.
The app has two pages. List of Present CSS Designs Created by You
The second webpage enables you to craft and refine your CSS designs seamlessly.
With the addition of an easy net manifest and a simple repair feature for employees, we can now successfully deploy our application as a Progressive Web App (PWA) on desktop devices. On a Mac operating system,
And on Home windows:
The app’s initial webpage features a vacant white title bar that could be optimized for better user experience and efficiency. The design space could extend all the way to the edge of the app window, providing a seamless and immersive experience for users.
Let’s utilize the Window Controls Overlay feature to further enhance this.
Enabling Window Controls Overlay
The experimentation remains ongoing. To achieve this goal, it’s crucial to access it using one of the supported web browsers.
As of now, the technology has been successfully implemented in Chromium, resulting from a collaborative effort between Microsoft and Google. We will therefore use it in Chrome or Edge by navigating to the inner webpage and enabling the feature flag.
Utilizing Window Controls Overlay
To effectively utilize this distinctive feature, it is essential to incorporate a new entry within your network application’s manifest file.
{ "title": "1DIV: Mini CSS Playground", "description": "Explore and experiment with CSS in a compact environment", "lang": "en-US", "start_url": "/", "theme_color": "#FFFFFF", "background_color": "#FFFFFF", "display_override": ["window-controls-overlay"], "icons": [ ... ] }
The simplicity of its characteristics makes them readily accessible on the floor. To effect this fundamental transformation, we must implement a single key modification: hiding the title bar while concurrently migrating the window controls to an overlay.
Regardless of the device or browser used by customers, we aim to provide exceptional service. To fully utilize the title bar area in our design, some minor adjustments are necessary, which will involve adding CSS and JavaScript codes.
What does the app appear like currently?
The title bar’s disappearance has inadvertently masked our emblem, search subject, and buttons beneath the window controls, causing an awkward layout that begins at the top of the window.
On Windows, the experience is comparable, yet distinguished by the presence of the close, maximize, and minimize buttons on the right side, alongside the PWA control buttons.
The latest advancements in CSS include the introduction of novel surrounding variables that distinctly characterize.
By applying these CSS variables, you enable the placement of your content above where the title bar would be situated, while ensuring it doesn’t interfere with the window controls. Here’s how we’ll incorporate those variables into the header: We’ll employ two key variables to effectively position our header, consisting of the brand, a search bar, and a prominent call-to-action (CTA) button.
The The variable `left` provides the gap between the left edge of the viewport and the position where the title bar would appear, while `width` specifies its width. While not equivalent to the full viewport width, the title bar’s dimensions specifically refer to the non-extended area above the window controls.
By taking this approach, we guarantee that our content remains consistently visible. We’re also defining fallback values – the second parameter in the `perform` function – for scenarios where variables are often undefined, such as on non-supporting browsers or when Windows Management Overlay functionality is disabled.
With our header now adaptable to its surroundings, the addition of window management buttons no longer feels like an afterthought. The application presents itself with a distinctly local flavour.
What about altering the window control’s background colour to blend seamlessly with its surroundings?
Let’s dive deeper into our CSS playground editor?
Not nice. While our CSS demo space extends seamlessly to its maximum capacity as intended, a notable anomaly persists: the window controls appear as stark white rectangles overlaying the design, creating an unsettling visual dissonance.
Let’s adjust the application’s colour scheme. There exist various approaches to structuring your ideas effectively.
PWA developers can specify a theme coloration in their app’s net manifest file by using the `theme_color` manifest member. The resulting coloration is subsequently leveraged by the operating system in various ways. On desktop platforms, AccentColor is typically used to provide a subtle background tint to both the title bar and window controls, enhancing overall visual consistency.
Websites can leverage these strategies to great effect. The CSS property is used by browsers to customize the color of the user interface (UI) elements across a website. For progressive web apps (PWAs), this coloration can potentially supersede the manifest.
By setting the manifest to a white background, we can provide the correct default colour scheme for our application. When the app is launched, the operating system learns the specified colour palette and applies it to make the window’s control background a crisp white. This color scheme works well for our primary website’s list of demos.
The metadata tag may be dynamically updated in real-time by employing JavaScript. We can attempt to override the default white background with a suitable demo background color whenever a new window is opened.
Here is the improved text in a different style as a professional editor:
By incorporating coloration and CSS transitions, we can seamlessly transition from the checklist webpage to the demo webpage, ensuring a cohesive visual flow that integrates well with the remaining app interface.
Dragging the window
Eliminating the title bar altogether has a significant accessibility consequence: it becomes more challenging to navigate the application window around.
The title bar provides ample room for customers to click and drag; conversely, leveraging the Window Controls Overlay feature confines the clickable area to the region of the management buttons, necessitating precise targeting to navigate the window.
Fortunately, this can be accomplished using CSS, thanks to its flexibility and the `property` attribute. Currently, this property is only compatible with Chromium-based browsers and requires a vendor prefix.
To transform any component within the app into a draggable target for the window, simply utilize the following:
It is often possible to explicitly make a component non-draggable.
-
These options could be beneficial for our consideration. To ensure seamless functionality, we’ll render the entire header a draggable entity while keeping the search subject and button within it non-interactive for normal usage purposes.
Despite the absence of a visible header on the editor webpage, users are unable to resize the window while editing code due to this design limitation? Let’s employ a distinctive technique instead. We will add another element preceding our header, fully positioned, and dedicated to resizing the window.
We’re configuring the draggable space to occupy the entire viewport width, while utilizing the `variable` to establish its height equivalent to that of a typical title bar. As demonstrated below, our draggable space harmonizes seamlessly with the window management buttons.
To guarantee that our search subject and button remain functional throughout.
Customers are able to click on and drag the location where the title bar previously resided. We’re committed to maintaining a familiar and intuitive space for our customers to navigate their desktop windows, ensuring a seamless experience that meets their expectations.
Adapting to window resize
It could be beneficial for an application to track when the window controls overlay is visible or not, as well as monitor its dimensional changes. If the individual designs the window extremely narrow, there might not be ample space to accommodate the search subject, icon, and button comfortably; in this scenario, we would likely need to adjust their position downward slightly.
The Window Controls Overlay feature comes equipped with a JavaScript API that allows us to utilize its capabilities.
Three pressing concerns arise from the API’s functionality.
Whether the overlay is visible to users remains uncertain, despite its touted ability to enhance navigation and engagement on mobile devices.
The title bar space is typically located at the top of a window or frame, occupying the space above the menu bar and below the window’s border. Its dimensions vary depending on the operating system, display settings, and application being used.
Dimensions or visibility adjustments will notify us whenever they take place.
Let’s adjust the title bar space dimensions and shift the header downwards if it appears too narrow.
When the title bar width falls below 250 pixels, we automatically set the class on the app’s instance accordingly. While we may consider alternatives to an API, leveraging this technology offers distinct advantages for our specific application.
When a characteristic is both supported and utilized, this particular element is solely activated; no adjustments to the design are required in such instances.
Throughout our development process, we accurately obtain the dimensions of the title bar space, which proves beneficial considering the distinct differences in window control dimensions between Mac and Windows operating systems. While utilizing a media inquiry may not directly reveal the exact amount of space available,
By employing this CSS code, we can successfully relocate our header downward to maintain a safe distance from the window management buttons when the window is excessively narrow, subsequently readjusting the thumbnails accordingly.
Thrilling Design Alternatives: Thirty Pixel-Precise Options to Elevate Your Visual Experience
By leveraging the Window Controls Overlay feature, we were able to transform our simple demo app into a more native-feeling experience on desktop devices. What sets this company apart from others is its ability to transcend traditional boundaries, providing bespoke solutions tailored specifically to each client’s needs.
In reality, this feature offers a mere 30 pixels of extra space, accompanied by difficulties in navigating the window controls effectively. However, potential obstacles in this space and among individuals could be transformed into captivating design opportunities.
New units of diverse shapes and forms are constantly being developed, with the internet continuously adapting to accommodate their integration. New features have been introduced on the net platform, enabling net authors like ourselves to seamlessly integrate and connect numerous elements in a more cohesive manner. As technology advances, from timepieces and foldable devices to desktop computers, we must adapt our design approach to the evolving internet landscape. Surrounded by the vast expanse of the open field, we find ourselves constructing something new for the digital realm.
So let’s embrace this. Let’s leverage existing applied sciences and pioneer novel approaches to deliver bespoke experiences for every unit, seamlessly integrated within a unified codebase.
If you encounter the chance to test the Window Controls Overlay feature and have thoughts on it, you’re able to share your insights. As the development of this feature is still in its infancy, your contribution can significantly enhance its potential. Or, you might consider exploring that and its numerous.
The primary objective of robotics research has long been to develop versatile robots capable of performing tasks on behalf of humans. While natural language holds promise as a user-friendly means of specifying tasks, it proves challenging to train robots to accurately follow linguistic instructions. While approaches such as language-conditioned behavioral cloning (LCBC) enable the immediate imitation of professional actions based on language inputs, they rely heavily on annotated coaching trajectories and struggle with generalization across diverse scenes and behaviors. While goal-conditioned methods excel in fundamental manipulation tasks, they still fall short in accommodating straightforward task definitions for human operators. Can we strike a balance between streamlining task assignments through LCBC-inspired methods and leveraging goal-conditioned learning’s productivity gains?
Agricultural drones take to the skies: Swarming innovation on Drone Radio’s show. Arthur Erickson, CEO and Founder of [Company Name], joins host Randy Goers to discuss his organization’s work, the FAA exemption for agricultural drone swarms, and the potential impact on the drone industry as a whole?
Arthur Erickson serves as the Chief Executive Officer and Founder of Hylio Drones, a pioneering organization that specializes in developing and offering cutting-edge drone technologies designed to streamline precision agriculture treatments through automation. Hylio is a U.S.-owned and operated company that manufactures its drones domestically, utilizing both American-sourced components and materials from around the world to ensure high-quality products. With the expertise of Hylio, farmers and producers can leverage crop therapies to revitalize underperforming regions, ultimately boosting yields by targeting pest-related issues and nutrient deficiencies with precision and effectiveness.
Twelve months ago, Hylio secured its first FAA exemption for a groundbreaking innovation: swarms of drones weighing over 55 pounds to fly over agricultural lands. The exemption permits the company to operate up to three such heavy-lift UAVs simultaneously, accompanied by a single pilot and no visible observer on site. The drones will employ AI-powered monitoring systems to track crop health, planting seeds and executing spray functions for fertilizers, pesticides, and other applications seamlessly. This milestone sets a crucial precedent for the burgeoning UAS industry, paving the way for other operators to seek and obtain similar approvals.
Arthur earned his degree in Aerospace Engineering from The University of Texas at Austin. During his tenure as a UAS researcher at UT, he co-founded Hylio in 2015 with a team of fellow college students, marking the inception of this innovative venture. Arthur has guided Hylio through its formative stages to its current success, with the company’s innovative methods now owned and operated by numerous farmers and applicators across the United States and globally.
As Editor-in-Chief of DRONELIFE and CEO of JobForDrones, Miriam McNabb is a respected authority on the drone industry, with in-depth knowledge of the market and regulations governing its development. With a prolific output of over 3,000 articles focused on the business drone sector, Miriam has established herself as a renowned expert and prominent speaker within the industry. With a degree from the University of Chicago, Miriam boasts over two decades of experience in high-tech sales and marketing, specializing in innovative technologies. For specialized drone trade consulting or expertly crafted writing services,
Fitzpatrick highlighted the accelerating convergence of synthetic intelligence with educational curricula. Artificial intelligence applied sciences offer innovative solutions to enhance learning outcomes, tailor education to individual needs, and optimize operational efficiency.
One significant advantage highlighted was AI’s ability to provide tailored learning experiences that catered to individual students’ needs. AI’s capacity to process vast amounts of information enables it to tailor tutorial content and pedagogy to the unique needs and inclinations of individual learners? This bespoke approach has the capacity to significantly boost scholar participation and academic performance.
AI empowers educators and administrators to make informed decisions by providing actionable insights into student performance, learning patterns, and areas for growth. This data-driven approach enables educators to develop effective instructional techniques and targeted interventions, ultimately streamlining the learning process.
While acknowledging the benefits of AI integration, Fitzpatrick also emphasized the hurdles involved in successfully implementing AI in education. Privacy concerns, ethical dilemmas, and the persistent digital disparity pose significant hurdles to ensuring inclusive access and protecting student data.
What’s crucially important is that educators undergo comprehensive professional development to effectively leverage AI tools and technologies, thereby empowering them to capitalise on these innovations in education. Educators require access to coaching applications and reliable sources of information to effectively harness the power of AI and stay abreast of innovative instructional methodologies.
Fitzpatrick stresses the imperative convergence of educators, policymakers, and innovation architects to chart a course for AI’s transformative impact on education. Through collaborative efforts, stakeholders can overcome obstacles, exchange expertise, and cultivate creativity to develop an even more inclusive and effective learning environment.
As the keynote drew to a close, Dan Fitzpatrick emphasized the profound impact AI could have on education, while also acknowledging the need to confront obstacles and nurture partnerships. By thoughtfully integrating AI into educational practices, educators can unlock its potential to enhance learning outcomes and equip students with the skills necessary to tackle the complexities of an increasingly technology-driven future.
Discover More About It Here:
As AI continues to transform education, educators must be equipped with the skills and knowledge necessary to effectively integrate these tools into their teaching practices.
Starting a pest management firm can be a highly profitable venture, as the consistent demand for pest control services ensures a steady stream of customers. According to reports in The New York Times, most homeowners have dealt with a pest or bug infestation, highlighting the ubiquity of pest-related issues. If you’re considering launching a pest management startup, consider these key strategies to get started.
Supply: Pexels
1. Conduct Thorough Market Analysis
Conducting a comprehensive market analysis is crucial before venturing into the pest management industry. Identifying the specific pest challenges affecting your environment enables targeted solutions that effectively address your unique needs. If consumer surveys like those conducted by ConsumerAffairs consistently rank ants as the most pressing pest concern in your region, you could capitalize on this trend by offering specialized ant control services tailored to meet the unique needs of local customers. Identify and scrutinize market leaders, innovators, and niche players to pinpoint unmet needs and opportunities that your entity can capitalize on to differentiate itself and gain a competitive edge.
2. Are you seeking to obtain mandatory licenses and certifications for a specific profession?
Pest management is a heavily regulated industry, where operating without the requisite licenses and certifications can lead to serious authorized issues and financial penalties. Prior to commencing operations, thoroughly investigate and comply with all applicable licensing requirements specific to your jurisdiction. Obtaining certifications from reputable entities like the National Pest Management Association (NPMA) can significantly enhance your professional reputation and attract more clients to your pest control startup, thereby boosting business prospects.
3. Develop a Complete Enterprise Plan
According to a recent survey conducted by ConsumerAffairs, humans are not the only ones who have learned to adapt and thrive in the face of uncertainty – so have spiders and roaches. To successfully eliminate ants and grow a thriving business, a thoughtfully designed marketing strategy is essential for startups. Your comprehensive business plan should clearly outline enterprise objectives, target market, services provided, pricing strategy, and a well-defined marketing approach. A comprehensive financial plan will illuminate a path to profitability by meticulously outlining startup costs, operational expenses, and projected revenue streams.
* Sales Revenue: $500,000/month (year 1), growing to $750,000/month (year 2) and $1,000,000/month (year 3) * Subscription Revenue: $100,000/month (year 1), growing to $200,000/month (year 2) and $300,000/month (year 3) * Grants and Funding: $50,000/month (year 1), declining to $20,000/month (year 2) and $10,000/month (year 3)
Total Monthly Revenue: $650,000 A transparent marketing strategy will inform your decision-making process and enable you to secure funding, if needed.
4. Invest in premium tools and products that deliver exceptional value.
Effective pest control services rely heavily on utilizing top-grade equipment and branded products. Invest in reliable equipment such as sprayers, traps, and protective gear that can withstand the rigors of regular use. Additionally, opt for environmentally friendly and secure pest control products that cater to eco-minded consumers. By providing effective and secure treatment options, you’ll establish trust with your clients and foster a loyal customer base that’s likely to return for future services?
5. Construct a Sturdy On-line Presence
As we navigate today’s digitally driven world, maintaining a strong online presence is crucial for drawing in potential clients and staying ahead of the competition. Develop a comprehensive online platform that effectively highlights our diverse array of services, proudly presents the heartfelt testimonials from satisfied clients, and readily provides multiple avenues for seamless communication. Leverage cutting-edge Search Engine Optimization techniques to dramatically increase your website’s online presence and drive targeted traffic from top search engines like Google. Engage with customers on social media channels to foster meaningful connections and showcase the value of your suppliers. Regularly publishing fresh online content featuring pest management tips and compelling success stories can establish you as a trusted industry authority.
6. Supply Wonderful Buyer Service
Building a loyal customer base requires offering exceptional customer support, a crucial component for any pest management startup. Promptly respond to customer inquiries, clearly outline provider profiles and pricing structures, and maintain open communication channels by following up with clients post-treatment to ensure their overall satisfaction is met. Offering comprehensive guarantees and complimentary follow-up visits can effectively differentiate you from competitors, fostering trust and loyalty among customers.
7. Implement an Efficient Advertising Technique
Effective advertising and marketing strategies are essential for successfully drawing in and keeping customers. Maximize your brand’s visibility by leveraging a strategic blend of online and offline advertising and marketing initiatives, thereby captivating a broader audience. Internet marketing, akin to Google Ads and social media initiatives, effectively drives website traffic to your online presence. Offline marketing strategies, such as distributing printed materials like flyers, leveraging local connections through company partnerships, and incentivizing referrals with discounts, are effective ways to drive lead generation. By showcasing your expertise in effectively managing pervasive infestations such as ant, spider, and cockroach invasions, you can amplify the impact of your promotional initiatives?
8. Staying ahead of the curve in trade trends requires continuous education and awareness.
The pest management industry is perpetually undergoing transformation, driven by the emergence of innovative tactics and products. Stay abreast of the latest business trends by attending conferences, joining professional organizations, and participating in training programs. Maintaining a strong grasp on your skills and expertise enables you to deliver exceptional value to clients, ultimately propelling you ahead of the competition and solidifying a competitive edge.
Establishing a personalized pest control company demands meticulous preparation, financial investment, and perseverance, as exemplified by hotels’ persistent battle against annual mattress bug infestations, underscoring the enduring need for expert pest management services? To establish a lucrative and successful pest control business, thoroughly analyze the market, secure necessary licenses, develop a robust marketing strategy, invest in premium equipment, build a robust online presence, deliver exceptional customer service, leverage effective advertising and marketing tactics, and stay abreast of industry trends. As a constant concern for homeowners and businesses alike, the expertise of your pest management startup will always be in high demand, ensuring a consistent flow of customers and opportunities for growth.
Before embarking on an adventure through the bayou, it’s essential to consider a few key points to guarantee a successful experience of Disney World’s newest and most exhilarating attraction, the Magic Kingdom. Unlike traditional “rise and shine” queues, this new system won’t feature a standard morning rush. Instead, guests will need to access a digital queue via the MyDisneyExperience app (with a second chance later in the day) or opt for the pay-as-you-go Genie+ option, which was introduced just in time for the highly sought-after experience’s debut.
A Florida family sues NASA over alleged space debris damage to their home.
When Does open?
Disney’s Orlando theme park officially opens its highly anticipated alternative to the previous with a property that fans have been eagerly awaiting. As the universe continues to expand, fans of Tiana’s escapades embark on a thrilling journey through an immersive, water-themed experience inspired by the timeless magic of Disney World’s beloved Splash Mountain attraction. Previews of Disney’s latest animated masterpiece have been generating significant buzz on social media, with fans raving about the film’s impressive animatronics, memorable characters, and catchy soundtrack. The excitement is palpable as viewers eagerly anticipate the release of this highly anticipated movie, which boasts a talented voice cast, including Anika Noni Rose, who lends her vocals to the film’s stunning finale song? When planning your Disney World trip for the summer, don’t miss out on a refreshing water experience while also previewing Princess Tiana’s enchanting storyline before its Disney+ animated series debut.
Picture: Sabina Graves/Gizmodo
Find out how to Experience
To fully optimize your Disney adventure, make sure to download the MyDisneyExperience app beforehand to enjoy the convenience of planning and accessing park experiences without additional fees beyond standard park admission. Ensure that total ticket quantities for each event are stored under the journey planner’s profile, assigning the most tech-savvy individual in your group to handle this task – although multiple people can attempt to book simultaneously using the Digital Queue, just ensure that they select all occasion participants within their boarding group lottery.
Walt Disney World’s Digital Queue allows access twice daily, commencing promptly at 7:00 a.m., from anywhere on property, followed by a second opportunity at 1:00 p.m. Note that Magic Kingdom currently only features digital boarding groups, necessitating guests to make a choice between two options. If you wish to accomplish something in the morning, you may aim to achieve it; however, if you don’t succeed, you can always try again at 1 p.m. to rescue the free-boarding group crossing for the last time (though uncertain) or (equally uncertainly). Noting the requirement that events within Magic Kingdom must take place by 1 p.m. and that only one boarding group can be maintained daily during the park’s operating hours.
While it can be challenging, there’s another option to guarantee access to exclusive experiences, such as those limited to the Digital Queue, without worrying about long standby lines currently available.
Introducing the latest innovation in nighttime entertainment at Walt Disney World – Lightning Lane! This revolutionary feature transforms the traditional FastPass system into a convenient and flexible way to experience your favorite attractions.
Genie+ is gone! Poof! Under a revamped model, Disney Experiences has rebranded its pay-per-use offering simply as Lightning Lane, effectively streamlining the process and bidding farewell to the once-popular free FastPass functionality. Since its transformation into a paid perk at both Disney World and Disneyland, the feature has undergone several name changes; from now on, it will primarily be known as Lightning Lane, comprising a multi-ride package called Lightning Lane Multi Go (offering three attractions) or Lightning Lane Single Go for individual use.
Purchasing a Lightning Lane Multi-Park option enables you to select up to three Lightning Lane experiences within a theme park. Are you staying at a Disney lodge or a participating neighbor hotel? You’ll be able to access this up to seven days prior to your trip to make selections, and you’ll also have the opportunity to select available times as you make your experience choices. If you’re buying a MultiGo the same day as your departure, your choices may vary depending on availability.
Three experience picks will emerge from three distinct ranges: one from thrill rides boasting exceptional queues similar to those found at a highly anticipated new E-ticket attraction; and two from experiences experiencing decreased demand stages, such as classic attractions that have stood the test of time. ). The price of a Lightning Lane Multi-Pass will vary depending on the time of year, scaling from peak trip days to the off-season.
If you want to secure a single spot in the Lightning Lane for one highly sought-after ride or attraction, similar rules apply regarding reservations, but keep in mind that day-of availability will vary and you can only buy up to two single Lightning Lane slots per event.
As the sun reaches its peak on Day 1’s afternoon at Walt Disney World, the options appear limitless.
Picture: Sabina Graves/Gizmodo
Don’t miss out by not staying informed and failing to plan your Disney World trip accordingly. Will you deliberately pass up the opportunity to explore Disneyland’s magic this year, opting instead for a potentially earlier opening on the West Coast at Walt Disney’s iconic theme park in Anaheim, California?
Nashville’s rich musical heritage attracts HBCU students seeking career direction in the music industry.
Launched in collaboration with Apple via its Racial Fairness and Justice Initiative, the yearlong PROPEL Middle Arts & Leisure Trade Accelerator is designed to bolster range all through the business
Empathy and storytelling. Motivational and strategic management. These are only a handful of the qualities members on this yr’s PROPEL Middle Arts & Leisure Trade Accelerator recognized of their “What’s Your Superpower?” course, designed to empower college students to uncover and embrace their genuine selves all through their careers.
As a child myself?
As she reflects on her journey, Liza Montgomery, a 2024 mass communications graduate from Xavier University of Louisiana, reveals that looking out for her younger siblings and cousins has always driven her to make a positive impact in their lives, setting them up for success. More than 100 college students from Historically Black Colleges and Universities (HBCUs), including Montgomery, were selected to participate in the PROPEL artistic arts accelerator program.
Aspiring professionals in higher education are exploring various strategies to prepare themselves for the workforce, with discovering their unique strengths and abilities being just one potential pathway. Since February, scholars have successfully completed micro-credential programs through the PROPEL Teach app, engaged in digital professional panels with industry experts at Apple, and participated in resume-building workshops to develop their portfolios and prepare for career paths.
This past summer, a group of 51 individuals, including Montgomery, was selected from among 19 Historically Black Colleges and Universities (HBCUs) to participate in a 10-day intensive program on the campuses of Tennessee State University in Nashville and Clark Atlanta University in Atlanta. With the acquisition of mentorship from experienced professionals at Historically Black Colleges and Universities (HBCUs) in both artistic and governmental spheres, they collaborated closely alongside experts at Apple Music’s Nashville office.
The Accelerator, in partnership with the Propel Middle, was unveiled with $25 million in funding from Apple’s Racial Equity and Justice Initiative, aimed at dismantling systemic barriers and combating injustices faced by communities of colour. The curriculum was crafted to provide innovative entry points for historically black colleges and universities’ (HBCU) students into careers within notoriously competitive industries.
“Topic-matter experts are everything along the way,” says Dr. Lisa Herring, President of PROPEL Middle. “What’s more impactful than having students interact with experienced professionals as they strive to become one themselves, gaining invaluable insights and learning from their successes and challenges?” “For Apple, it’s not just about being a companion, but about being an integral part of the learning process – sitting on the desk, moving from the desk, and seamlessly integrating into the subject matter alongside students and educators, demonstrating unparalleled commitment to the smallest details.”
The Propel Middle is a pioneering global innovation and learning centre exclusively dedicated to Historically Black Colleges and Universities (HBCUs). To equip future generations of leaders, PROPEL offers comprehensive educational programming and professional development opportunities across a diverse range of disciplines, including artificial intelligence, agricultural technologies, social justice, entertainment, mobile application development, augmented reality, design, and the creative arts. Apple consultants help design curricula and provide continuous guidance through mentorship and internship opportunities.
“When we launched our Racial Fairness and Justice Initiative four years ago, our transparent mission was clear: to drive progress towards fairness and expand opportunities for under-resourced communities,” says Lisa Jackson, Apple’s Vice President of Environment, Policy, and Social Initiatives. These persistent and systemic challenges demand collective action; we’re committed to collaborating with our partners at PROPEL Middle to bridge existing gaps and drive meaningful transformation. Our partnership with PROPEL aims to equip talented college students with the skills, resources, and opportunities necessary for them to become business leaders, regardless of their career paths in arts and entertainment, technology, or beyond.
In Nashville, college students visited the Nationwide Museum of African American Music for a fireplace chat with Ebro Darden, Apple Music’s international editorial head of Hip Hop and R&B; obtained hands-on with specialists of their fields on the Apple Music Nashville workplace and Common Music Group’s East Iris Studios; and took part in an expertise with the Apple Downtown Nashville retailer.
The Accelerator members, comprised of 10 individuals, went beyond their assigned tasks by actively engaging with this year’s theme, “Propelling Preservation.” Through their collaborative efforts, they highlighted the pivotal role Black creatives have played in driving social progress and shed light on how their collective impact can spark a new era that perpetuates HBCU culture for future generations.
“‘Propelling preservation’ is about giving a voice to those who have previously been unheard,” Montgomery explains. What I’ve been striving to achieve through my art is to amplify the silenced voices and marginalized experiences that have been overlooked for far too long. It’s crucial to authenticate the stories of people of colour in their authentic, radiant forms.
“A variety of instances, when folks suppose Black social justice motion, they suppose unfavorable,” provides Emmanuel Strickland, a Tennessee State College pupil and rising R&B singer who’s certainly one of Montgomery’s teammates. We’re attempting to reframe our approach into a more positive and solution-focused mindset.
We’re tackling the theme of HBCU love and the everyday experiences that define college life, particularly among students who form strong bonds as a cohesive unit. At an HBCU, regardless of the specific institution, students cultivate a unique sense of camaraderie that transcends individual experiences.
Each workforce was assigned a unique style and challenged to produce a music single, assemble an advertising and marketing strategy, create a visual campaign using only an iPhone, and then present their concept to a panel of experienced business professionals who served as judges.
As a professional musician, Montgomery crafted a comprehensive advertising and marketing strategy and created the striking quilt art for her band’s song. With the seamless integration of Apple Pencil and the Procreate app on her iPad Professional, she relished the app’s intuitive pace and versatility in providing a wide range of creative tools.
“With its unique ability to mimic the texture and depth of traditional media, I find that Procreate on my iPad, paired with the Apple Pencil, excels at recreating historically drawn artwork pieces – it’s a game-changer due in large part to the fact that it’s not just a two-dimensional representation.” The technology has the ability to identify dimensions, textures, reflective surfaces, and animated features. Utilizing Procreate enables an almost boundless scope of possibilities for digital artworks.
Growing up, Strickland, aka “Mille Manny,” found himself immersed in a world of sound. The air inside his home vibrated with the harmonious fusion of his mother and sisters’ voices as they sang along to iconic hits by Mariah Carey, Selena, and the incomparable Beyoncé. “With roots in Memphis, it’s as if soul is inherent to your DNA,” he notes.
As Strickland’s professional success grows, he constantly ponders the next step in crafting a new song. Whenever creative sparks fly, he swiftly jots down song details – lyrics and harmonies – into the Voice Memos app on his cutting-edge iPhone 13 Pro Max. At home, his MacBook and Neumann microphone operate as a mini studio, allowing him to produce tracks using Professional Instruments.
Collaborating throughout the accelerator, Strickland, Montgomery, and their teammates worked closely with Recent Ayr, a multi-talented artist, producer, musician, and songwriter, who provided the beat for their track. They also collaborated with the audio engineering team at UMG East Iris Studios to create their song using Logic Pro. This stage offers scholars a multitude of benefits, with enhanced entry and visibility being just one significant advantage of this innovative system.
“For me, the most pivotal moment of realization was grasping that what truly matters isn’t what’s visible on the surface, but rather what lies beneath,” says Strickland. What’s happening beneath the surface becomes apparent as the accelerator takes you on a guided tour, revealing the intricacies of its operation. It’s becoming clear that it’s more than just a handful of individuals who might seem to be causing problems.
The PROPEL program excels at providing historically black colleges and universities’ (HBCU) students with a prominent platform to showcase their unique identities and experiences. “We’re afforded the opportunity to self-identify artistically, cultivate meaningful connections, and engage in authentic dialogue with industry leaders who embody the professional aspirations we strive for throughout our careers.”
Aspiring entrepreneurs, musicians, accountants, and lawyers alike found immense value in navigating the accelerator’s journey through Nashville, where they gained a crucial head start in their professional development. Scholars engaged in candid discussions to gain insight into the inner workings of the industry, delved deeper into areas with the most untapped potential for innovation, and drew valuable lessons from the personal experiences of renowned artists like Kirk Franklin, a gospel musician who had to navigate the traditionally exclusive business on his own.
“A diverse group of scholars is comprised of individuals hailing from various academic disciplines and backgrounds,” remarks Sylvester Polk, a music engineering mentor within the accelerator program, where he also instructs music expertise at Bethune-Cookman College, an HBCU located in Daytona Beach, Florida. Some of these secrets have already been discovered, while others remain unknown. The vast array of disciplines and specialties across diverse sectors presents a multitude of opportunities for individuals with unique skill sets. The accelerator programme has provided scholars with a comprehensive grasp of how businesses operate, and by extension, PROPEL offers an opportunity to apply theoretical knowledge in a real-world setting.
This technology permits us to gain access to and physically be present within the room. It enables us to have our voices heard. According to Strickland, this allows businesses to genuinely connect with individuals already operating within their desired industry. Students will have opportunities to participate in internships as a direct result of this program. Apprenticeships will emerge from this initiative. As people form genuine relationships, they will cultivate, nourish, and potentially even create a tangible sense of momentum through shared experiences.


 Serves as a Senior Analytics Options Architect at Amazon Web Services (AWS). She is fervently dedicated to delivering tailored cloud-based analytics solutions that empower clients to uncover the root causes of their business challenges. Outside of work, she enjoys traveling and spending quality time with her loved ones.
 Serves as an Analytics Specialist and Options Architect at Amazon Web Services (AWS). With expertise in Amazon Redshift, he assists clients in building scalable analytical solutions. With over 16 years of experience in various database and information warehousing technologies. He has an unwavering dedication to streamlining and resolving customer concerns regarding cloud-based products.
 Serving as a seasoned Senior Redshift Specialist and Options Architect at AWS, this expert leverages extensive information warehousing experience to navigate and optimize vast datasets, effortlessly managing petabytes of information. Prior to joining AWS, he developed data warehousing solutions at Amazon.com and Amazon Services. With a specialty in Amazon Redshift, he assists clients in developing scalable analytics solutions.
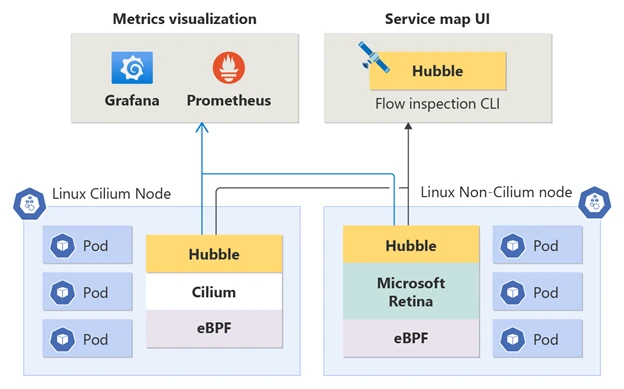


 As the keynote drew to a close, Dan Fitzpatrick emphasized the profound impact AI could have on education, while also acknowledging the need to confront obstacles and nurture partnerships. By thoughtfully integrating AI into educational practices, educators can unlock its potential to enhance learning outcomes and equip students with the skills necessary to tackle the complexities of an increasingly technology-driven future.


