
Musicians have long grappled with the frustration of wasted time spent crafting and the unrelenting struggle to overcome creative roadblocks.
As an artist, I’m all too familiar with the frustration of encountering creative roadblocks. What if an instrument could seamlessly transform your ideas into refined tunes, freeing you from those frustrating creative roadblocks?
I recently came across an AI-powered app that seamlessly integrates. With Udio, you’ll be able to zero in on your creative vision and surmount artistic hurdles with greater ease.
Here’s an improvement in a different style:
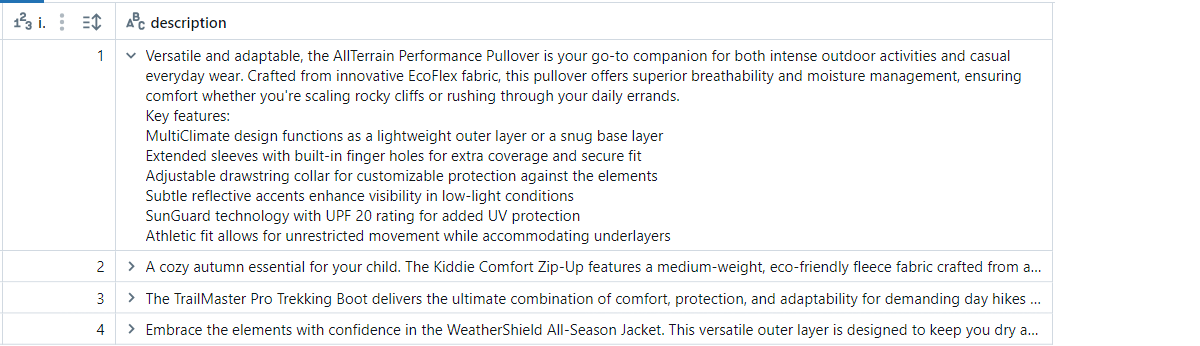
This Udio evaluation delves into both the strengths and weaknesses of the platform, providing insight into what it offers, who it suits best, and its core features. Here’s a song about why the rent is just too damn high, folks, alright.
Fairly spectacular, proper? It’s astonishing that AI was capable of creating such a comprehensive melody! This music appears to be a meticulously crafted piece, showcasing the artistic precision of its creator. I will additionally introduce you to learning how to utilize AI tools such as Udio to edit your song.
As I conclude this article, I will analyze Udio against my top three alternatives: Audible, Spotify, and Scribd. Let’s take a closer look at Udio to determine whether it’s the right fit for your needs.
Verdict
excelles at crafting genuine content with cutting-edge AI tools and innovative instrumentation. Despite potential drawbacks from screen size constraints, the product’s appeal may still be affected.
Execs and Cons
- With Uido’s innovative technology, you can craft authentic songs that seamlessly integrate your preferred vocal styles and instrument effects, all generated from textual content prompts across various genres.
- AI-powered tools for instrument extension, image inpainting, and audio remixing.
- Developed in collaboration with former Google DeepMind engineers, this innovative tool boasts a user-centric design and cutting-edge technology.
- The free plan offers a generous allocation of ten daily credits, along with access to core features, the ability to generate up to two concurrent iterations, and remixing capabilities.
- With its cutting-edge AI technology, Udio generates high-caliber music that resonates emotionally with listeners, allowing them to connect on a deeper level.
- The export function allows for the initiative to be exported in various codecs, including MP3, WAV, and Stems, catering to a diverse range of languages.
- A Udio group where customers can share their experiences, suggestions, and creative works.
- Concerns surround Udio’s handling of copyrighted material and its utilization of coaching expertise.
- The strict two-minute time constraint restricts the development of elaborate melodies, stifling creativity and innovation in music composition.
- Fails to incorporate essential tools for ensuring collaborative success.
What’s Udio AI?
Is a revolutionary AI music generator that empowers anyone to craft customised music simply by defining what they envision. Whether it’s a unique theme or a distinct genre, Udio brings textual prompts to life with expertly crafted professional tracks.
Audio aims to democratize music creation, making high-quality production accessible to both seasoned musicians and newcomers alike. Professional musicians leverage Udio’s tools to elevate their craft, while hobbyists can transform their ideas into polished tracks with minimal musical proficiency or technological savvy. With Uideo’s cutting-edge tools, you can effortlessly integrate them into your production pipeline, effortlessly crafting genuine tracks, or breathing new life into existing ones through seamless remixing and restoration processes.
Founded by a team of renowned AI experts from Google DeepMind, including David Ding, Andrew Sanchez, Conor Durkan, Yaroslav Ganin, and Charlie Nash, Udio partners with the most innovative musicians in the industry to revolutionize the way we experience music. Noted musicians and producers such as will.i.am, Frequent, and Tay Keith support the platform.
With Udio, even the most ordinary idea can be transformed into a polished, professionally crafted audio masterpiece capable of captivating global audiences.
Who’s Udio Greatest For?
With its versatility and creative possibilities, the audio studio has become an indispensable tool for individuals from all walks of life, including college students looking to explore new musical horizons and songwriters seeking inspiration to overcome creative blocks.
- Like YouTubers, creators can leverage Udio’s vast library of background music for their initiatives, eliminating the need to spend hours searching for royalty-free options. The ability to quickly produce tailored audio content significantly reduces costs and boosts efficiency when compared to commissioning voice artists or acquiring music licenses.
- Can utilize Udio to craft bespoke audio experiences for displays, initiatives, and e-learning materials, meticulously crafting a sonic landscape that perfectly aligns with clients’ unique specifications. With their adaptable instruments, U dio’s musicians are able to pinpoint specific genres that seamlessly match the desired tone and sophistication.
- Can seamlessly utilize Udio’s extensive library of royalty-free music tracks to craft exceptional background scores for their promotional videos and coaching resources? Its versatility stems from the vast array of voices and languages available, making it an ideal solution for a wide range of enterprise needs.
- Writers and publishers leverage Udio’s innovative technology to craft bespoke audiobook soundtracks, elevating the listener’s experience by seamlessly integrating music that harmonizes with the narrative’s tone and genre. They will also craft engaging background music for promotional content, producing captivating e-book trailers to further amplify their appeal.
- Musicians can utilize Udio as a source of short-form inspiration. Artists will further enrich their scores by elaborating on melodies, reharmonizing chord progressions, or adding specific textures without modifying the underlying structure.
- With Udio, music enthusiasts and emerging artists can explore the art of music-making without needing extensive musical knowledge or equipment. Discovering the art of songwriting and creating captivating background music is a wonderful pursuit.
- Individuals curious about exploring AI-generated art or seeking a creative outlet for fun can benefit from experimenting with Udio’s innovative music creation features.
Udio Key Options
This cutting-edge AI music generator boasts a suite of highly advanced tools that enable seamless customization, modification, extension, and remixing of tracks.
- AI Music Creation from Textual Content: Udio revolutionizes the process of transforming simple text prompts into high-quality, professionally produced music akin to what you’d hear in a state-of-the-art recording studio. Udio’s algorithmic creativity needs a sonic spark – can you give me a vibe and I’ll get the virtual orchestra warming up? The software will create every element of a song, from the melody’s title to the instrumentation and singing styles.
- Effortlessly extend, reinvigorate, or fill gaps in audio files with our intuitive track editors. These instruments enable you to introduce novel musical segments without modifying the original composition. Can you transform your favorite song by rearranging its melody? With Udio’s AI instruments, editing and enhancing your music is remarkably straightforward, making it accessible to anyone.
- Customized Cowl Artwork: Udio’s AI-powered technology creates unique visual representations of your music, ensuring a harmonious blend of sound and sight on your screen. Unleash your artistic vision by crafting unique cowl designs using innovative tools and techniques.
- Musicians can export individual stems for use in professional digital audio workstations (DAWs) such as Ableton Live or Pro Tools.
- Publish and share your music: Distribute tracks through Udio or obtain video content, including optional subtitles and accompanying cover art, to seamlessly share on platforms such as SoundCloud and YouTube.
Create a masterpiece with minimal effort.
Within mere seconds, Udio enabled me to produce two distinct iterations of a melody concept, effortlessly generating fresh takes on the original idea.
- Signal Up for Udio
- Discover the Dashboard
- Describe a Tune
- Generate Tune
- Preview Your Songs
- Choose the Tune Title
- Edit the Tune Particulars
- Entry the AI Instruments
- Choose Inpaint
- Select a Tune Phase
- Spotlight the Lyrics
- Edit the Superior Options
- Inpaint the Tune
Signal up for Udemy?

I started by navigating to the platform and selecting “Sign Up” at the topmost level.
Step 2: Discover the Dashboard

Upon setting up my account, Udio seamlessly guided me to my personalized dashboard. Within Udio, I can swiftly generate a melody by crafting an outline of it with a specific style, or I can choose from numerous prompts available to produce a tune instantly.

The Udio platform categorizes songs created using its tools by their inspirational source.
- Employees Picks
- Trending
- Prime Classes
- Prime Tracks
- Extra tracks for you
Step 3: Describe a Tune & Tweak Settings

On top of my dashboard, I outlined the kind of song I wanted to compose with the directive: “A tune about why the price is just too damn excessive, folks—people.” This prompt resonated with me as an inspired idea from Udio earlier, which struck a chord for its humor. If you’re struggling with music ideas, I highly recommend taking advantage of Udio’s prompts to spark inspiration and get your creative juices flowing.
With the inclusion of my tune description, additional settings became apparent.
- Style ideas.
- Video length options: 2-minute and 30-second clips.
- Lyrics (Auto-generated or Instrumental).
- Superior Creation Instruments.
You chose to go to a place called “Superior Creation Instruments.”
Step 4: Generate Tune

Selecting “Go to Superior Creation Instruments” provided the option to choose between two distinct AI styles:
- Audio-130: Quickly produce 2:10 clips without additional cost, no credits required.
- Audio creation – 32-second clips (priced at two credits).
I will consider selecting among three melodic options:
- Customized: Write your lyrics.
- Instrumental.
- Auto-generated.
I crafted my song settings to the default template – 32-beat mannequin and automatically generated lyrics – before clicking the “Create” button.

Within minutes of hitting “Create,” Udio started generating my melody in the designated panel below “All Creations.” A short while later, I had two 30-second tracks of a folksy tune that lamented the high cost of hiring. Two individuals were colloquially dubbed “The Lease Is Too Excessive” and “Barely Getting By,” respectively.
Step 5: Preview Your Songs

As I hovered over the small cowl photo, a preview of my tune played softly.
The technological advancements in display technology have enabled the creation of a monitor that exceeds my wildest expectations. The melody proved infectious, as Udio crafted every element with precision: from the melodic structure and sonic devices to tone and emotional resonance. It even generated cowl artwork!
Without hesitation, I would agree with you that the language is impressive and sophisticated, making it challenging to distinguish from human-generated content.
The perfect tune title makes all the difference. It’s a crucial step that sets the stage for your song’s success. With so many options, how do you narrow it down? Start by brainstorming words and phrases that capture the essence of your melody. Jot down anything that comes to mind – no matter how silly or obscure. Then, review your list and circle the ones that truly resonate with you.

When selecting the tune title, I was presented with an additional menu offering more options:
- Create: Optimized Process Suite. Remix, Prolong, Inpaint, Copy Immediate, Copy Seed Quantity, and Copy Observe Settings streamlined for enhanced efficiency?
- Share.
- Edit.
- Publish on the Udio platform.
I selected “Edit” to modify my song details.
The tune particulars have been entered incorrectly, please verify that all fields are accurate.

A fresh window opened, displaying my personal music details.
- When Sunny Skies Appear
- The attribution was incorrect, the revised text is:
The iconic song “Halo” by Beyoncé, which has a correct credit score of 75 on various music platforms.
- In this melodic narrative, I weave a tapestry of sonic emotions, transporting listeners to a realm where nostalgia and longing converge, as the gentle whispers of a forgotten melody slowly unravel the threads of memory, evoking the bittersweet essence of a love left unrequited.
- Folk? Indie Folk? Singer-Songwriter?
- Lyrics: Modify the tune’s lyrics.
- AI-Generated Cowl Artwork: Enhance Your Musical Experience with Dynamic Visuals.
Words that alter the song’s interpretation don’t modify its exact melody’s lyrics.
Entering the AI instruments ensures seamless integration with existing infrastructure.

Within the “Creations” tab, a click on the downward arrow beside “Prolong” exposed the AI tools that could refine the melody I had produced.
- Prolong: Develop additional components that seamlessly integrate with a display’s existing architecture, such as appending supplementary content modules or lengthening the terminal segment.
- Craft remixes that juxtapose subtle nuances with stark contrasts while preserving the essence of the original elements.
- Inpaint: Modify specific monitor components, such as lyrics or devices, without altering the overall composition.
Step 9: Choose Inpaint

I might additionally choose the guts icon to favorite it, or select the three ellipsis to reveal further options.
- Publish
- View
- Present Historical past
- Add to Playlist
- Share
- Obtain
- Delete
- Report Tune
I wanted to try out one of Udio’s AI tools to edit my song. Among the various AI tools available, I was most intrigued by “Inpaint,” which seemed the most captivating to explore. I aimed to replace specific monitor parts without modifying the overall layout.
Why not try selecting a tune phase that harmonizes with your target audience’s preferences?

Upon selecting “Inpaint,” intuitive controls unfolded, accompanied by a straightforward sequence of instructions effortlessly followed.
-
Let’s hone in on the 28-second segment and refine its contents. You can adjust your workspace by simply clicking and dragging the blue bordering area.
- Which specific areas of the window would you like me to focus on for improvement? The remainder of the monitor would remain unchanged. You can simply drag the blue area to select a specific portion or adjust your selection by dragging the surface to expand your range. You may opt to expand the space further through selecting the “Add Area” option.
I’ve selected the pivotal first 10 seconds of my composition.
Step 11: Spotlight the Lyrics

As instructed, subsequent I highlighted the pertinent lyrics to facilitate modification of the song’s specific section for the model.
The opening 10 seconds of my song initially introduced the first two lines of the first verse. I used to put *** around them, but I think they’re fine without.
What are our best options for exceptional outcomes?

The final step involved fine-tuning the premium choices. I deployed the settings without delving into the intricacies, opting instead for the standard defaults, and chose the latest Music Mannequin version, v1.5, for its renowned quality.
Step 13: Inpaint the Tune

Again on the prime, I invoked Inpaint.

Promptly, Udio began generating two original songs largely tailored to my preferred styles and genres. Here is an improved version of the text in a different style as a professional editor:
One of many inpainted tracks appears to resemble this.
The audio engineer adapted the way the singer performed the first two verses without modifying the song’s arrangement. The inpainted model’s somber beginning was unexpectedly captivating, and I found myself intrigued by its novelty. If I’d had greater control over the way the singer performed the melody, it might have turned out well. The prospect of AI effortlessly adjusting my screen’s tone and clarity with minimal effort was truly captivating.
Totally, I was formerly astounded by the consistency and tempo of Udio’s musical era, as well as his adaptability in manipulating various instruments. The innovative tool simplified the process of creating high-quality music quickly, allowing for precise edits through the integration of advanced AI capabilities. The ability to selectively inpaint specific areas of the monitor without affecting the surrounding content proved to be a revolutionary breakthrough.
Can you unlock your creative potential by leveraging AI-powered tools?
- Pursue innovative themes: Embrace the courage to tackle fresh, unconventional ideas, formats, and styles. Can combining music genres and styles lead to new discoveries in sound?
- Udios’ AI-driven toolbox comprises Prolong, Remix, and Inpaint, empowering users to refine their creations with precision. Take advantage of these tools to achieve the desired audio outcome.
- Collaborate Creatively: Join forces with friends, fellow musicians, and colleagues to co-create innovative projects that foster growth and learning. Combining innovative ideas with traditional perspectives sparks new possibilities for breakthroughs and fresh insights?
Prime 3 Udio Alternate options
While Udio can produce professional-sounding music in mere moments, it’s prudent to explore different options to find the ideal platform that meets your specific requirements.
Here are some of the best Udemy options you may want to consider:
What’s your best guess? The primary audio watermarking solution I’d advocate for is Hydra II by Rightsify. What sets Hydra II apart is its focus on delivering unique, high-quality solutions that are particularly well-suited for business applications.
While Udio stands out for generating entire song compositions based on text prompts, Hydra II excels at crafting premium instrument-only tracks that leave room for lyrical creativity. While Udio’s AI tools, such as extended monitoring and remix capabilities, offer additional creative freedom for crafting complete tracks. Meanwhile, Hydra II excels at providing in-depth customization options for background music, soundtracks, and various business applications, eliminating the need to worry about copyright concerns?
Looking for a versatile platform to craft rich, genuine music tracks featuring vocals? Udio stands out as the top choice. If you’re seeking a reliable source of copyright-free instrumental tracks for your business ventures, consider Hydra II from Rightsify – a great option.
I suggest exploring AIVA as an alternative option for those familiar with Udio. AIVA stands out for its exceptional customizability and straightforward licensing options.
While Udio and AIVA offer impressive tools for generating AI music, Udio stands out by creating emotionally resonant, professional-grade compositions from text-based input prompts with unparalleled effectiveness. The tool also provides advanced AI tools for editing your tracks, including extensions, inpainting, and remixing capabilities. This platform offers an exceptionally intuitive and adaptable experience, complemented by a dedicated community that provides unwavering support. Notwithstanding ongoing copyright concerns, the Udio platform currently allows users to create original music tracks up to a maximum duration of approximately two minutes.
While AIVA offers a vast array of options, its true strength lies in its ability to seamlessly integrate user-generated audio or MIDI files, thereby allowing for a high degree of personalization. With Spotify’s Professional Plan, you can fully personalize the copyright of your music, thereby eliminating any potential licensing issues.
When seeking a reliable tool for rapid music production and effortless track creation, Udio proves to be an excellent option. When seeking tailored options with distinct ownership rights, AIVA stands out as a top selection.
The ultimate Udio option I’d recommend is Soundful. It’s remarkably easy to create royalty-free background music that perfectly complements various projects.
While Soundful and Udio both offer AI-generated music, their distinct approaches cater to diverse needs. Soundful excels at crafting high-quality, royalty-free music tracks for film, streaming, and podcasting purposes. You’re capable of producing an enormous range of exceptional tracks. While users wait, Udio offers advanced AI capabilities, such as remixing, inpainting, and track extension, to create highly customized and innovative music projects.
When seeking a tool for crafting royalty-free music for content creation, Soundful stands out as an excellent option. Audacity is well-suited for creating full songs with advanced remixing and various modifying options.
Which Audio Assessment Tool is Right for Your Needs?
I thoroughly enjoyed leveraging my skills through the Udio platform. The instrument proved surprisingly intuitive to operate, and I was struck by its ability to produce high-caliber, emotionally resonant music using straightforward text-based prompts. The AI instruments for modifying and remixing proved delightfully straightforward and engaging to work with.
Notwithstanding the challenges I face, my primary concerns remain centered on the potential copyright infringement implications. I further found that it was missing crucial editing tools, which could have enabled greater control over the final product. Despite initial reservations, the tracks showcased impressive skill, requiring little to no revision.
If Udio doesn’t meet your expectations as an AI music generator, consider these top alternatives:
- Are you seeking the finest copyright-cleared instrumental music solutions for your unique business projects?
- Are ideal for those seeking a high level of customization and crystal-clear copyright ownership of their music?
- Proving a vast library of high-quality, royalty-free background music, Audiosocket is an ideal platform for quickly creating soundtracks for films, live streams, and podcasts.
Thank you for studying your Udio evaluation! I hope you found it useful.
Obtain ten daily credits, plus an additional 100 monthly credits, allowing you to create professional-grade music tracks in your studio. While you can indeed remix and prolong tracks, What’s holding you back from trying something new?
Often Requested Questions
Is Udio price it?
The Udio app offers a unique experience in AI-powered music generation, ideal for curious users and musicians looking to explore the creative potential of artificial intelligence. While concerns about copyright issues may arise, it’s generally recommended to wait until legal guidelines are clarified before using music tracks commercially.
What’s higher, Suno or Udio?
According to initial clients, Suno has a tendency to craft exceptionally well-structured and lengthier written pieces. Meanwhile, Udio produces crisp, high-quality audio that expertly brings intricate sonic concepts to life. Regardless of personal preferences, the difference between two options hinges on individual desires. While many music production platforms excel at crafting complete tracks with vocals.
The Udio platform is free to join and start using, with no upfront costs or subscription fees.
With limited daily credits and prime options available. While basic plans offer limited capabilities, upgraded tiers like Commonplace ($10/month) and Professional ($30/month) provide expanded boundaries, extra features, and expedited processing for a premium experience.
How does Udio work?
Audio is a cutting-edge AI-powered music creation platform that enables users to generate bespoke soundtracks by inputting textual content prompts, revolutionizing the way we experience and interact with music. Within a matter of seconds, the AI tool produces original, high-quality instrumental compositions, harmonies, and arrangements primarily informed by user-provided descriptions regarding the desired model, tone, equipment, and genre. Here’s an attempt at improving the text in a different style:
In my younger years, I effortlessly crafted a 30-second ditty using Udio’s intuitive interface and the prompt “A song about how this hire is just too bloody outrageous, folks.”
Is Udio being sued?
Major document labels within the music industry, including Sony Music Entertainment, Universal Music Group, and Warner Music Group, are key players. A lawsuit alleges that Udio has utilized copyrighted music without permission from the rights holders, using it to train its AI system, and is seeking damages of up to $150,000 per infringing work.
The current top-notch AI music generators include Amper Music, AIVA, and Jukedeck. These innovative tools employ sophisticated algorithms to create original compositions that rival human musicians.
One of the most outstanding AI music generators currently available. With the ability to produce high-quality music and harmonious vocals from text-based inputs, it truly shines. Notwithstanding ongoing litigation against Udio for alleged copyright infringement, prudent consideration of alternative strategies such as acquiring licenses, negotiating settlements, or developing novel solutions may be warranted.


_Dzmitry_Skazau_Alamy.jpg?disable=upscale&width=1200&height=630&fit=crop&w=768&resize=768,0&ssl=1 "How to Establish and Enhance Endpoint Security Effectively?")