

The sequence of posts on single sign-on to Amazon Redshift with AWS IAM Id Middle (successor to AWS Single Signal-On) integration continues from our prior put up.
On this put up, we define a complete information for establishing single sign-on from Tableau desktop to Amazon Redshift utilizing integration with IAM Id Middle and PingFederate because the id supplier (IdP) with an LDAP based mostly information retailer, AWS Listing Service for Microsoft Energetic Listing.
Stipulations
You must have the next conditions:
- A PingFederate account that has an lively subscription. You want an admin position to arrange the applying on PingFederate. When you’re new to PingFederate, you may attain out to Ping Id Gross sales.
- A working PingFederate server.
- Amazon Redshift Serverless workgroup or a provisioned Amazon Redshift information warehouse.
- Obtain and set up the newest Redshift ODBC 2.X driver.
- Obtain and set up Tableau Desktop 2024.1 or later
- Set up Tableau Server 2023.3.9 or later. For Tableau Server set up, see Set up and Configure Tableau Server.
Answer overview
PingFederate occasion connects to IAM Id Middle utilizing SAML. The customers and teams in PingFederate are synced to IAM Id Middle utilizing an open customary SCIM. After you arrange SAML and SCIM, it is possible for you to to allow single sign-on to Amazon Redshift from the AWS Administration Console utilizing Amazon Redshift Question Editor v2. That is achieved by creating an Id Middle utility within the Amazon Redshift console.
To allow single sign-on to Amazon Redshift from exterior of AWS utilizing a third-party shopper like Tableau, you arrange a trusted token issuer token alternate utilizing OIDC customary.
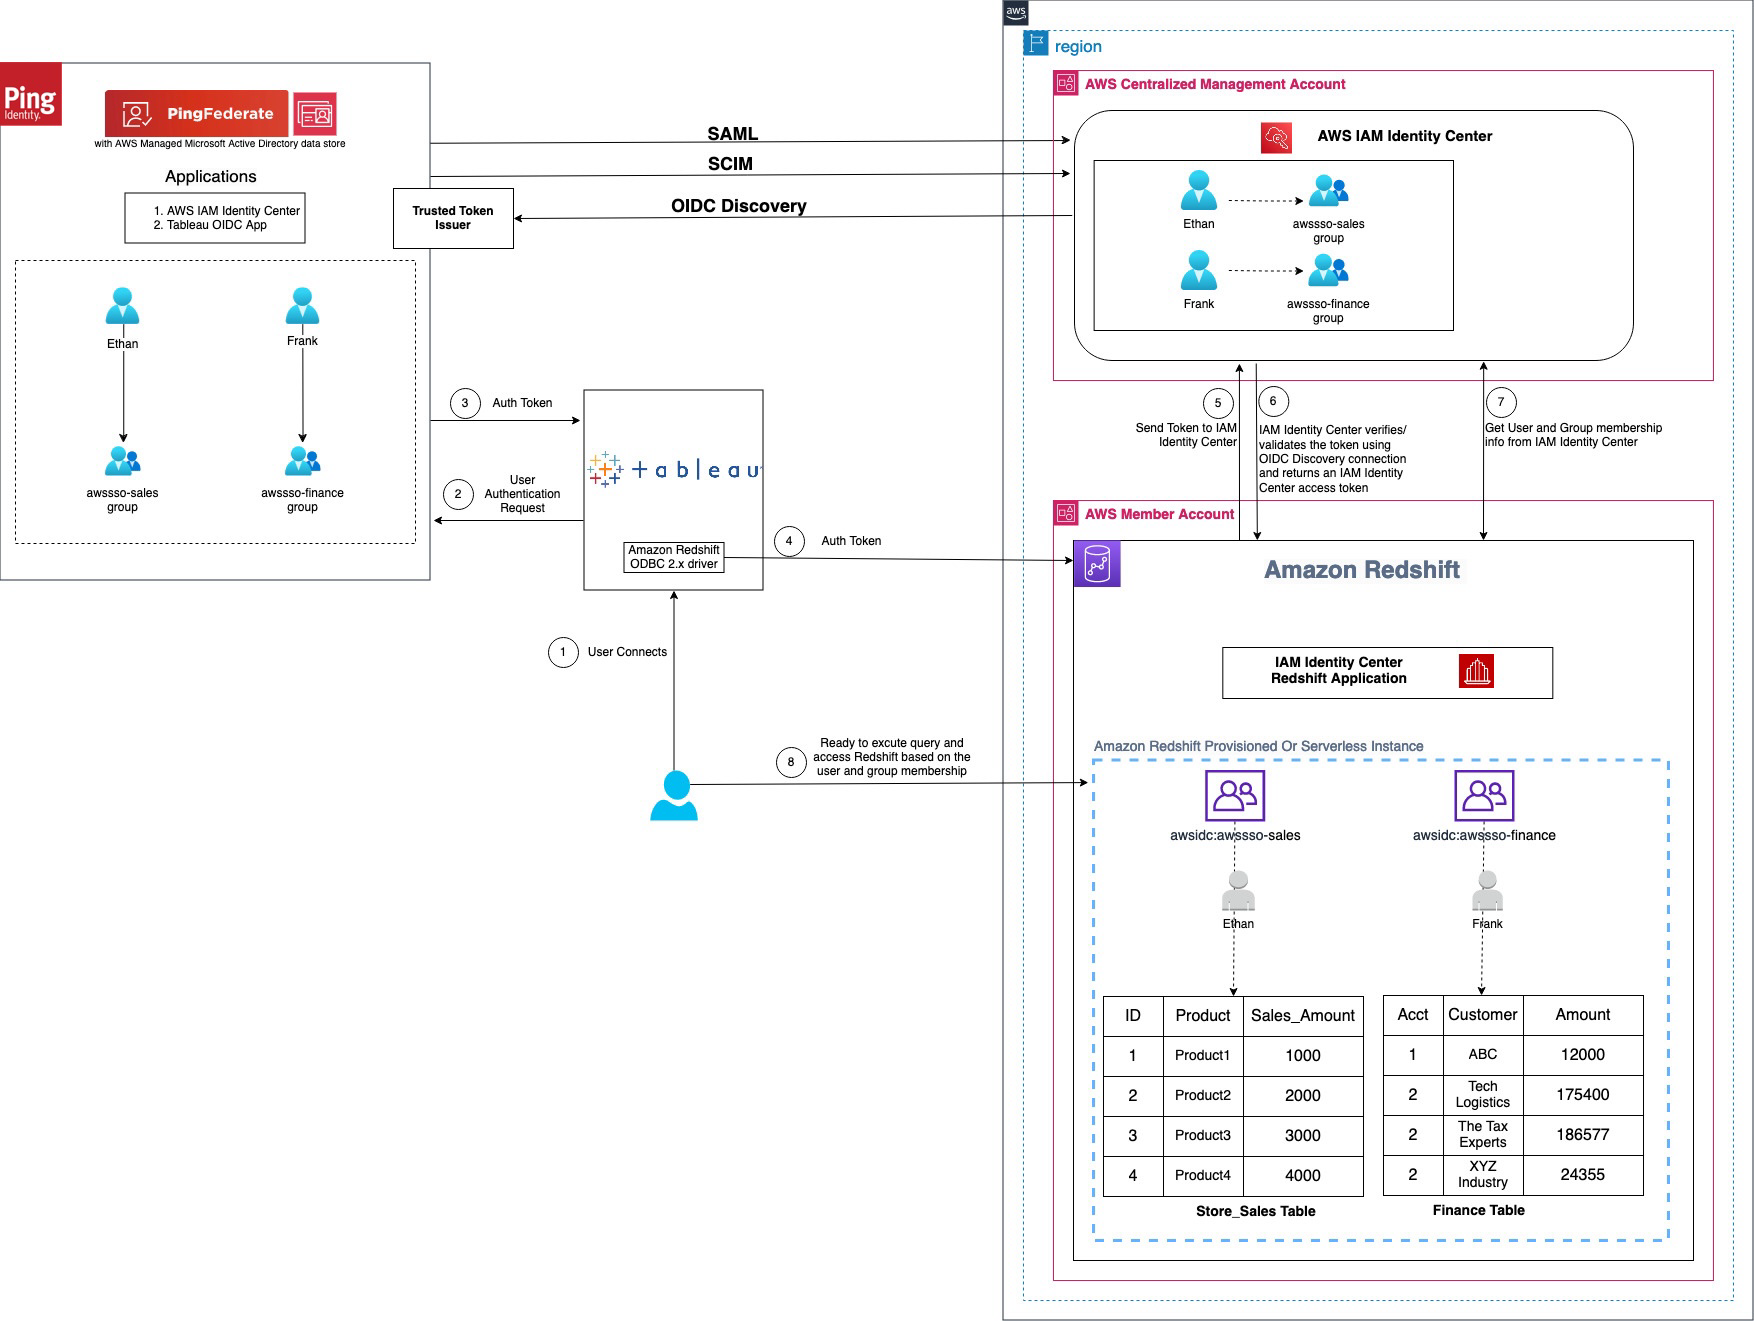
Determine 1 : Answer overview for Tableau integration with Amazon Redshift utilizing IAM Id Middle and Ping Federate
The workflow, proven within the previous determine, contains the next steps:
- The consumer configures Tableau to entry Amazon Redshift utilizing IAM Id Middle authentication.
- On a consumer sign-in try, Tableau initiates a browser-based OAuth movement and redirects the consumer to the PingFederate check in web page to enter the sign-in credentials. Password validation is finished towards the AWS Managed Microsoft AD information retailer.
- On profitable authentication, PingFederate points an authentication token (ID and entry token) to Tableau.
- The Amazon Redshift driver then makes a name to the Amazon Redshift-enabled Id Middle utility and forwards the
- Amazon Redshift passes the token to Id Middle and requests an entry token.
- Id Middle verifies the token utilizing the OIDC discovery connection to the trusted token issuer and returns an Id Middle-generated entry token for a similar consumer. Within the previous determine, trusted token issuer (TTI) is the PingFederate server that Id Middle trusts to supply tokens that third-party functions like Tableau use to name AWS providers.
- Amazon Redshift then makes use of the token to acquire the consumer and group membership data from Id Middle.
- Tableau consumer will be capable to join with Amazon Redshift and entry information based mostly on the consumer and group membership returned from Id Middle. The consumer and group settings within the LDAP-based AWS Managed Microsoft AD information retailer for PingFederate are propagated to id heart utilizing SCIM protocol for outbound provisioning.
Walkthrough
On this walkthrough, you’ll use the next steps to construct the answer:
- SAML and SCIM arrange between PingFederate and IAM Id Middle
- Hook up with Amazon Redshift utilizing Question Editor v2
- Configure id federation from a third-party shopper
- Create an entry token supervisor and entry token mapping
- Create an OIDC coverage
- Create an OAuth shopper
- Arrange a PingFederate Authorization Server
- Coverage Contract Grant Mapping
- Accumulate PingFederate data
- Arrange a trusted token issuer in IAM Id Middle
- Arrange shopper connections and trusted token issuers in Amazon Redshift
- Configure Tableau OAuth config information for PingFederate to combine with Amazon Redshift utilizing IAM Id Middle
- Set up a Tableau OAuth config file on a shopper machine for Tableau Desktop
- Set up a Tableau OAuth config file for a web site on Tableau Server or Tableau Cloud
- Federate to Amazon Redshift from Tableau Desktop utilizing Id Middle
- Federate to Amazon Redshift from Tableau Server utilizing Id Middle authentication
SAML and SCIM arrange between PingFederate and IAM Id Middle
IAM Id Middle integration with PingFederate begins with SAML arrange adopted by SCIM.
- Arrange SAML 2.0 for SP Connection of kind Browser SSO (single sign-on) in PingFederate.
- Arrange SCIM 2.0 for outbound provisioning. It would sync the customers and teams created in an LDAP based mostly information retailer like AWS managed Microsoft AD for PingFederate to the customers and teams in IAM Id Middle.
The implementation for the cloud based mostly IdP choice PingOne will not be in scope of this put up and follows steps much like these described in Combine IdP with Amazon Redshift Question Editor v2 utilizing AWS IAM Id Middle for seamless Single Signal-On.
Additional particulars of SAML and SCIM arrange are as follows.
-
- Set up PingFederate Server.
- Arrange IAM Id heart integration by following the Ping documentation together with the obtain for Id Middle integration information.
- Deploy the mixing information to your PingFederate set up.
- Allow provisioning and configure IdP Browser SSO (SAML connection). (You possibly can implement Browser SSO connection solely utilizing IAM Id Middle metadata file.)
- Underneath System > Server > Protocol Settings > Federation Information
BASE_URLdiscipline, use the publicly accessible totally certified area title of the PingFederate server. - Create an LDAP based mostly information retailer (the title used on this instance is
AWSManagedMSAD) as a result of SCIM 2.0 protocol for outbound provisioning solely works with LDAP based mostly information shops with PingFederate. In case you are utilizing a cloud-based answer like PinOne, you may arrange outbound provisioning in PingOne itself. Thus for this writing, now we have used AWS Managed Microsoft AD as a knowledge retailer created utilizing AWS Listing Service. - Create a password credential validator (title used on this instance is
awsmanagedmsadpassval) and IdP adapters (title used on this instance isawsmanagedmsadadapter) in your information retailer as relevant. - Create an SP connection of kind Browser SSO utilizing the
sp-saml-metadata.xmlfile as defined in making a provisioning connection.
- Underneath System > Server > Protocol Settings > Federation Information
- Export SAML metadata from PingFederate.
- Register PingFederate as an IdP in Id Middle.
- Navigate again to the connection saved in step b, and configure outbound provisioning.
- Allow provisioning in IAM Id Middle by following step 1 within the documentation.
- Then, configure provisioning in PingFederate by following step 2 within the documentation.
- Optionally, you may configure and cross consumer attributes from PingFederate for entry management in Id Middle.
Subsequent, connect with Amazon Redshift utilizing its native question editor, Question Editor v2, to validate AWS providers’ connectivity utilizing IAM Id Middle.
Hook up with Amazon Redshift utilizing Question Editor v2
Full the Walkthrough part of IAM Id Middle integration with Amazon Redshift, which can arrange your Amazon Redshift connectivity with Question Editor v2.
When you want additional assist with SAML and SCIM arrange, and connecting to Amazon Redshift utilizing Question Editor v2, you too can comply with step-by-step guided demo video single sign-on to Amazon Redshift with IAM IDC integration utilizing PingFederate with AWS Managed MSAD Demo
Configure id federation from a third-party shopper
Configure id federation enabled by IAM Id Middle from IdP PingFederate to the service supplier Amazon Redshift utilizing an exterior shopper like Tableau. The next steps within the PingFederate admin console and Id Middle information you thru the id federation course of.
Create an entry token supervisor and entry token mapping
To map PingFederate attributes to OAuth entry tokens and OpenID Join ID (OIDC) tokens, create an entry token supervisor and token mapping. For full particulars and arrange based mostly in your safety wants, see Token mapping in PingFederate, which explains entry token administration intimately. Full the next steps to create a token supervisor.
- Within the PingFederate administrative console, go to Purposes > OAuth > Entry Token Administration, and select Create New Occasion.
- In Sort tab,
- Enter an Occasion Identify and Occasion ID of your selection, for instance
TrustedTokenIssuerMgr. - Choose the Sort from drop down listing as JSON Net Tokens, generally referred to as JWT.
- Go away Dad or mum occasion as None and select Subsequent.
- Enter an Occasion Identify and Occasion ID of your selection, for instance
- In Occasion configuration tab,
- Underneath Certificates, choose Add a brand new row to ‘Certificates’, choose the certificates for token supervisor from the drop-down listing, enter a Key ID equivalent to
certkey, and select Replace beneath Motion. You possibly can create a brand new certificates by navigating to Safety > Certificates & Key Administration > Signing & Decryption Keys & Certificates > Create New. - Choose Use Centralized Signing Key.
- In JWS Algorithm, choose RSA utilizing SHA-256.
- Choose Allow Token Revocation. Go away every thing else as default and select Subsequent.
- Underneath Certificates, choose Add a brand new row to ‘Certificates’, choose the certificates for token supervisor from the drop-down listing, enter a Key ID equivalent to
- Underneath Session Validation tab,
- Choose Embrace Session Identifier in Entry Token.
- Choose Verify for legitimate authentication session.
- Go away different selections as is and select Subsequent.
- Within the Entry Token Attribute Contract tab, depart the Topic Attribute Identify because the e default and proceed to Lengthen the Contract so as to add the next attribute and values.
- Enter
aud, depart multi-value unchecked. Select Add beneath Motion. - Repeat the identical to enter e mail, exp, iss, sub. When accomplished, select Subsequent.
- Enter
- On every of Useful resource URIs and Entry Management tabs, depart as is and select Subsequent.
- On the Abstract tab, evaluate your adjustments and select Save. An occasion title with the title you supplied, like TrustedTokenIssuerMgr seems in Purposes > Oauth > Entry Token Administration.
Determine 2 : Entry Token Administration Configuration Abstract
- Navigate to Purposes > OAuth > Entry Token Mappings, choose the default Context and Entry Token Supervisor, TrustedTokenIssuerMgr that was created within the earlier step. Select Add Mapping.
- Go away Attribute Sources & Person Lookup as is and select Subsequent.
- Underneath Contract Success tab,
- For Contract aud, choose Textual content from the Supply, and enter the Worth as
AWSIdentityCenter. - For Contract e mail, choose Persistent Grant from the Supply, and Worth as e mail.
- For Contract exp, choose Persistent Grant from the Supply, and Worth as EXPIRES_AT.
- For Contract iss, choose Textual content from the Supply, and enter your base URL because the Worth, like
https://yourwebsite.area.com, the identical as in System > Server > Protocol Settings > BASE URL. - For Attribute Contract sub, choose Persistent Grant from the Supply, and Worth as USER_KEY.
- Select on Subsequent.
- For Contract aud, choose Textual content from the Supply, and enter the Worth as
- Go away Issuance Standards as is and select Subsequent.
- On the Abstract tab, evaluate all of your adjustments and select Save. A brand new default Context with Entry Token Supervisor if TrustedTokenIssuerMgr seems in Purposes > OAuth > Entry Token Mappings.
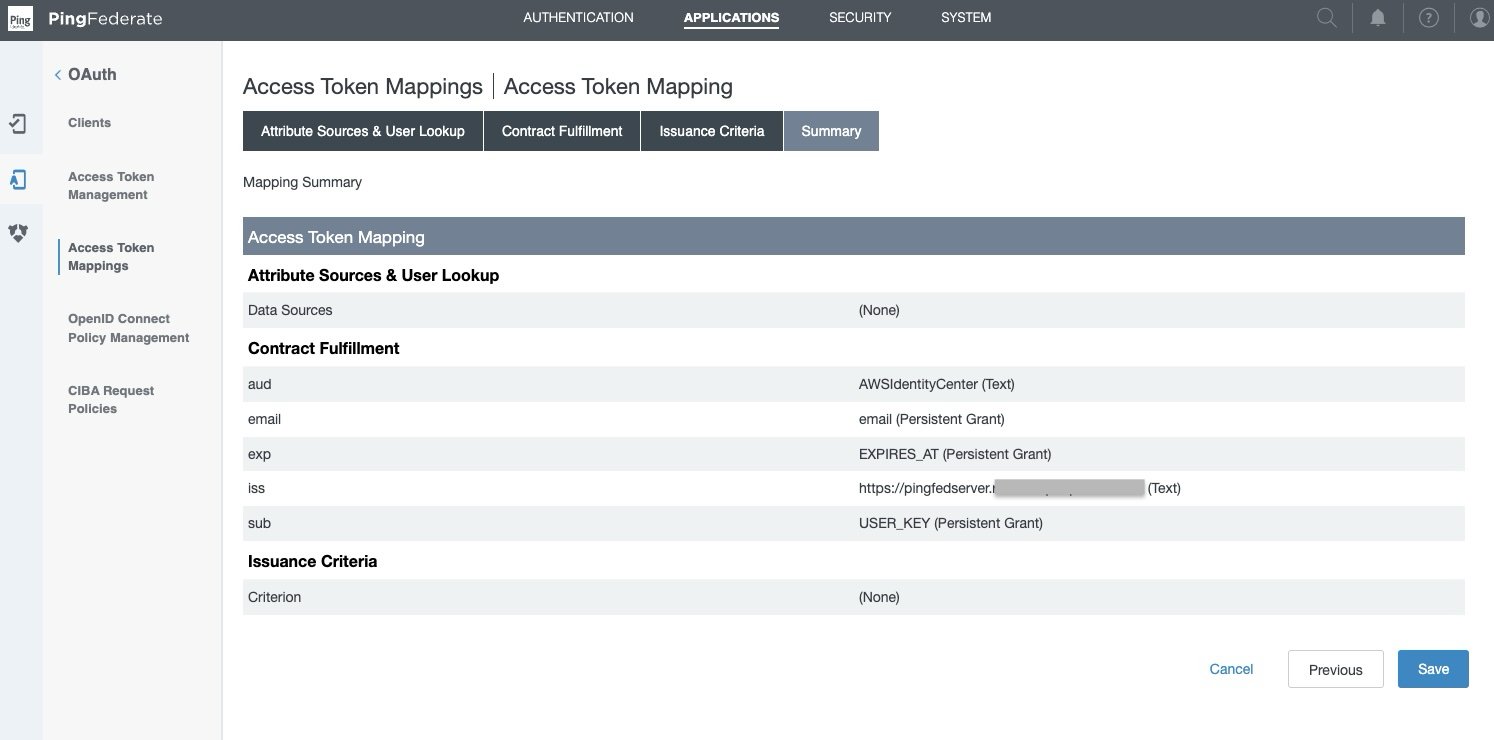
Determine 3: Entry Token Mappings Abstract
Create an OIDC coverage
For full particulars and arrange based mostly in your safety wants, see to Open ID join (OIDC) coverage administration in PingFederate. Full the next steps to arrange an OIDC coverage.
- Within the PingFederate administrative console, go to Purposes > OAuth > OpenID Join Coverage Administration, and select Add Coverage.
- Within the Handle Coverage tab,
- Enter the Coverage ID and Identify of your selection, for instance
OIDCPolicy. - Choose the Entry Token Supervisor from drop down listing created within the earlier part—TrustedTokenIssuerMgr.
- Choose Embrace Session Identifier in ID Token
- Choose Embrace Person Information in ID Token
- Choose Return ID Token on Refresh Grant
- Go away others as is and select Subsequent.
- Enter the Coverage ID and Identify of your selection, for instance
- Within the Attribute Contract tab, preserve solely the required attributes in prolonged contract and delete the others.
- Go away the sub attribute beneath Attribute Contract as is.
- Underneath Lengthen the contract, select delete for all attributes besides e mail. select Subsequent.
- Within the Attribute Scopes tab,
- Choose openid from the Scope listing.
- Choose e mail from Attributes.
- Select Add from Actions. Select Subsequent.
- Go away Attribute Sources & Person Lookup as is and select Subsequent.
- In Contract Success tab,
- For Attribute Contract e mail, choose Persistent Grant from the Supply, and Worth as e mail.
- For Attribute Contract sub, choose Persistent Grant from the Supply, and Worth as USER_KEY.
- Select Subsequent.
- Go away Issuance Standards as is and select Subsequent.
- On the Abstract tab, evaluate your adjustments and select Save. A coverage ID with the title you supplied, like OIDCPolicy, seems in Purposes > Oauth > OpenID Join Coverage Administration.
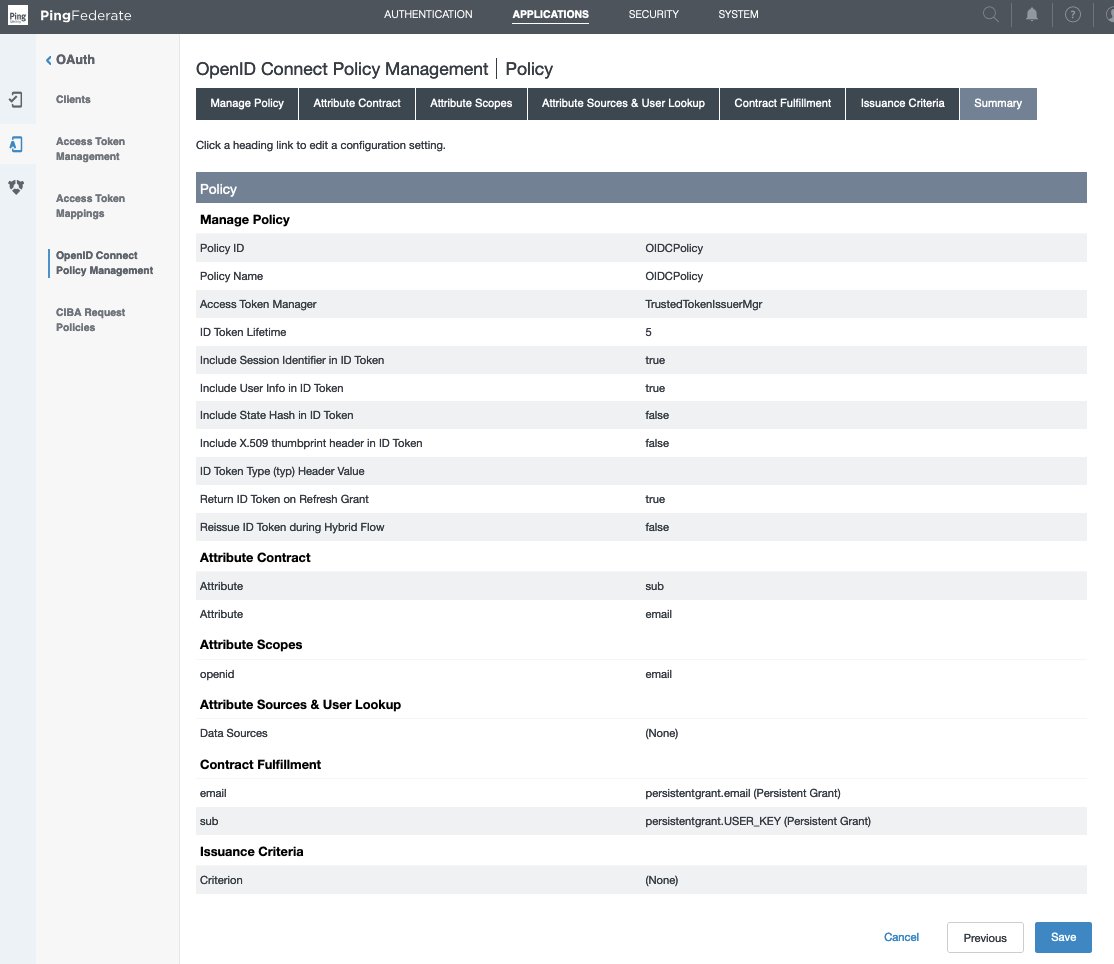
Determine 4 : OpenID Join Coverage Administration Abstract
Create OAuth shopper
For full particulars and arrange based mostly in your safety wants, see configure an OAuth shopper in PingFederate, which explains every discipline intimately. Full the next steps to create an OAuth shopper.
- Within the PingFederate administrative console, go to Purposes > OAuth > Shoppers, and select Add Shopper.
- Within the Shopper ID discipline, enter a singular, immutable shopper ID. We use
tableauredshiftpingfedbecause the title on this instance. - Enter a Identify and Description for the shopper.
- Choose a Shopper Authentication technique. You possibly can choose from None, Shopper TLS Certificates, Personal Key JWT, or Shopper Secret. For this situation, choose Shopper Secret. Select Generate Secret to create a brand new one or use choose Change secret to create your personal.
- Go away Request object signing algorithm set to Enable Any. You possibly can override to make use of the algorithm of your selection if wanted.
- Within the Redirect URIs discipline, add every of the next values.
http://localhost:8080/authorization-code/callbackhttp://localhost:55556/Callbackhttp://localhost:55557/Callbackhttp://localhost:55558/Callbackhttp://localhost/auth/add_oauth_token
- Choose Prohibit widespread scopes. Prohibit scopes by choosing the checkboxes for e mail, offline_access, openid, and profile as required.
- In Emblem URL, optionally enter the URL for emblem you wish to show on the Person Grant Authorization and Revocation pages.
- Within the Allowed Grant Varieties listing, you may select from a listing of authorization choices. On this instance, choose Authorization code. Optionally, you may choose Implicit, Refresh Token, and Shopper Credentials.
- Underneath Default entry token supervisor, choose the entry token supervisor TrustedTokenIssuerMgr created within the earlier part.
- Choose the Prohibit field for Prohibit to default entry token supervisor.
- Customise Persistent grants max lifetime to match your necessities. Set it to 12 hours for this instance by utilizing the third radio button.
- For Openid join, select your most popular ID token signing algorithm. Choose RSA utilizing SHA-256 for this instance. Optionally, for Coverage you may select the OIDC coverage created within the earlier part.
- Go away the remaining settings as default and select Save.
Determine 5 : OAuth Shopper Configuration
The Tableau Desktop redirect URLs ought to all the time use localhost. The next instance, additionally use localhost for the Tableau Server hostname to simplify testing in a take a look at atmosphere. For this setup, you must also entry the server at localhost within the browser. In a manufacturing atmosphere, or Tableau Cloud, it’s best to use the total hostname that your customers will use to entry Tableau on the net, together with HTTPS. If you have already got an atmosphere with HTTPS configured, you may skip the localhost configuration and use the total hostname from the beginning.
Arrange a PingFederate authorization server
For full particulars and arrange based mostly in your safety wants, see PingFederate authorization server settings in PingFederate. Full the next steps to configure an authorization server.
- Within the PingFederate administrative console, go to System > OAuth Settings > Authorization Server Settings, and make following adjustments.
- Go away the preliminary configurations as default and scroll all the way down to Persistent Grant Prolonged Attributes, add Attribute e mail.
- For OAuth Administrative Net Companies Settings, in Password Credential Validator, choose awsmanagedmsadpassval that you just created within the SAML and SCIM arrange part.
- For Persistent Grant Administration API,
- In Entry Token Supervisor, choose the TrustedTokenIssuerMgr created earlier.
- In Required Scope, choose openid.
- Go away remaining the settings as default and select Save.
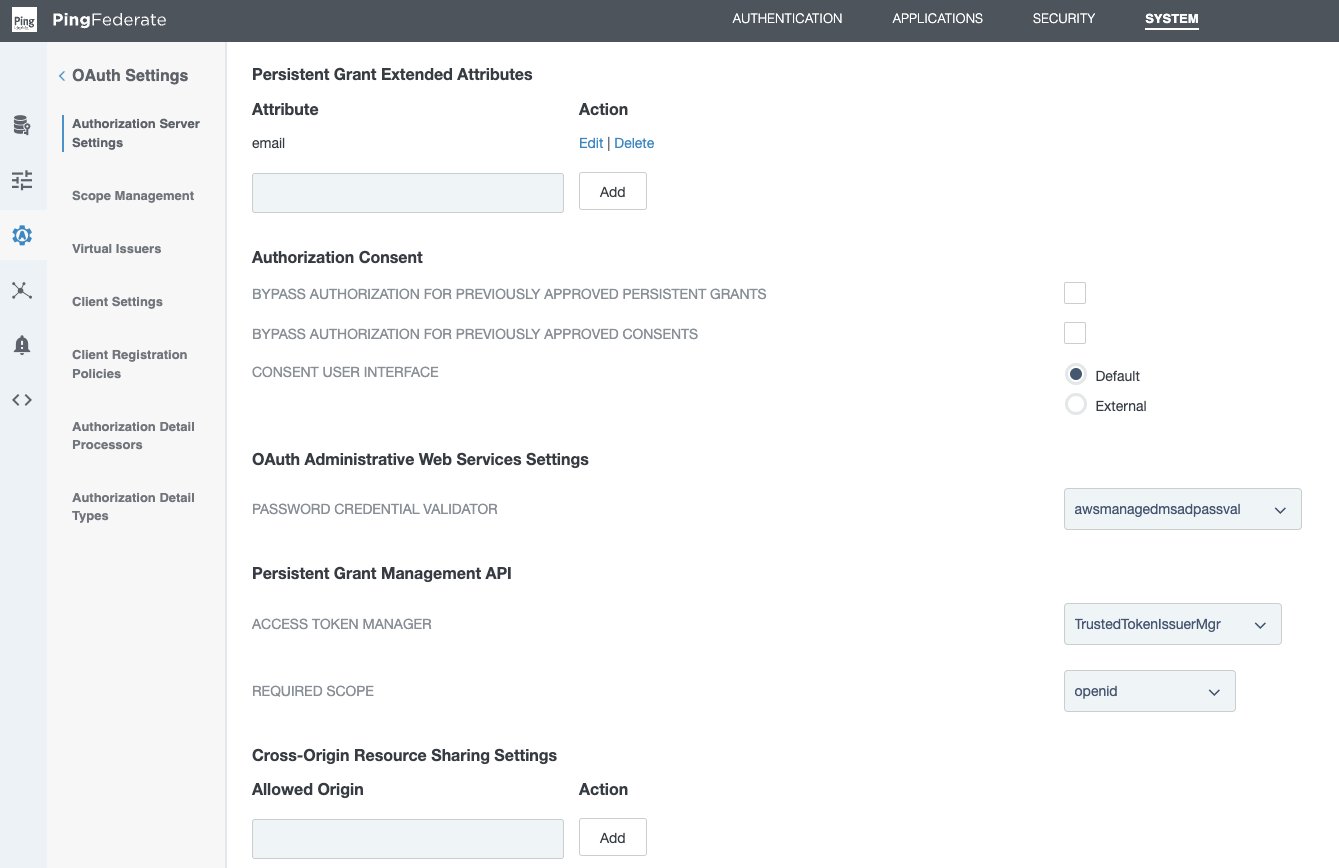
Determine 6 : PingFederate Authorization Server Setting
Coverage contract grant mapping
For full particulars and arrange based mostly in your safety wants, see Grant contract mapping in PingFederate. For this illustration, we arrange a coverage contract grant mapping for authentication in a three-step course of.
Step 1: Create a coverage contract
- Within the PingFederate administrative console, go to Authentication > Insurance policies > Coverage Contracts, and select Create New Contract.
- In Contract Information tab, enter a reputation. For this instance, we use
OIDCPolicyContract. - In Contract Attributes tab, select Lengthen the Contract so as to add e mail attribute.
- Evaluate and select Save.
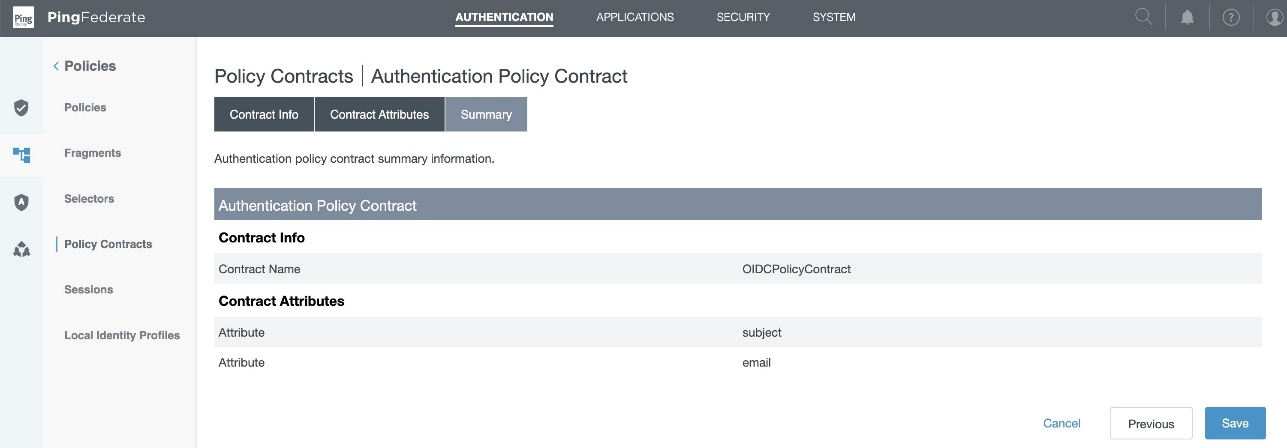
Determine 7 : Coverage Contract Abstract
Step 2: Add authentication coverage
- Within the PingFederate administrative console, go to Authentication > Insurance policies > Insurance policies, and select Add Coverage.
- Enter a coverage title. On this instance, we use
OAuthOIDCPolicy. - Within the Coverage drop down, choose IdP Adapter and choose the awsmanagedmsadadapter that you just created within the SAML and SCIM arrange part.
- Set FAIL to Completed and beneath SUCCESS, choose Coverage Contracts from the drop-down menu and choose the OIDCPolicyContract created in step 1. Select Completed.
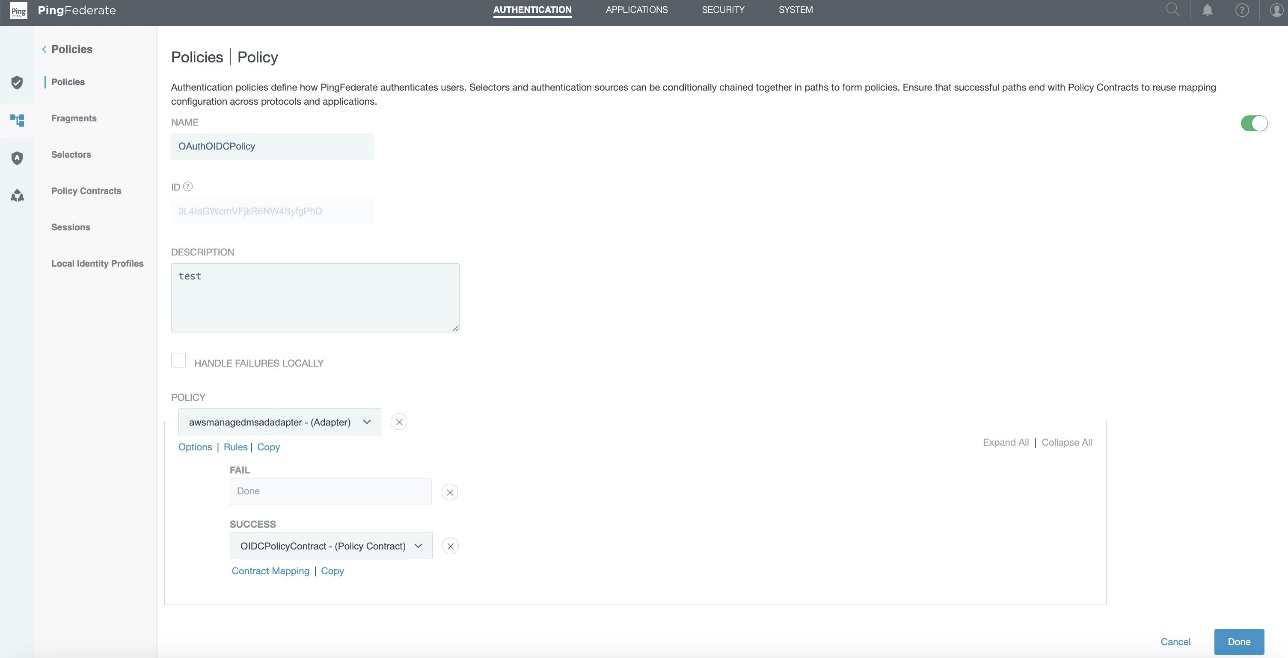
Determine 8 : Authentication Coverage Configuration
Step 3: Coverage contract grant mapping
- Within the PingFederate administrative console, go to Authentication > OAuth > Coverage Contract Grant Mapping, and beneath Mappings, choose OIDCPolicyContract created in Step1 and select Add Mapping.
- On the Attribute Sources & Person Lookup tab, select Subsequent.
- Within the Contract Success tab,
- For Contract USER_KEY, choose Authentication Coverage Contract from the Supply, and Worth as topic.
- For Contract USER_NAME, choose Authentication Coverage Contract from the Supply, and Worth as topic.
- For Contract e mail, choose Authentication Coverage Contract from the Supply, and Worth as e mail.
- Select Subsequent.
- Go away Issuance Standards as is, evaluate and select Save.
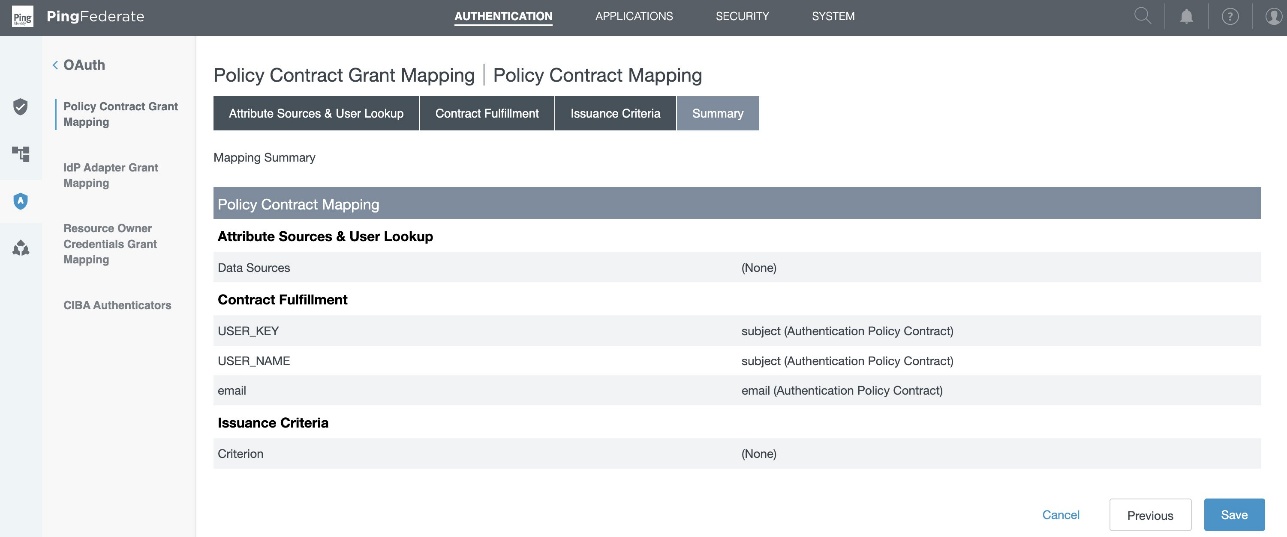
Determine 9 : Coverage Contract Grant Mapping Abstract
Accumulate PingFederate data
To configure your PingFederate with IAM Id Middle and Amazon Redshift, gather the next parameters. When you don’t have these parameters, contact your PingFederate admin.
- Issuer URL, auth URL (authUri), and token URL (tokenUri).
You may get these values from the OIDC IdP URL: https://pingfedserver.instance.com/.well-known/openid-configuration. Open this URL in an online browser, changing pingfedserver.instance.com together with your IdP server title.
The next is an instance screenshot of IdP attributes utilizing OIDC IdP URL the place:
- The issuer URL corresponds to the issuer
- The auth URL (authUri) corresponds to
authorization_endpoint - The token URL (tokenUri) corresponds to
token_endpoint
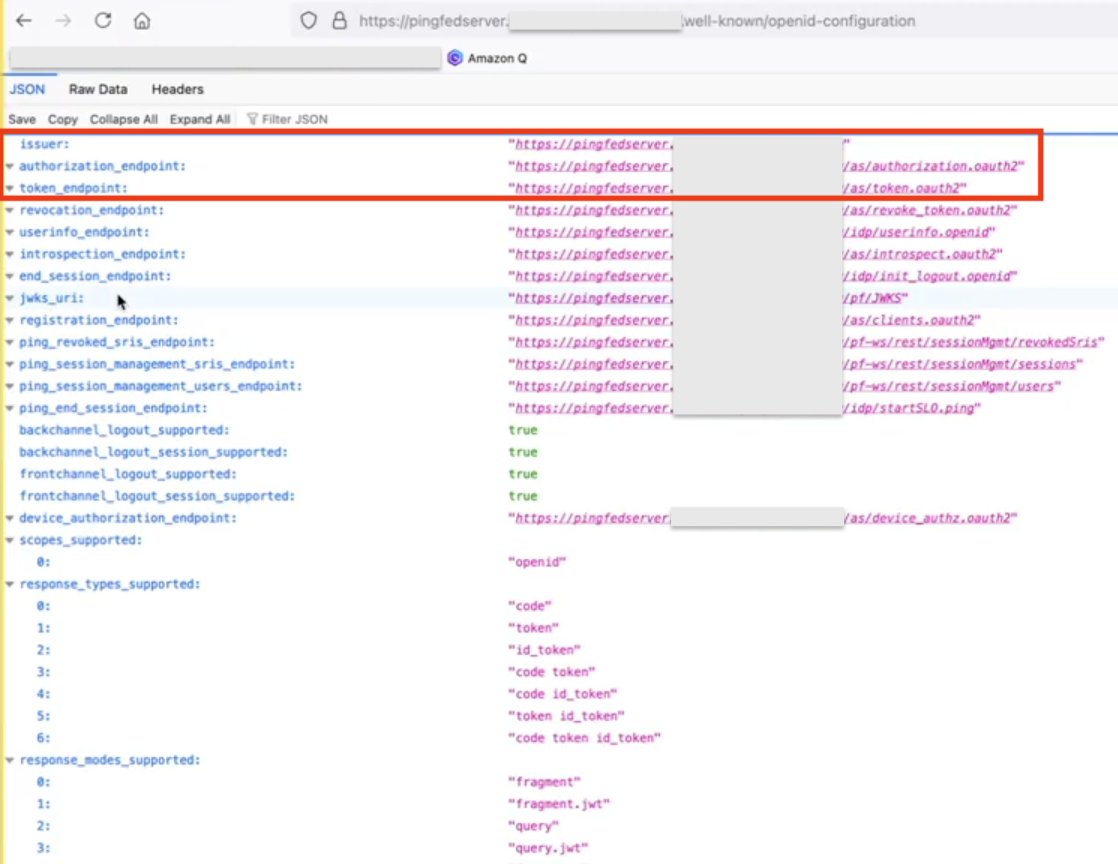
Determine 10 : Screenshot of IdP Attributes
- Viewers worth
To get the Viewers worth from PingFederate, check in as an admin to PingFederate and navigate to the next path to get the viewers worth that you just created throughout entry token mapping creation in PingFederate:
Purposes > OAuth > Entry Token Mappings > TrustedTokenIssuerMgr → Abstract > aud

Determine 11 : Entry Token Mapping
Arrange a trusted token issuer in IAM Id Middle
Change from the PingFederate console to the IAM Id Middle console for the AWS facet of configuration. Begin by including a trusted token issuer (TTI), which makes it potential to authorize Tableau to make requests on behalf of their customers to entry information in Amazon Redshift. A TTI is an OAuth 2.0 authorization server that points tokens to functions that provoke requests (requesting functions). The tokens authorize these functions to provoke requests on behalf of their customers to a receiving utility (an AWS service). On this step, you create a TTI within the central administration account. To create a TTI,
- Open the AWS Administration Console and navigate to IAM Id Middle, after which to the Settings web page.
- Choose the Authentication tab and beneath Trusted token issuers, select Create trusted token issuer.
- On the Arrange an exterior IdP to situation trusted tokens web page, beneath Trusted token issuer particulars, do the next:
- For Issuer URL, enter the OIDC discovery URL of the exterior IdP that may situation tokens for trusted id propagation. You may get issuer the URL as talked about in step 1 of the previous part Accumulate PingFederate data.
- For Trusted token issuer title, enter a reputation to establish this TTI in Id Middle and within the utility console.
- Underneath Map attributes, do the next:
- For the id supplier attribute, choose an attribute from the listing to map to an attribute within the Id Middle id retailer. You possibly can choose E-mail, Object Identifier, Topic, and Different.
- For Id Middle attribute, choose the corresponding attribute for the attribute mapping.
- Underneath Tags (non-compulsory), select Add new tag, enter a price for Key, and optionally for Worth. For details about tags, see Tagging AWS IAM Id Middle sources.
The next determine reveals the arrange for TTI:
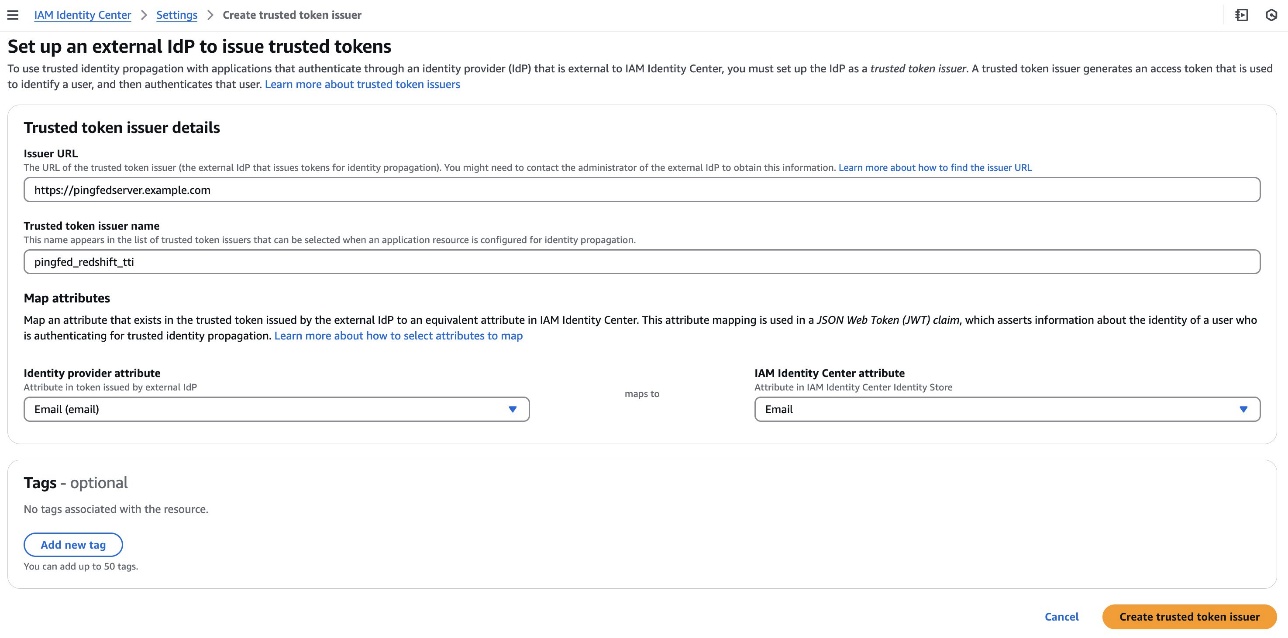
Determine 12 : Configuring Trusted Token Issuer
Arrange shopper connections and trusted token issuers in Amazon Redshift
On this step, the Amazon Redshift functions that alternate externally generated tokens should be configured to make use of the TTI you created within the earlier step. Additionally, the viewers declare (or aud declare) from PingFederate should be specified. On this instance, you might be configuring the Amazon Redshift utility within the member account the place the Amazon Redshift cluster or serverless occasion exists.
- Choose IAM Id Middle connection from the Amazon Redshift console menu.
- Choose the Amazon Redshift utility that you just created as a part of the conditions.
- Choose the Shopper connections tab and select Edit.
- Select Sure beneath Configure shopper connections that use third-party IdPs.
- Choose the checkbox for Trusted token issuer that you just created within the earlier part.
- Enter the Aud declare worth beneath Configure chosen trusted token issuers. For instance,
AWSIdentityCenter. You may get the viewers worth from the PingFederate path: Purposes > OAuth > Entry Token Mappings > TrustedTokenIssuerMgr > Abstract > aud. - Select Save.
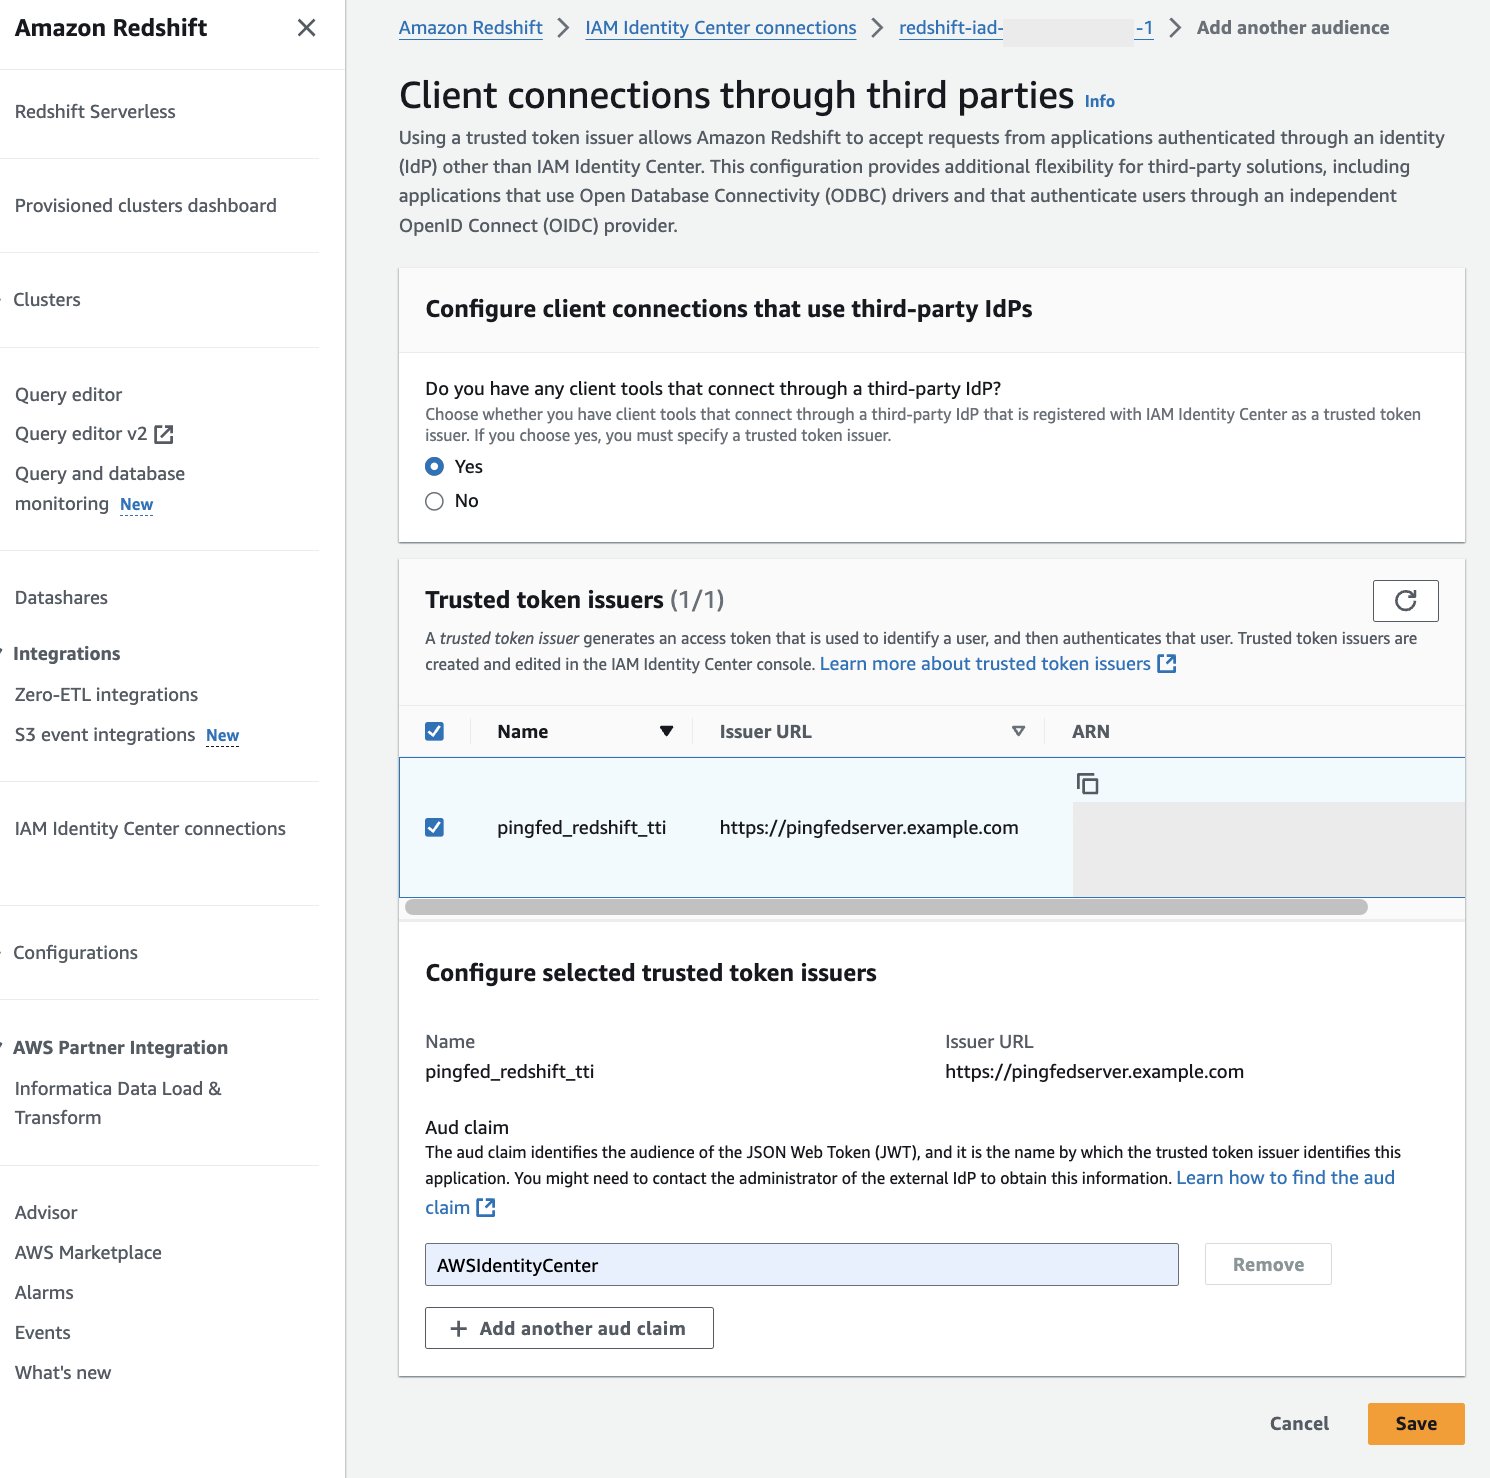
Determine 13 : Configure Viewers Worth in Amazon Redshift
At this level, your IAM Id Middle, Amazon Redshift, and PingFederate configuration are full. Subsequent, you could configure Tableau.
Configure Tableau OAuth config information for PingFederate to combine with Amazon Redshift utilizing IAM Id Middle
This XML file used on this part shall be used for all of the Tableau merchandise like Tableau Desktop, Server and Cloud.
To combine Tableau with Amazon Redshift utilizing IAM Id Middle, you could use a customized XML file. On this step, you’ll use the next XML and substitute the values beginning with a $ signal and highlighted in daring. The remainder of the values could be saved as it’s or you may modify them based mostly in your particular wants. For detailed data on every of the weather within the file, see the Tableau documentation on GitHub.
You may get authUri and tokenUri as talked about in step 1 of previous part, Accumulate PingFederate data.
The next is the instance XML:
Set up Tableau OAuth config file on a shopper machine for Tableau Desktop
After the XML configuration file is created, it ought to be copied to a particular location for use by Amazon Redshift Connector from Tableau Desktop. Save the previous file as .xml and put it aside beneath DocumentsMy Tableau RepositoryOAuthConfigs.
Notice: Presently this integration will not be supported in macOS as a result of the Amazon Redshift ODBC 2.X Driver will not be supported but for MAC.
Set up Tableau OAuth config file for a web site on Tableau Server or Tableau Cloud
To combine with Amazon Redshift utilizing IAM Id Middle authentication, you could set up the Tableau OAuth config file in Tableau Server or Tableau Cloud.
- Register to the Tableau Server or Tableau Cloud utilizing admin credentials.
- Navigate to Settings.
- Go to OAuth Shoppers Registry and choose Add OAuth Shopper.
- Select the next settings:
- Connection kind: Choose Amazon Redshift.
- OAuth Supplier: Choose Custom_IdP.
- Shopper ID: Enter your IdP shopper ID worth.
- Shopper Secret: Enter your shopper secret worth.
- Redirect URL: Enter the worth as
http://localhost/auth/add_oauth_token. On this put up, we’re utilizing localhost for testing within the native atmosphere. You must ideally use the total hostname with https. - Select OAuth Config File: Choose the XML file that you just configured in Configure Tableau Desktop.
- Choose Add OAuth Shopper and select Save.
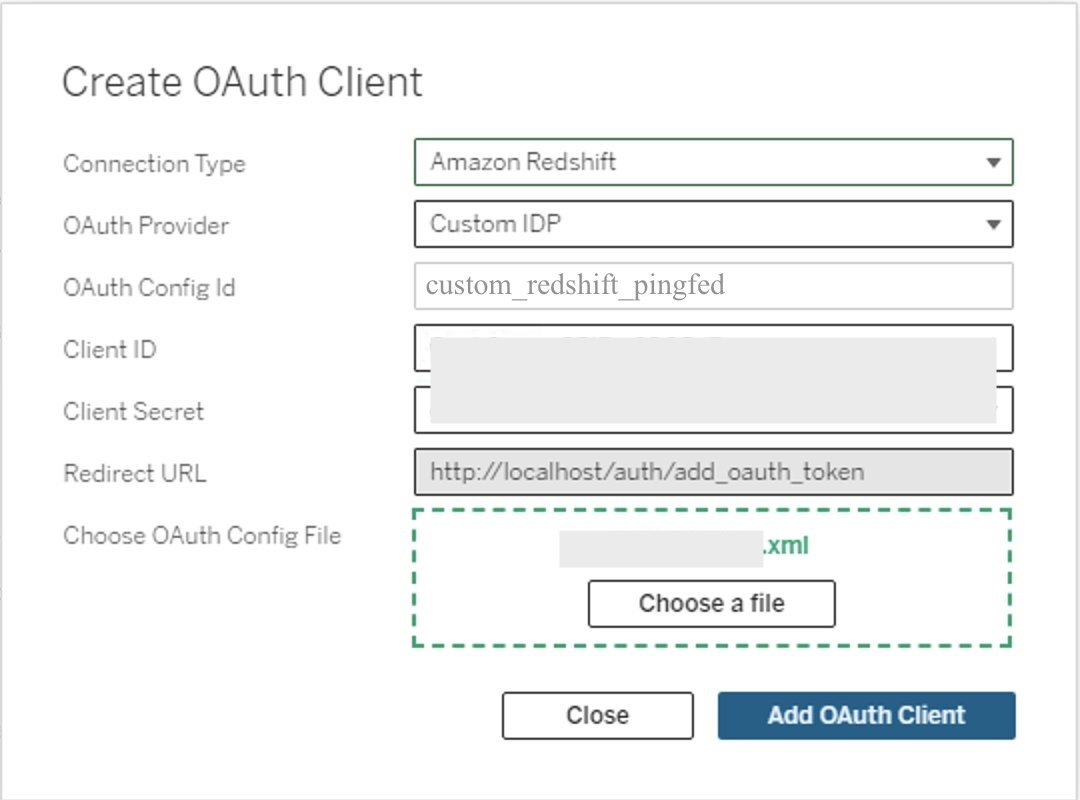
Determine 14: Create an OAuth connection in Tableau Server or Cloud
Federate to Amazon Redshift from Tableau Desktop utilizing IAM Id Middle
Now, you’re prepared to attach from Tableau and federated sign-in utilizing IAM Id Middle authentication. On this step, you’ll create a Tableau Desktop report and publish it to Tableau Server.
- Open Tableau Desktop.
- Select Amazon Redshift Connector and enter the next values:
- Server: Enter the title of the server that hosts the database and the title of the database you wish to connect with.
- Port: Enter
5439. - Database: Enter your database title. On this instance, we use
dev. - Authentication: Choose OAuth.
- Federation Sort: Choose Id Middle
- Id Middle Namespace: You possibly can depart this clean.
- OAuth Supplier: This worth ought to robotically be pulled out of your configured XML. It will likely be the worth from the component
oauthConfigId. - Choose checkbox for Require SSL.
- Select Signal-In.
- A browser pop-up will provoke the place you’ll enter your IdP credentials.
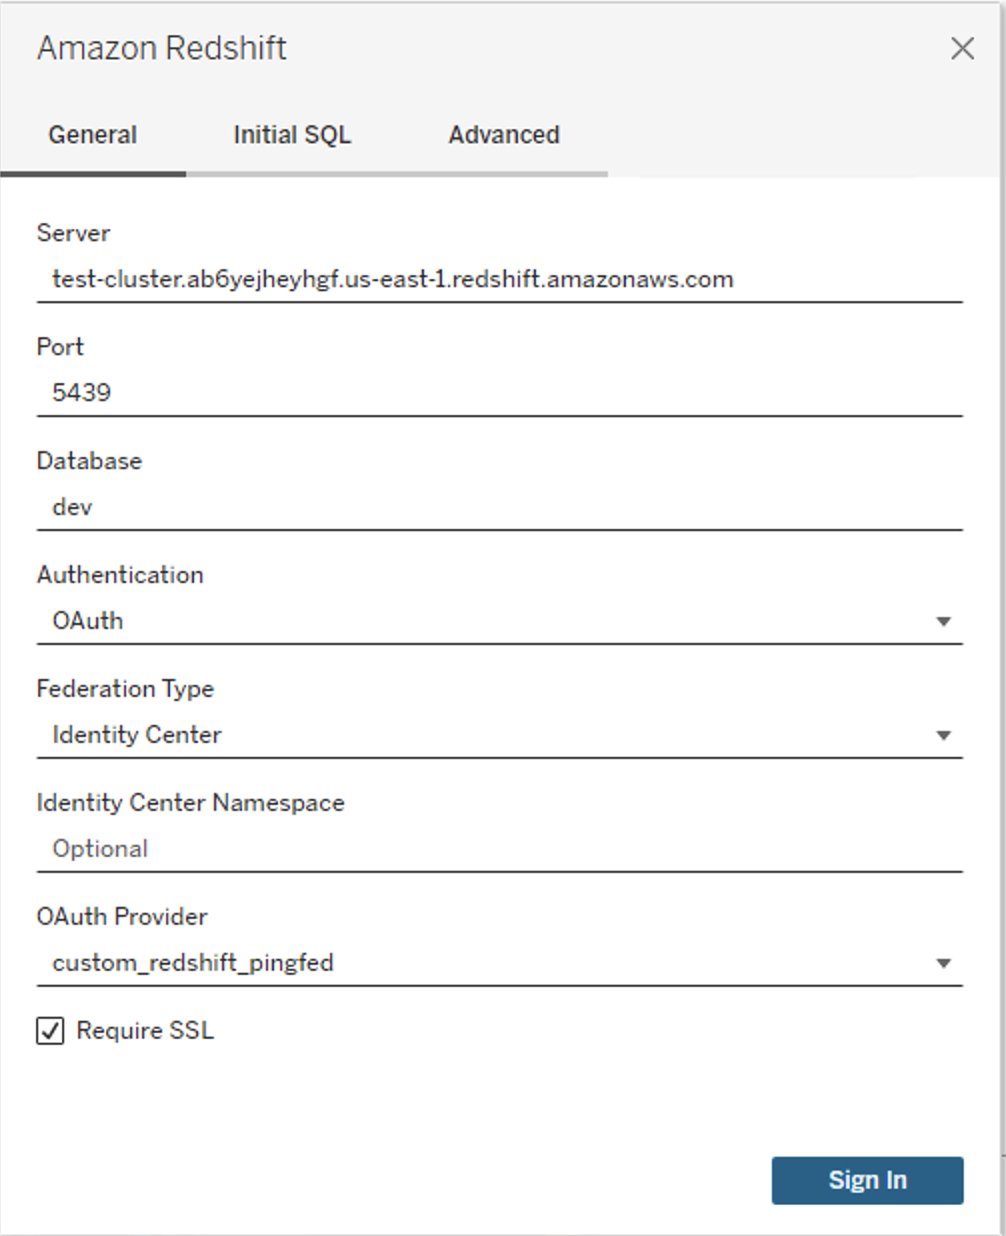
Determine 15: Tableau Desktop OAuth connection
- When authentication is profitable, you will notice the message Tableau created this window to authenticate. It’s now secure to shut it.
Determine 16: Profitable authentication utilizing Tableau
Congratulations! You might be signed in utilizing the IAM Id Middle integration with Amazon Redshift and are able to discover and analyze your information utilizing Tableau Desktop.
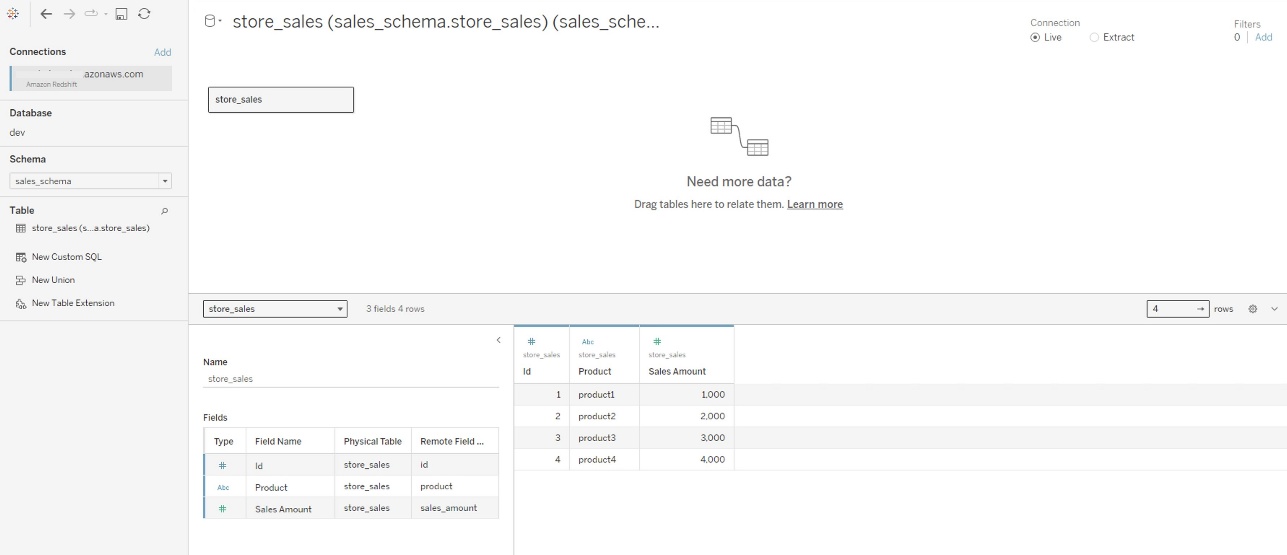
Determine 17: Profitable connection utilizing Tableau Desktop
The next is a screenshot from Amazon Redshift system desk (sys_query_history) exhibiting that consumer Ethan from PingFederate is accessing the gross sales report.

Determine 18: Person audit in sys_query_history
Now you may create your personal Tableau Report on the desktop model and publish it to your Tableau Server. For the following part, you create and publish a report named Account Stage Gross sales.
Federate to Amazon Redshift from Tableau Server utilizing IAM Id Middle authentication
After you may have revealed the report from Tableau Desktop to Tableau Server, check in as non-admin consumer and consider the revealed report utilizing IAM Id Middle authentication.
- Register to the Tableau Server web site as a non-admin consumer.
- Navigate to Discover and go to the folder the place your revealed report is saved.
- Choose the report and select Signal In.
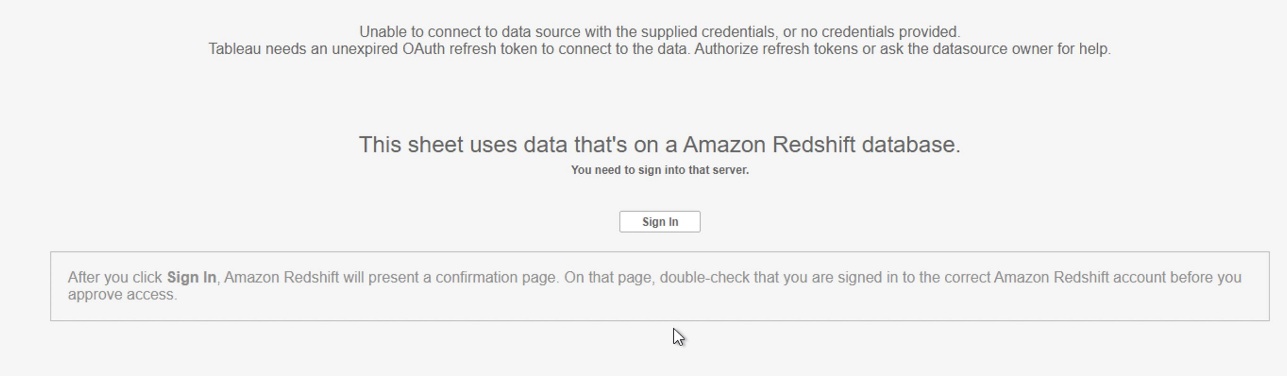
Determine 19: Signal In Immediate on Tableau Cloud/Server
- Enter your PingFederate credentials to the browser pop-up to authenticate.
- After profitable authentication, you may entry the info and create experiences.
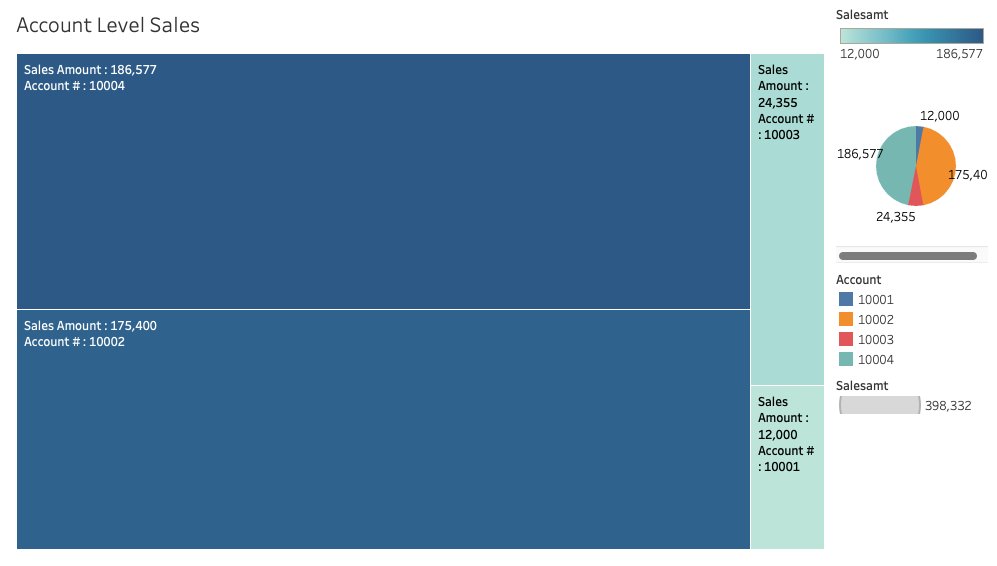
Determine 20: Tableau report
Clear up
Full the next steps to wash up your sources:
- Delete the IdP functions that you just created to combine with IAM Id Middle.
- Delete Id Middle configuration.
- Delete the Amazon Redshift utility and the Amazon Redshift provisioned cluster or Serverless occasion that you just created for testing.
- Delete the IAM position and IAM coverage that you just created for Id Middle and Amazon Redshift integration.
- Delete the permission set from Id Middle that you just created for Amazon Redshift Question Editor v2 within the administration account.
- Clear up sources associated to PingFederate.
Conclusion
This put up coated streamlining entry administration for information analytics by utilizing Tableau’s functionality to assist single sign-on based mostly on the OAuth 2.0 and OIDC protocol. This setup facilitates federated consumer authentication, the place consumer identities from an exterior id supplier like PingFederate are trusted and propagated to Amazon Redshift. You walked by means of the steps to configure Tableau Desktop and Tableau Server to combine seamlessly with Amazon Redshift utilizing AWS IAM Id Middle for single sign-on. By harnessing this integration of a third-party IdP with IAM Id Middle, analysts can securely entry Amazon Redshift information sources inside Tableau with out managing separate database credentials.
Be taught extra about Amazon Redshift integration with IAM Id Middle utilizing PingFederate as an id supplier by visiting the next sources.
Concerning the authors